ATtiny Low Power
3rd April 2014
The ATtiny85 is a great processor for simple stand-alone battery powered projects. This describes how to get the power consumption down to maximise battery life. The project is a simple 15-minute timer that flashes an LED once every 2 seconds while it is counting down, and then beeps when the time has expired.
The ATtiny85 seemed like the ideal choice for this simple project; it's low cost, in a convenient 8-pin package, and it provides 5 I/O pins, ample for this project. It also has a low-power sleep mode which is ideal, because it avoids needing to have an on-off switch.
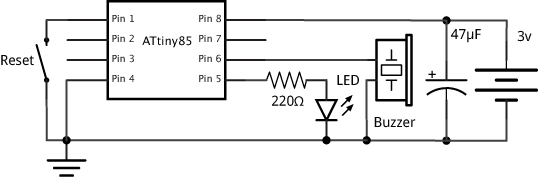
Here's the circuit:
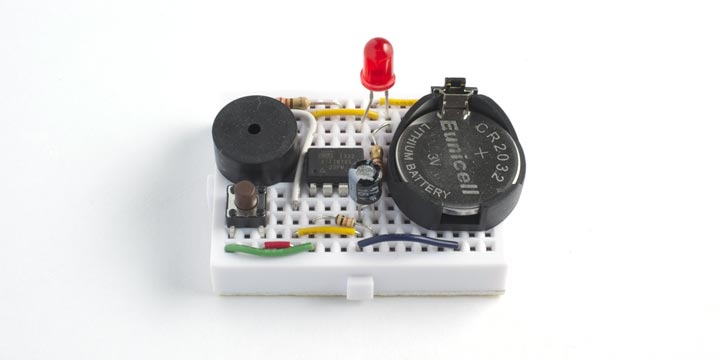
It all fits neatly on a SparkFun mini breadboard (available in the UK from HobbyTronics):
You can build a programmer for the ATTiny85 using an Arduino Uno board [1], but I chose the easier option of using SparkFun's Tiny AVR Programmer (available in the UK from Proto-PIC). You can program the ATTiny85 using the Arduino development environment, and there's a good tutorial on how to do this on SparkFun's website [2].
By default the ATtiny85 provides a 1MHz clock using an internal oscillator. You can also have an 8MHz internal clock; to do this choose ATtiny85 (internal 8MHz clock) from the Board option on the Tools menu in the Arduino environment, and then choose Burn Bootloader from the Tools menu. Note that this doesn't actually install a bootloader on the ATtiny85; it just sets the clock fuses. There's also an option for an external 20MHz clock, which uses two of the I/O pins; I haven't tried this option.
Sleep mode
The ATtiny85 provides a power-down sleep mode. This turns off the clock, ADC, and I/O to reduce the current consumption. There are four ways to wake the processor up from sleep:
- With an interrupt on pin 0.
- With a pin change interrupt.
- With a watchdog interrupt.
- With a start condition on the Universal Serial Interface.
These options will be explored in future projects. The processor will also wake up on a reset signal, which is what I'm using here.
To choose the sleep mode we want to use, call:
set_sleep_mode(SLEEP_MODE_PWR_DOWN);
We then execute sleep mode by executing:
sleep_enable();
sleep_cpu();
Minimising power consumption in sleep mode
To minimise the power consumption while in sleep mode the ATtiny datasheet advises you to disable the following modules if they're not being used:
- Analog to Digital Converter (ADC)
- Analog Comparator
- Brown-out Detector
- Watchdog Timer
- Pin Outputs
- Analog Input Buffer
I confirmed that the ADC uses about 320µA in sleep. It is disabled in setup() by calling:
adc_disable();
The Analog Comparator, Brown-out Detector, and Watchdog Timer, and Analog Input Buffer are not enabled by default, so there's no advantage in disabling them.
It's usually recommended that you program all outputs as inputs before going to sleep, but I couldn't measure any advantage from doing this so I've ignored it.
Results
With a 3v coin cell and these power-saving techniques I achieved a consumption of 0.2µA in sleep mode:
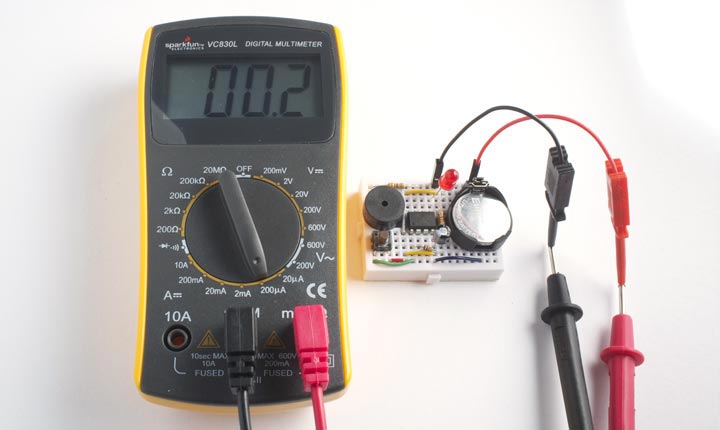
That's a theoretical battery life of 40 years with a 200mAH CR2032 coin cell, well over the shelf life of the battery!
Here's a table showing the power consumption I measured, both in operating mode and in sleep mode for internal clocks of 1MHz and 8MHz, and supply voltages of 5v (from USB) and 3v from the coin cell:
| 5v | 3v | |||
|---|---|---|---|---|
| 1MHz | 8MHz | 1MHz | 8MHz | |
| Normal | 2.5mA | 8.0mA | 0.7mA | 3.6mA |
| Sleep | 0.5µA | 0.5µA | 0.2µA | 0.2µA |
Full listing
Here's the full listing of my 15-minute timer:
/* ATtiny85 Low-Power Timer */

#include <avr/sleep.h>

// Utility macro
#define adc_disable() (ADCSRA &= ~(1<<ADEN)) // disable ADC (before power-off)

// constants
const int Speaker = 1;              // speaker pin
const int Lamp = 0;
const unsigned long Alarm = 900000; // alarm time - 15 minutes
unsigned long StartTime = 0;        // start time

void setup () {
  pinMode(Lamp, OUTPUT);
  pinMode(Speaker, OUTPUT);
  pinMode(2, INPUT_PULLUP);
  pinMode(3, INPUT_PULLUP);
  pinMode(4, INPUT_PULLUP);
  adc_disable(); // ADC uses ~320uA
  set_sleep_mode(SLEEP_MODE_PWR_DOWN);
}

void enterSleep (void)
{
  sleep_enable();
  sleep_cpu();
}

void playBeep (void) {
  for (int i=0; i < 500; i++) {
    digitalWrite(Speaker, HIGH);
    delay(1);
    digitalWrite(Speaker, LOW);
    delay(1);
  }
}

void flashLed (int wait) {
  digitalWrite(Lamp, HIGH);
  delay(wait);
  digitalWrite(Lamp, LOW);
}

// Main loop ----------------------------------------------

void loop () {
  // Long flash
  flashLed(125);
  delay(125);
  flashLed(125);
  do {
    // Flash light
    flashLed(1);
    delay(2000);
  } while (millis() - StartTime < Alarm);
  // Alarm
  playBeep();
  enterSleep();
  // Continue after reset
}
Update
12th October 2019: Under some conditions leaving inputs floating can increase the power consumption, so I've updated the program to enable pullups on the unused inputs.
- ^ Arduino Board as ATTiny Programmer on High-Low Tech.
- ^ Tiny AVR Programmer Hookup Guide on SparkFun.
blog comments powered by Disqus