Reading the PyBadge Display
9th April 2020
The Adafruit PyBadge and PyGamer boards are a great idea for experimenting with writing your own games. This post describes a couple of graphics routines that could be useful, to read pixels from the display, or do erasable plotting on the display:
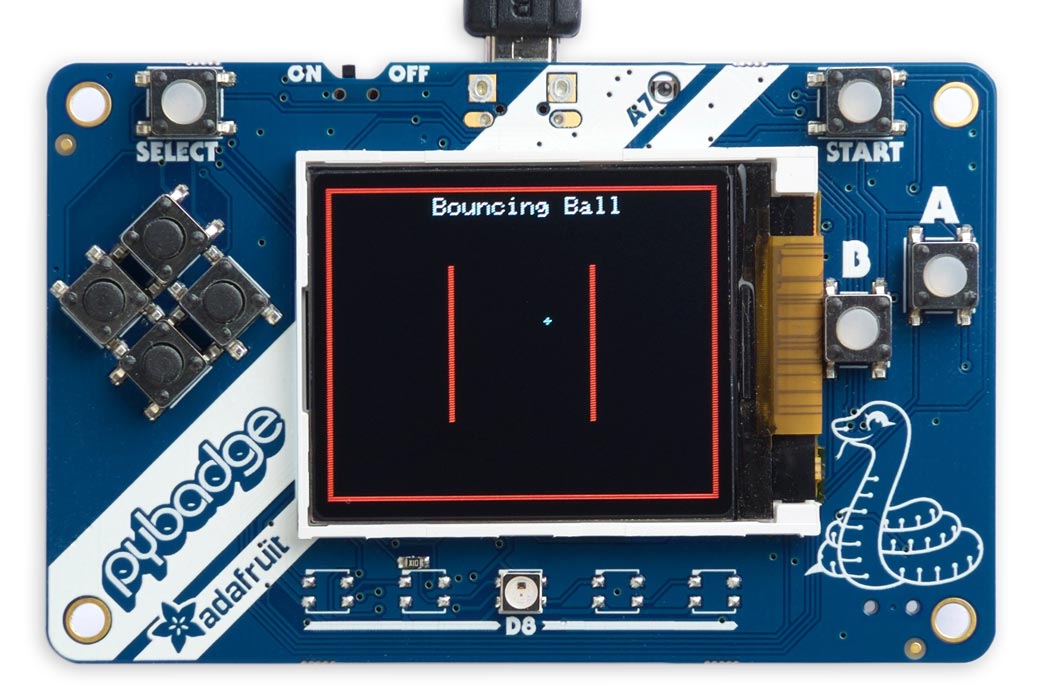
Bouncing ball demo on an Adafruit PyBadge LC,
showing a simple application of my getPixel() and xorPixel() routines.
These routines help you implement collision detection, making it far easier to write animated games because you can define the behaviour of the game simply by drawing objects on the screen.
They also allow you to do exclusive-OR plotting, which lets you restore the previous state of the display by plotting the same thing twice. For example, you could draw the moving hands of a clock without having to worry about what happens when the hands overlap.
I've included a simple bouncing-ball demo program that shows how you could use the routines.
Introduction
Adafruit sell three boards designed as the basis for your own hand-held game console: the PyGamer [1], the PyBadge [2], and the lower-cost PyBadge LC [3], also available from Pimoroni in the UK [4]. They each incorporate a 1.8" 160x128 colour TFT display. Adafruit provide interface libraries for the TFT displays, and their GFX library [5] provides a wide range of graphics functions to allow you to plot points, draw lines, plot open or filled rectangles, circles, ovals, or triangles. The one function that's missing is the ability to read back a point from the display.
These two routines supplement Adafruit's GFX library, adding a getPixel routine that reads the colour value of a point on the display, and an xorPixel routine that plots a point using exclusive-OR plotting. They work without needing to keep a copy of the display memory in RAM.
I've tested them with the Adafruit PyBadge LC board, and they will work with the similar PyBadge and PyGamer. It should also be possible to adapt them to work with any TFT display based on the ST7735 display controller; you will need to specify the pins used for the TFT display signals CS, DC, MOSI, SCLK, and RST.
Here's a description of the two routines:
getPixel()
Returns the colour of the pixel at the specified X, Y coordinates:
uint16_t getPixel (uint16_t x, uint16_t y)
The colour will be a 16-bit number in the same format as other colours in the GFX library, with 5-6-5 bits specifying the red, green, and blue respectively.
xorPixel()
Plots a pixel at the specified X, Y coordinates by exclusive-ORing the specified colour with the colour that's already there:
xorPixel (uint16_t x, uint16_t y, uint16_t colour)
On a black display this has the same effect as drawPixel(). On a white display this will draw in the inverse colour; for example, blue will appear as yellow, because 0x001F (blue) ^ 0xFFFF (white) = 0xFFE0 (yellow).
On any background, plotting a second time with the same colour will undo the effect of the first plot, restoring the background.
The routines
getPixel()
uint16_t Technoblogy_ST7735::getPixel (uint16_t x, uint16_t y) {
  uint32_t ret = 0;
  startWrite();
  setAddrWindow(x, y, 1, 1);
  writeCommand(ST77XX_RAMRD);
  pinMode(TFT_MOSI, INPUT);
  pinMode(TFT_SCLK, OUTPUT);
  for (int i=0; i<33; i++) {
    digitalWrite(TFT_SCLK, HIGH);
    ret = ret<<1 | digitalRead(TFT_MOSI);
    digitalWrite(TFT_SCLK, LOW);
  }
  pinMode(TFT_MOSI, OUTPUT);
  endWrite();
  return ((ret & 0xf80000)>>8 | (ret & 0xfc00)>>5 | (ret & 0xf8)>>3);
}
The getPixel() routine first calls the library function setAddrWindow() to set the column and row ranges to the point specified by x and y. It sends the RAMRD (RAM-read) command, and defines the MOSI pin as an input. It then reads 33 bits from the input; the first 9 are dummy reads, and the next 24 bits contain the colour information, 8 bits for each of the red, green, and blue components. The last line of the routine converts this to the 16-bit 5-6-5 colour format used by the GFX library.
xorPixel()
void Technoblogy_ST7735::xorPixel (uint16_t x, uint16_t y, uint16_t color) {
  uint16_t lastcolor = getPixel(x, y);
  if ((x >= 0) && (x < _width) && (y >= 0) && (y < _height)) {
    startWrite();
    writeCommand(ST77XX_RAMWR);
    SPI_WRITE16(color ^ lastcolor);
    endWrite();
  }
}
The xorPixel() routine first calls getPixel() to read the previous pixel colour. It then sends the RAMWR (RAM-write) command, followed by the exclusive-OR of the previous pixel colour with the plotting colour. This routine doesn't need to call setAddrWindow() again because it will already be set to the correct row and column range by the getPixel() call. The library calls to startWrite() and endWrite() just take the CS line low and then high again.
Bouncing ball example
To demonstrate these routines I've written a simple demo that animates a ball bouncing around on the display. Anything drawn in red on the display is treated as a barrier, and the ball will bounce off it. Any other colours, such as the white text, are ignored and can be used to create an interesting background.
After initialising the display the program first draws the arena, consisting of an enclosing rectangle, and two vertical barriers:
void setup() {
  tft.initR(INITR_BLACKTAB);
  tft.setRotation(1);
  pinMode(TFT_BACKLIGHT, OUTPUT);
  digitalWrite(TFT_BACKLIGHT, HIGH);
  tft.fillScreen(ST77XX_BLACK);
  //
  // Draw arena
  tft.fillRect(0, 0, 160, 2, Barrier); tft.fillRect(0, 126, 160, 2, Barrier);
  tft.fillRect(0, 0, 2, 128, Barrier); tft.fillRect(158, 0, 2, 128, Barrier);
  tft.fillRect(50, 32, 2, 64, Barrier); tft.fillRect(108, 32, 2, 64, Barrier);
  tft.setCursor(44, 4); tft.setTextColor(ST77XX_WHITE);
  tft.print("Bouncing Ball");
}
The ball is drawn by five calls to xorPixel(). I could have made the ball a single pixel, but this gives the ball a more interesting shape:
void drawBall (int x, int y) {
  tft.xorPixel(x, y, Ball);
  tft.xorPixel(x+1, y, Ball);
  tft.xorPixel(x-1, y, Ball);
  tft.xorPixel(x, y+1, Ball);
  tft.xorPixel(x, y-1, Ball);
}
Finally, here's the main program:
void loop() {
  int ballX = 80, ballY = 64;
  int dirX = -1, dirY = -1;
  drawBall(ballX, ballY);
  for (;;) {
    drawBall(ballX, ballY);
    // Move ball
    ballX = ballX + dirX; ballY = ballY + dirY;
    drawBall(ballX, ballY);
    // Check if collision
    if (tft.getPixel(ballX + (dirX*2), ballY) == Barrier) dirX = -dirX;
    if (tft.getPixel(ballX, ballY + (dirY*2)) == Barrier) dirY = -dirY;
    delay(10);
  }
}
It repeats the following sequence:
- Call drawBall() to undraw the previous position of the ball.
- Update the ball's position, ballX, ballY, with the direction it's currently moving in, dirX, dirY.
- Call drawBall() again to draw the new position of the ball.
- Check the points in the direction that the ball is moving to see if it is touching a barrier, and if so, reverse that direction.
Here's the whole program with the demo: PyBadge Display Read Program.
Update
21st April 2020: Corrected a minor mistake in the program.
Further suggestions
It should be simple to extend this demo to make it so that you can control the motion of the ball, or the position of the barriers, using the pushbuttons or joystick on the PyBadge/PyGamer.
I've tried to get the routine to work with my Tiny TFT Graphics Library, but so far without success. If I manage to get it working I'll post it in a future article.
- ^ Adafruit PyGamer board on Adafruit.
- ^ Adafruit PyBadge board on Adafruit.
- ^ Adafruit PyBadge LC Board on Adafruit.
- ^ Adafruit PyBadge LC on Pimoroni.
- ^ Adafruit GFX Graphics Library on Adafruit.
blog comments powered by Disqus