IR Remote Control Tool (NEC)
25th March 2015
This is a version of my IR Remote Control Tool designed to work with the NEC infrared remote control protocol, which is used on many low cost infrared remotes available from the Far East, such as the ones sold by Adafruit [1] (available from Proto-PIC in the UK [2]), and SparkFun [3] (available from HobbyTronics in the UK [4]). It is also used by the Apple Remote [5].
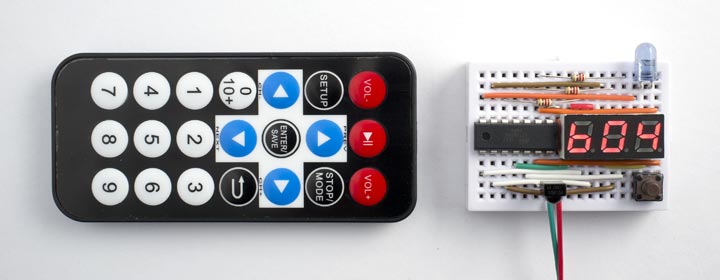
The NEC version of the IR Remote Control Tool displaying the code for a key on the Adafruit remote.
The receive and transmit routines used in the IR Remote Control Tool are designed to be portable, so you can reuse them in other projects that need to receive or transmit NEC-format IR codes.
Alternatively see my article IR Remote Control Receiver for an interrupt-driven receive routine.
NEC remote control protocol
This version of the IR Remote Control Tool decodes NEC format codes, originally developed by the consumer electronics firm NEC. For a full description of this protocol see San Bergmans's excellent SB-Projects site [6].
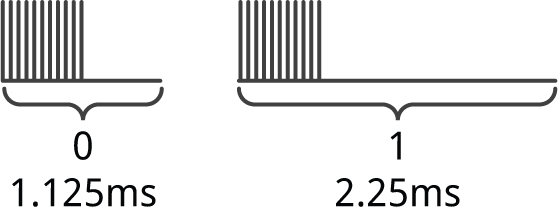
The data is encoded using pulse distance encoding. Each bit starts with 562.5µs of carrier. A zero has a total width of 1.125ms before the start of the next bit, and a one has a total width of 2.25ms before the next bit:
The carrier pulse consists of 21 cycles at 38kHz. The pulses usually have a mark/space ratio of 1:4, to reduce the current consumption:

Each code sequence starts with a 9ms pulse, known as the AGC pulse. This is followed by a 4.5ms silence:

The data then consists of 32 bits, a 16-bit address followed by a 16-bit command, shown in the order in which they are transmitted (left to right) :

Note that there needs to be one extra pulse at the end to terminate the last bit.
The Address identifies the piece of equipment being controlled, and the Command indicates which key was pressed.
In the original version of the NEC protocol the high-order 8 bits of the address was just an inverted version of the low-order 8 bits, and likewise for the command (as in the above example). The remote controls I've tested from Adafruit and SparkFun follow this convention, so for these you could ignore the high-order bytes of the command.
The Apple Remote uses the full 16-bits of the address and command; the address is 0x87EE, the high byte of the command is the ID of the remote, and the low byte of the command identifies the key [7].
IR receiver
The IR receiver routine, ReadNEC(), waits until it has received an NEC code, and returns it as a 32-bit long value.
The infrared receiver module generates a high-level output when there's no carrier, and a low level on each carrier pulse. ReadNEC() first waits for the input to go low, indicating the AGC pulse, and for the start of the first bit.
ReadNEC() then reads two lots of 16 bits and stores them in the variables address and data. For each bit it measures the time until the start of the next bit, and if it's greater than 1680µs interprets the bit as a '1' and ORs it into the appropriate bit position of the variable data. Finally the variables address and command are packed into a long and returned:
long ReadNEC () {
  int mask, start, data, command;
  long address;
  WaitWhile(HIGH);  // Wait for start
  start = TCNT1;
  do ; while (microsecs(start) < 4950);
  start = TCNT1;
  do {
    if (microsecs(start) > 4950) return 0;  // Bottle out
  } while (digitalRead(IRin) == LOW);
  WaitWhile(HIGH);  // Wait for end of space
  // Read address and command
  for (char i=0; i<2; i++) {
    address = data;
    mask = 1; data = 0;
    do {
      start = TCNT1;
      WaitWhile(LOW);
      WaitWhile(HIGH);
      if (microsecs(start) > 1680) data = data | mask;
      mask = mask << 1;
    } while (mask);
  }
  command = data;
  return address<<16 | (command & 0xFFFF);
}
If the wait for the AGC pulse takes longer than 9900ms (2 x 4950) the routine returns 0 to indicate that an error has occurred, such as an unrecognised IR code format.
As with the RC-5 version, the routine ReadNEC() uses the Timer/Counter1 counter to do the microsecond timing, since this is already running to do the display multiplexing:
int microsecs (int start) {
  int diff = TCNT1 - start;
  if (diff < 0) diff = diff + 5000;
  return diff;
}
If you are using ReadNEC() in another application you could provide an alternative timer, or use the Arduino library's micros() function.
The routine returns the 32 bits received packed into a long value. If your remote control uses the standard NEC protocol you could ignore the redundant high-order bytes and return the 8-bit address and command packed into an int instead.
IR transmitter
The IR transmitter SendNEC() transmits a code in NEC format. It uses Timer/Counter1 in Fast PWM mode to generate the 38kHz carrier, by setting a prescaler of 1 and a TOP value of 209, and the output to OCR1 is inverted. To generate a half-bit gap it sets OCR1A to TOP, which generates a continuous low output on OCR1. To generate a stream of pulses with a 1/4 mark-space ratio it sets OCR1A to 156.
It uses a routine Pulse() to output a specified number of 38kHz pulses, followed by a gap equivalent to a specified number of pulse times. It counts each pulse by waiting for the overflow bit in register TIFR1:
void Pulse (int carrier, int gap) {
  int count = carrier;
  OCR1A = match;  // Generate pulses
  for (char i=0; i<2; i++) {
    for (int c=0; c<count; c++) {
      do ; while ((TIFR1 & 1) == 0);
      TIFR1 = 1;
    }
  count = gap;    // Generate gap
  OCR1A = top;
  }
}
The SendNEC() routine first outputs the AGC pulse, consisting of 342 cycles, and a gap of 171 cycles. For each of the 16 address and command bits it then outputs an appropriate pulse and gap by calling Pulse(). Finally it sends a terminating pulse to end the last bit:
void SendNEC (long code) {
  int mask, start, data, command, address;
  command = code & 0xFFFF;
  address = (code >> 16) & 0xFFFF;
  TCNT1 = 0;             // Start counting from 0
  // Send AGC tone
  Pulse(342, 171);
  data = address;
  for (char i=0; i<2; i++) {
    mask = 1;
    do {
      if (data & mask) Pulse(21, 64); else Pulse(21, 21);
      mask = mask << 1;
    } while (mask);
    data = command;
  }
  Pulse(21, 0);
}
If you are using this routine in another application you could equally well use an 8-bit timer to generate the carrier pulses.
Main program
The main loop of the IR Remote Control Tool displays "---" and calls ReadNEC().
If this returns with an NEC code, the 32 bits are displayed as three 3-digit hexadecimal numbers, with a half second delay between each display. For example, the code "FF0039C6" is displayed as "0FF", "003", "9C6".
If the button is pressed ReadNEC() returns 0, and the program outputs the last code to the IR LED. It then waits for another code to be received:
void loop() {
  long rccode, code;
  // Display mode
  rccode = 0;
  do {
    SetupDisplay();
    do {
      if (rccode) {
        DisplayHex(rccode>>24 & 0x0FF);
        delay(500);
        DisplayHex(rccode>>12 & 0xFFF);
        delay(500);
        DisplayHex(rccode & 0xFFF);
        delay(500);
      }
      code = ReadNEC();
      if (code) rccode = code;
    } while (code != 0);
    // Pressed button - send IR code
    TIMSK1 = 0<<OCIE1A;    // Disable compare match interrupt
    for (int d=0; d<3; d++) digitalWrite(Digits[d], LOW);
    SetupPCM();
    pinMode(IRout, OUTPUT);
    SendNEC(rccode);
    // Wait for button release
    do ; while (digitalRead(Button) == LOW);
  } while (1);
}
The circuit and compiling the program
For information about the circuit and compiling the program see the earlier article, IR Remote Control Tool.
Here's the whole program for the NEC version of the IR Remote Control Tool: IR Remote Control Tool Program (NEC).
- ^ Mini Remote Control on Adafruit.
- ^ Mini Remote Control on Proto-PIC.
- ^ Infrared Remote Control on SparkFun.
- ^ Infrared Remote Control on HobbyTronics.
- ^ Apple Remote on Wikipedia.
- ^ NEC Protocol on SB-Projects.
- ^ Apple Remote on Wikipedia.
blog comments powered by Disqus