Tiny Lisp Computer
8th September 2016
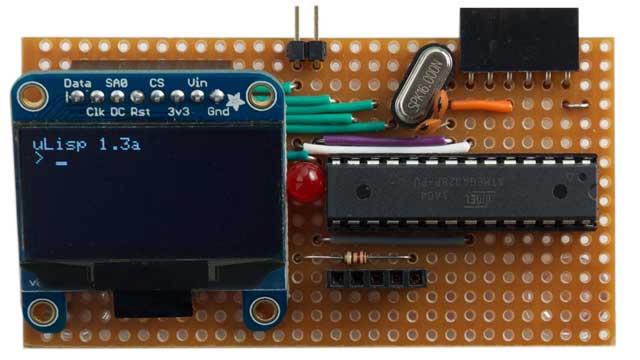
This article describes a self-contained computer with its own display and keyboard interface, based on an ATmega328, that you can program in Lisp. You can use it to run programs that interface to components such as LEDs and push-buttons via the I/O pins, read the analogue inputs, and operate external devices via the I2C and SPI interfaces. It has a small monochrome OLED display that gives 8 lines of 21 characters per line, and you can connect a miniature PS/2 keyboard:

The Tiny Lisp Computer - a self-contained computer programmed in Lisp.
Tiny Lisp Computer – Specification
Display: 21 characters x 8 lines.
Memory available: 316 Lisp cells (1264 bytes).
EEPROM: 256 Lisp cells (1K bytes).
Language: uLisp, a subset of Common Lisp, with 122 Lisp functions and special forms. For a full definition see uLisp Language Reference.
Types supported: list, symbol, and integer.
An integer is a sequence of digits, optionally prefixed with "+" or "-". Integers can be between -32768 and 32767. You can enter numbers in hexadecimal, octal, or binary with the notations #x2A, #o52, or #b101010, all of which represent 42.
User-defined symbol names can have up to three characters consisting of a-z and 0-9. Any sequence that isn't an integer can be used as a symbol; so, for example, 12a is a valid symbol.
There is one namespace for functions and variables; in other words, you cannot use the same name for a function and a variable.
Includes a mark and sweep garbage collector. Garbage collection takes under 1 msec.
Interfaces:- Analogue input using analogread: A0 to A5 (14 to 19)
- Analogue output using analogwrite: 3, 9, 10, 11
- Digital input and output using pinmode, digitalread, and digitalwrite: 0, 1, 3, 9 to 13, A0 to A5 (14 to 19)
- I2C using with-i2c and restart-i2c: A4 and A5
- SPI using with-spi: 11, 12, 13
As on an Arduino Uno, pin 13 is connected to an LED.
uLisp
The computer is programmed in uLisp, my compact Lisp interpreter for the Arduino. This allows you to control the I/O ports directly, access I2C and SPI peripherals, and write small programs to automate functions. You can also save programs to EEPROM so they are retained when the power is disconnected, and they can be configured to run automatically on restart.
If you're not familiar with Lisp, think of it as a scripting language with a very consistent syntax: everything is written as a list of items, in brackets. For example, the command to turn on the LED on pin 13 is just:
(digitalwrite 13 t)
where t (true) means on. The command name is always the first item in a list, so to add two numbers you write:
(+ 123 456)
Although putting the operator "+" first might look unnatural, it means that operators and functions are handled in a consistent way, and allows you to express many operations more concisely. For example, you can sum five numbers by writing:
(+ 12 34 56 78 90)
For a simple introduction to Lisp see the tutorials at www.ulisp.com.
Examples
Blink
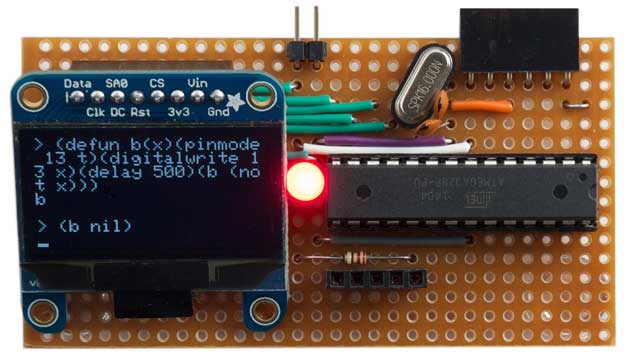
As on an Arduino Uno, pin 13 is connected to an LED. You can flash the LED with the following simple uLisp program:
(defun b (x) (pinmode 13 t) (digitalwrite 13 x) (delay 500) (b (not x)))

Running a Lisp version of Blink on the Tiny Lisp Computer.
Run it by typing:
(b nil)
Press Esc to stop the program.
Analogue read
The following program is useful for measuring the voltage at several points in a circuit. It reads analogue inputs A0 to A5 and displays their values on the screen, updated twice a second:
(defun a ()
  (cls)
  (dotimes (x 6)
    (print x)
    (princ (analogread x)))
  (delay 500)
  (a))
This is formatted nicely so you can see the structure of the program, but you can type it in using fewer keystrokes as follows:
(defun a()(cls)(dotimes(x 6)(print x)(princ(analogread x)))(delay 500)(a))
The (cls) function is an addition to the Tiny Lisp Computer that clears the display.
Run it by typing:
(a)
As before, press Esc to stop the program.
Interfacing using I2C
Here's a simple example of using uLisp's Arduino interface routines to interface to the popular HMC5883L I2C triple-axis magnetometer. First we define a setup function set to select continuous measurement mode (the I2C address of the magnetometer is 30):
(defun set ()
  (with-i2c (s 30)
    (write-byte 2 s)
    (write-byte 0 s)))
Run this by typing:
(set)
Next we define a function w to read two bytes from stream s and combine them into a 16-bit word:
(defun w (s) (logior (ash (read-byte s) 8) (read-byte s)))
Finally here's the function rd to return the x, y, and z readings:
(defun rd ()
  (with-i2c (s 30)
    (write-byte 3 s)
    (restart-i2c s 6)
    (list (w s) (w s) (w s))))
We can display these continuously by evaluating:
(loop (print (rd)) (delay 500))
This displays a list of readings such as:
(-415 6 -41)
Saving and loading programs
You can save your currently defined programs to EEPROM with the command:
(save-image)
You can then load them after disconnecting and reconnecting the power with:
(load-image)
Display
The display is based on my Text Display for the Arduino Uno. It uses a 1.3" 128x64 SPI/I2C OLED display, a small display about 3.5cm (1.4") wide with a very clear, bright monochrome display, and based on the SSD1306 driver chip. It is available from Adafruit [1], or Pimoroni [2].
It is also compatible with the 1.3" 128x64 SPI 7-pin OLED displays available from Banggood [3] or AliExpress. These are based on a slightly different driver chip, the SH1106, which supports displays up to 132 pixels wide, so two small changes have to be made to the program to accommodate this. These are implemented by a constant SH1106 which should be set to 0 for SSD1306 displays, and 1 for SH1106 displays.
The display interface uses the hardware scrolling provided by the display to give very fast screen update when scrolling a screenful of text.
Although the display is quite small, it's usually possible to break your Lisp program into a series of small functions, each of which will fit on the screen.
Keyboard
For the keyboard I chose a PS/2 keyboard, which is relatively easy to interface to an ATmega328; it is based on my Simple PS/2 Keyboard Interface. I used a miniature PS/2 keyboard [4], which is large enough to use comfortably, but small enough to fit neatly alongside the computer. Low cost PS/2 keyboards are also available on eBay. You could probably modify the program to work with a USB keyboard, using a suitable interface.
When you enter text at the keyboard it is entered into a 168-character buffer, large enough to hold a full screen of text, and you can use the Backspace key to edit what you've typed. Pressing Enter then submits the line to Lisp. The Esc key can be used to interrupt a running program.
Circuit
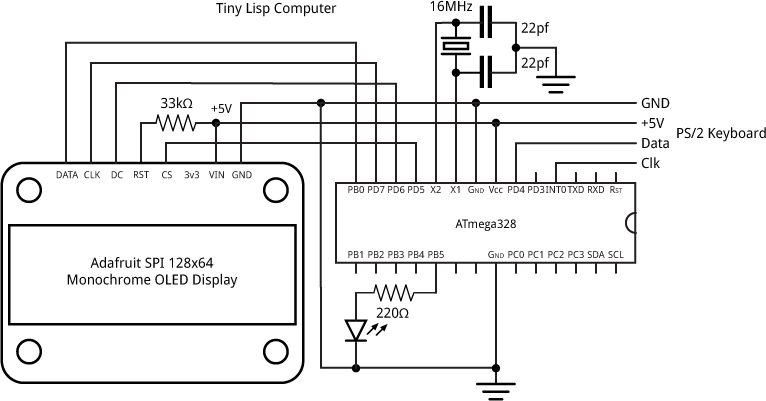
Here's the circuit for the tiny Lisp computer:

Circuit for the Tiny Lisp Computer.
It uses Arduino pins 5, 6, 7, and 8 for the display interface, and Arduino pins 2 and 4 for the keyboard interface. I power it from a 3.7V Lipo battery, but anything from 3V to 5V should be fine.
I prototyped the circuit on a small prototyping board, and then built the final version on Veroboard.
Compiling the program
The best Arduino core to use for programming a bare ATmega328P now is MiniCore, which avoids the need to edit boards.txt as in the original instructions when I first wrote this article.
Select the MiniCore ATmega328 option, set Clock to External 16 MHz, and upload the program to the ATmega328 using a suitable ISP programmer such as the Tiny AVR Programmer Board; see ATtiny-Based Beginner's Kit.
Here's the whole Tiny Lisp Computer program: Tiny Lisp Computer Program.
For help with using uLisp on the Tiny Lisp Computer visit the uLisp Forum.
Extensions
The main limitation of the Tiny Lisp Computer is the amount of memory available for programs. To provide more memory an ideal next step would be to base it on an ATmega1284, which has 16 Kbytes of RAM and 4 Kbytes of EEPROM. For more information see Using the ATmega1284 with the Arduino IDE.
Updates
10th September 2016: Added an example of interfacing via I2C.
11th September 2016: Corrected the link to the Tiny Lisp Computer program.
12th December 2022: Added the note about using MiniCore.
- ^ Monochrome 1.3" 128x64 OLED Graphic Display on Adafruit.
- ^ Monochrome 1.3" 128x64 OLED Graphic Display on Pimoroni.
- ^ 1.3 Inch 7 Pin White OLED 128x64 SPI Interface Display Module on Banggood.
- ^ Miniature Keyboard - Microcontroller Friendly PS/2 and USB on Adafruit.
blog comments powered by Disqus
