Tiny Terminal 2
6th November 2018
This article describes a text display based on a 256x64 OLED display that provides 8 lines of 42 characters per line. Its width makes it ideal for displaying text or program listings, unlike the more common 128x64 displays:

The Tiny Terminal 2 serial terminal provides eight lines of 42 characters per line.
The display is driven by a standard 9600 baud serial interface, making it ideal for debugging serial devices, or as a self-contained character display for a project. Both the display and serial input are handled by an 8-pin ATtiny85, and it's based on my earlier project Tiny Terminal.
Design
I'm always on the lookout for interesting displays, as the basis for new projects, and I found this 256x64 greyscale OLED display offered by a supplier on Aliexpress [1]. It allows you to have a text display of eight lines with 42 characters per line, which is just about large enough for reading text, and is ideal for program listings. It's based on an SH1122 driver chip [2]:
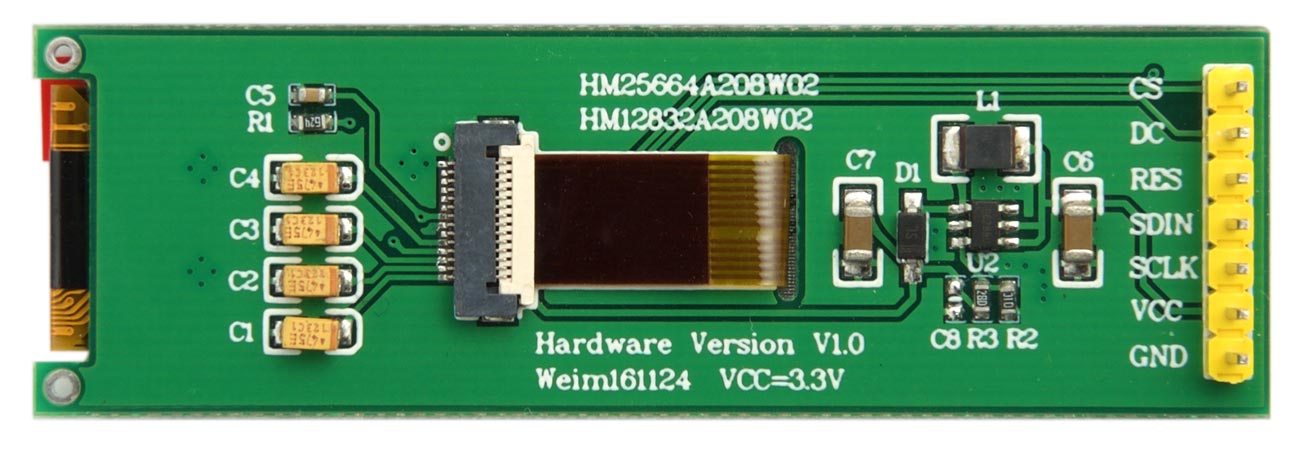
Back of the 256x64 greyscale OLED display.
Note that unlike most other OLED displays this display is 3.3V, so you should take care not to drive it directly from 5V. The circuit below includes a 3.3V regulator, and a level shifter for the serial input.
The Tiny Terminal 2 circuit uses an ATtiny85, and it takes advantage of the fact that the display stores the data written to the display in its own internal memory, so there's no need for a separate memory buffer. It uses the display's built-in hardware scrolling to scroll the display up when the text reaches the end of the last line.
The circuit
Here's the circuit of the Tiny Terminal 2:
Circuit of the serial terminal, based on an ATtiny85.
The display needs a 3.3V supply and signals, so I used a LE33CZ low-dropout 3.3V regulator, although any type should be suitable. The small-signal diode and 10kΩ resistor convert the serial input to 3.3V. The 0.1µF capacitor and 33kΩ resistor ensure the display is reset correctly on power-up.
I built the prototype on two mini-breadboards clipped together. These are available from SparkFun [3] or HobbyTronics in the UK [4].
Writing to the display
The ATtiny supports toggling of one or more bits in a port, so provided you set all the pins to their disabled state at startup, for speed the display access routines can simply toggle the appropriate pins to enable or disable them.
The Send() routine sends a byte to the display by toggling the clock pin, clk, for each bit on the data pin:
void Send (uint8_t d) {
  for (uint8_t bit = 0x80; bit; bit >>= 1) {
    PINB = 1<<clk;                        // clk low
    if (d & bit) PORTB = PORTB | (1<<data); else PORTB = PORTB & ~(1<<data);
    PINB = 1<<clk;                        // clk high
  }
}
Before and after accessing the display you need to toggle the chip-select pin, cs, with the statement:
PINB = 1<<cs;
By default data is sent to the display memory. If you want to send a command you first have to enable the data/command pin, dc, with:
PINB = 1<<dc;
Plotting characters
The terminal program writes characters to successive character positions on the display. When you reach the end of the bottom line of the display it scrolls the display up, just like on a terminal, so you always see the last 8 lines written to the display. The scrolling is handled automatically by the display's Display Offset command.
Each byte of display memory corresponds to two successive pixels in a row; each set of four bits determines the greyscale level. So to write a 6x8 bitmap character to the display you specify the starting row and column, and then write three bytes for each of the eight rows in the character:
void PlotChar (char ch, uint8_t line, uint8_t column) {
  ch = ch - 32;
  uint8_t row = (line+Scroll)<<3 ; uint8_t col = column*3;
  PINB = 1<<cs;                           // cs low
  for (uint8_t r = 0 ; r<8; r++) {
    PINB = 1<<dc;                         // dc low
    Send(0x00 + (col & 0x0F));            // Column start low
    Send(0x10 + (col >> 4));              // Column start high
    Send(0xB0); Send((row+r) & 0x3F);     // Row start
    PINB = 1<<dc;                         // dc high
    for (uint8_t c = 0 ; c < 3; c++) {
      int adds = &CharMap[ch][c*2];
      uint8_t hi = pgm_read_byte(adds);
      uint8_t lo = pgm_read_byte(adds + 1);
      uint8_t mask = 1<<r;
      hi = hi & mask ? Grey<<4 : 0;
      lo = lo & mask ? Grey : 0;
      Send(hi | lo);
    }
  }
  PINB = 1<<cs;                           // cs high
}
For example, to plot an "A" in column 0 of the bottom line of the display the call would be:
PlotChar('A', 7, 0);
With an 8MHz clock the PlotChar() routine takes about 0.95ms to plot a character.
The program provides bitmaps for the 96 characters from ASCII 32 (space) up to 127, and they are stored in program memory as there isn't room in the ATtiny85 RAM.
Control characters
Characters are printed to the terminal using the routine Print():
void Print (char c) {
  c = c & 0x7F;                           // Ignore top bit
  if (c >= 32) {
    PlotChar(c, Line, Column++);
    if (Column > 41) {
      Column = 0;
      if (Line == 7) ScrollDisplay(); else Line++;
    }
  } else if (c >= 0x11 && c <= 0x14) {    // Greyscale
    Grey = (1<<(c & 7))-1;
  } else if (c == 13) {                   // Return character
    Column = 0;
    if (Line == 7) ScrollDisplay(); else Line++;
  }
}
This calls PlotChar() to print the characters 32 to 127, and handles control characters. Currently the only control characters supported are Return (0x13), and DC1 (0x11) to DC4 (0x14). Return returns the printing position to the start of the next line, calling ScrollDisplay() to scroll the display if necessary. DC1, DC2, DC3, and DC4 set the grey level for subsequent characters to 25% grey, 50% grey, 75% grey, and 100% grey respectively.
Optimising the display routine
The advantage of a serial interface is that it only requires one wire. Its disadvantage is that it's asynchronous; we cannot tell the transmitting device to pause sending characters, so we have to make sure we process each character before the next one arrives.
At the 9600 baud rate we're using characters are being received on the serial input at intervals of 1msec, so we need to make sure that we always take less than 1ms to write a character to the display. In my earlier project Tiny Terminal I was able to achieve this; with this display it's harder because you have to write more data to the display.
The slowest operation is ClearLine(), which clears a line before scrolling the display. At a minimum the routine needs to:
- Set the line number to the required line.
- Toggle the clk pin 8192 times to emit 512 zero bytes; ie eight blank rows.
The minimum theoretical execution time is 1.024ms, the time taken to toggle the clk pin 8192 times at the 8MHz processor clock frequency. I thought about whether I could use a Timer/Counter to do this, but couldn't think of any way to use it to generate an exact number of pulses. Detecting overflow of the counter by polling or an interrupt would probably not be precise enough.
My best solution was to have a block of 256 copies of the statement:
PINB = 1<<clk;
inside a for loop which gets executed 32 times, to give the 8192 toggles. To avoid needing a large block of identical statements I used these three recursive #defines:
#define clk128 clk16 clk16 clk16 clk16 clk16 clk16 clk16 clk16
#define clk16 clk2 clk2 clk2 clk2 clk2 clk2 clk2 clk2
#define clk2 PINB=1<<clk;PINB=1<<clk;PINB=1<<clk;PINB=1<<clk;
Here's the final version of the ClearLine() routine:
void ClearLine (int line) {
  PINB = 1<<dc | 1<<cs;                   // dc and cs low
  Send(0x00); Send(0x10);                 // Column start
  Send(0xB0); Send(line<<3);              // Row start
  PINB = 1<<dc;                           // dc high
  for (uint8_t i=0; i<32; i++) {
    clk128 clk128
  }
  PINB = 1<<cs;                           // cs high
}
I tested how long this takes by setting the serial pin to be an output, and then making the main loop:
void loop () {
  // Time scroll delay
  ScrollDisplay();
  PINB = 1<<serial;
}
This toggles the serial pin each time the screen is scrolled. By measuring the frequency on the serial pin using the frequency measurement mode on my multimeter I could calculate how long the routine takes to execute. This gave an execution time of about 2.1ms.
I tested the display with this routine and as expected, two characters get lost every time the display scrolls, so we need a solution.
Circular buffer
Fortunately the solution is quite simple; we put received characters onto one end of a circular buffer, and read characters to be displayed from the other end. While the display is being scrolled characters get buffered, and the display then catches up when the scrolling is finished.
Here's the code for the circular buffer:
int const BufSize = 32;
uint8_t Buffer[BufSize];
int BufStart = 0, BufEnd = 0;

void putBuf (uint8_t byte) {
  if ((BufStart+BufSize-BufEnd) % BufSize == 1) return; // Buffer full
  Buffer[BufEnd] = byte;
  BufEnd = (BufEnd+1) % BufSize;
}

int getBuf () {
  if (BufStart == BufEnd) return -1;                    // Buffer empty
  int temp = Buffer[BufStart];
  BufStart = (BufStart+1) % BufSize;
  return temp;
}
BufStart points to the next character to be displayed. BufEnd points to the first free cell at the end of the buffer. The logic is quite simple:
The routine getBuf() reads the next character from the buffer. If BufStart and BufEnd are equal the buffer is empty (underflow), and reading a character from the buffer returns -1.
The routine putBuf() puts a character into the buffer. If BufStart is the cell after BufEnd the buffer is full (overflow), and we have no choice but to throw away the incoming character. This should never happen.
Because the buffer is circular all the calculations on BufStart and BufEnd must be done modulo the buffer size, so the pointers automatically wrap around.
In this implementation the capacity of the buffer is one less than its size. Although this wastes one buffer cell it makes it easier to distinguish between the buffer full and buffer empty cases.
Note that there are still some extreme situations that can cause the buffer to overflow, such as a stream of Return characters. The solution is to pad the output with null characters when outputting multiple Returns; this will give the display time to process the output.
Serial interface
The serial interface is based on my earlier article Simple ATtiny USI UART. However, in this case there aren't enough pins left on the ATtiny85 to use a crystal clock, so the Tiny Terminal 2 uses the ATtiny85's default internal 8MHz clock. The factory calibration is quoted as accurate to within 10%, which may not be accurate enough for correct operation of the serial UART. You may be lucky, and find that it's close enough, but if you get corrupted characters you may need to calibrate the internal clock using the OSCCAL register provided in the ATtiny85, with a statement in setup() such as:
OSCCAL = 0x81;
See the original article Tiny Terminal for details of how to calibrate the internal processor clock.
The serial UART receives each character and calls putBuf() to store it in the circular buffer. The main loop then simply checks for characters in the buffer, and prints them to the display:
void loop () {
  char temp = getBuf();
  if (temp != -1) Print(temp);
}
For the photograph at the top of the article I used text from Alice in Wonderland on Project Gutenberg [5] sent from the serial output of an Arduino Uno.
Compiling the program
I compiled the programs using Spence Konde's ATTiny Core [6]. Choose the ATtiny25/45/85 option under the ATtinyCore heading on the Board menu. Then choose Timer 1 Clock: CPU, B.O.D. Disabled, ATtiny85, 8 MHz (internal) from the subsequent menus. Choose Burn Bootloader to set the fuses appropriately. Then upload the program using ISP (in-system programming); I used Sparkfun's Tiny AVR Programmer Board; see ATtiny-Based Beginner's Kit.
Here's the whole Tiny Terminal 2 program: Tiny Terminal 2 Program.
Update
16th December 2018: Fixed a bug in the ClearLine() routine that could cause the top line of the display to get corrupted on scrolling.
- ^ 2.08 inch SPI White OLED Screen Module SH1122 256*64 on Aliexpress.
- ^ SH1122 datasheet on DisplayFuture.
- ^ Breadboard - Mini Modular on SparkFun.
- ^ Mini Breadboard from HobbyTronics.
- ^ Alice's Adventures in Wonderland by Lewis Carroll on Project Gutenberg.
- ^ ATTinyCore on GitHub.
blog comments powered by Disqus