AM Morse-Code Transmitter
16th December 2021
This is a simple low-power AM morse-code transmitter, allowing you to key morse code and receive it on any medium-wave transistor radio. It's based on an ATtiny85 and a few other components:
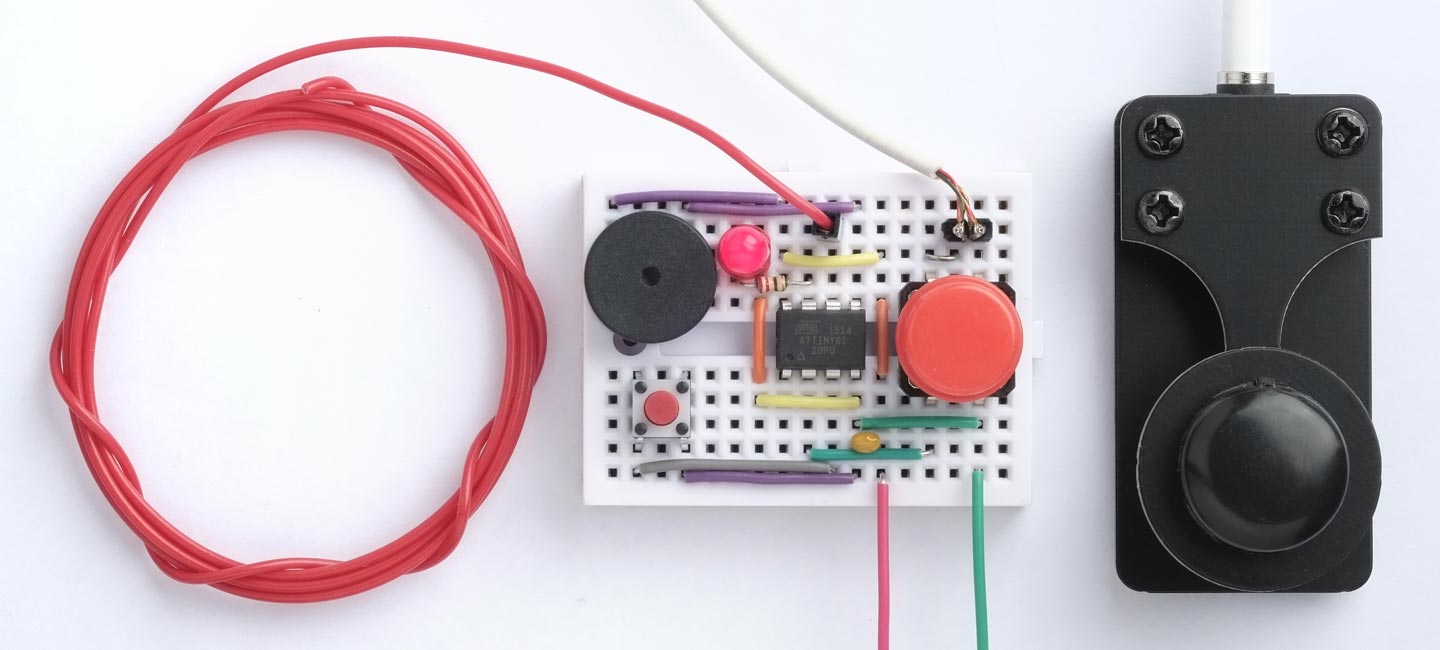
AM Morse-Code Transmitter, which transmits morse code to an AM radio.
The range is good enough to go between two rooms in a house, but not enough to risk interfering with radio broadcasts. You can use it to transmit morse code messages manually, by keying them using the pushbutton or a morse key. A second button transmits a predefined message automatically, which is useful for practising morse code comprehension.
Introduction
My friend's son recently became interested in morse code, so I was inspired to design this device to help learn morse code and experiment with sending messages. It has the following features:
- It allows you to key morse code manually, using a pushbutton, and you can see the code on an LED, or hear it on a piezo speaker.
- With the addition of a metre of cable to act as an antenna it will transmit the code over a short distance to an AM transistor radio, allowing two people to send secret messages to each other between the rooms in a house.
- It will also play or transmit a predefined message, for help in learning morse code and gaining proficiency at faster speeds.
It is based on an ATtiny85 with a minimum of additional components, and is easy to set up and use.
Morse code may no longer be necessary for long-distance communication, but it could be a useful skill to learn for occasions when technology isn't available. For example, using morse code you could flash a message with a torch or piece of mirror from the top of a mountain where there's no mobile phone signal.
Morse code
Morse code uses a series of short and long beeps to encode the letters A to Z, the digits 0 to 9, and a few punctuation marks, so that messages can be sent by sound or light between two people who know the code. To keep messages as short as possible the most common letters in English have a short encoding, with the longer encodings used for less common letters:
The morse code sequences for the letters and digits.
The timings are explained in the following table:
| Feature | Timing |
| Dot | 1 unit |
| Dash | 3 units |
| Gap between dots or dashes | 1 unit |
| Gap between characters | 3 units |
| Gap between words | 7 units |
I've found that the easiest way to learn the letters is to visualise the following diagram, where each left branch represents a dot, and each right branch represents a dash:

A diagrammatic representation of the morse code sequences for the letters A to Z.
Transmitting morse code
Traditionally morse code is transmitted using a technique known as Continuous Wave, or CW. The dots and dashes are transmitted by pulsing on and off a carrier frequency. On a standard AM receiver the presence of the carrier frequency can usually only be detected by tuning to that frequency, and then listening for a drop in the background noise. To make the morse code more audible, amateur radio operators introduce a Beat-Frequency Oscillator (or BFO) into the receiver with a frequency close to the carrier frequency, and this causes an audible beep when the carrier is present.
Since domestic transistor AM radios don't have a beat-frequency oscillator, this simple morse transmitter modulates the carrier to give an audible tone. Here's a trace of the amplitude modulated carrier [1]:

The circuit
Here's the circuit of the AM Morse-Code Transmitter:
Circuit of the AM Morse-Code Transmitter, based on an ATtiny85.
I used an ATtiny85, but the program should also fit on an ATtiny45 or ATtiny25.
The antenna should be a length of cable up to a metre long. Connect one end to PB1, leave the other end unconnected, and hang the cable approximately vertical.
You can omit the antenna if you don't want the morse code to be transmitted to an AM radio, and add a piezo speaker [2] instead for auditory feedback.
Using the AM Morse-Code Transmitter
Press the Keyer button to manually generate morse code. If you have a professional morse key you can connect this in parallel with the Keyer button to use that to generate morse code. I used the NanoKey from Phoenix Kits [3].
Press the Auto button to generate the message defined in the program. To interrupt the message and return to manual mode press the Keyer button.
You can replace the message with any message of your choice, up to the amount of memory available. The message is stored in the ATtiny85 program memory, so there is about 7000 characters available.
The program
The program uses the two ATtiny85 timer/counters and the watchdog timer to perform all the timing and waveform generation, and these are configured in setup() as follows.
Timer/Counter1
On the ATtiny85 you can clock Timer/Counter1 from a phase-locked loop (PLL), which generates 32MHz from the 8MHz internal clock; this is divided by the value 28 in OCR1C to generate a signal that is used to toggle the antenna output, PB1:
  // Set up Timer/Counter1 to generate 552kHz
  PLLCSR = 1<<LSM | 1<<PCKE | 1<<PLLE;
  TCCR1 =  1<<CTC1 | 1<<COM1A0 | 1<<CS10; // CTC mode /1
  OCR1C = 28;
The carrier frequency is:
This is in the AM medium wave band, which extends between about 530kHz and 1600kHz, so to receive the morse code you simply tune your radio to this frequency.
The ATtiny85 processor clock is only accurate to ±10%, so in practice the carrier frequency may be slightly either side of this frequency, so you may need to tune the radio until you hear the tones. The following table shows the nominal frequencies that will be given for a selection of values of OCR1C:
| OCR1C | 22 | 23 | 24 | 25 | 26 | 27 | 28 | 29 |
| Frequency | 696kHz | 667kHz | 640kHz | 615kHz | 593kHz | 571kHz | 552kHz | 533kHz |
Choose a frequency that corresponds to part of the waveband without any broadcast stations.
Timer/Counter0
Timer/Counter0 is used to generate an audible frequency of about 644Hz [4]:
  // Set up Timer/Counter0 to 644 Hz
  TCCR0A = 1<<COM0A0 | 2<<WGM00;          // CTC mode
  TCCR0B = 0<<WGM02 | 3<<CS00;            // Clock / 64
  OCR0A = 96;                             // Divide by 97
  TIMSK = 1<<OCIE0A;                      // Interrupt enabled
Timer/Counter0 toggles the output PB0, to drive the piezo speaker. It is also used to generate an interrupt. The interrupt service routine toggles the Timer/Counter1 clock on or off. This gates the carrier frequency on and off, as a simple form of amplitude modulation, to make the dots and dashes audible as tones on a radio receiver:
// Interrupt modulates carrier at 644Hz
ISR (TIMER0_COMPA_vect) {
  TCCR1 = TCCR1 ^ 1<<CS10;
}
During periods of silence the pure carrier is transmitted.
Watchdog timer
When automatically generating morse code the program uses the watchdog timer to generate a 32Hz interrupt, which is used to time the duration of the dots, dashes, and intervals:
  // Set up Watchdog timer for 32 Hz interrupt for ticks timer.
  WDTCR = 1<<WDIE | 1<<WDP0;              // 32 Hz interrupt
The interrupt service routine simply increments a global tick counter, Ticks:
// Watchdog interrupt counts ticks (1/32 sec)
ISR (WDT_vect) {
  WDTCR |= 1<<WDIE;
  Ticks++;
}
The watchdog interrupt automatically reverts the watchdog timer to causing a reset on the next interrupt; to avoid this the interrupt service routine sets the interrupt bit before the next interrupt:
WDTCR |= 1<<WDIE;
The watchdog timer is used by the routine Wait(), which waits a specified number of ticks:
// Ticks timer
void Wait (int units) {
  NextTick = NextTick + units * Dot;
  unsigned int t;
  do {
    cli(); t = Ticks; sei();
  } while (t < NextTick);
}
Note that interrupts are disabled while the variable Ticks is read, to prevent the possibility of it being updated by the watchdog interrupt.
The overall speed is determined by the constant Dot, which specifies the duration of a dot in 32ths of a second. Initially Dot is 6, giving a rate of about 5 words per minute (WPM) which is slow enough to allow you to write down the letters as you hear them, and was the rate required to pass the amateur radio proficiency exam [5]. Reduce the value of Dot for a faster rate.
Generating a beep
The routine Beep() turns on or off the generation of a beep:
void Beep (bool on) {
  if (on) {
    digitalWrite(Lamp, HIGH);             // LED on
    TCCR0B = 0<<WGM02 | 3<<CS00;          // Clock / 64
  } else {
    digitalWrite(Lamp, LOW);              // LED off
    TCCR0B = 0<<WGM02 | 0<<CS00;          // Clock off
    TCCR1 =  TCCR1 | 1<<CS10;             // Leave carrier on
  }
}
If the parameter is true it lights the LED, and turns on the Timer/Counter0 clock.
If the parameter is false it turns the lamp off, and turns off the Timer/Counter0 clock. It also turns on the Timer/Counter1 clock, because the Timer/Counter0 interrupt service routine might have left it off.
Automatic morse code generation
Pressing the Auto button generates the morse code for the string Message[]:
const char Message[] PROGMEM = "The quick brown fox jumps over the lazy dog. ";
The PROGMEM directive stores the message in flash program memory.
The program uses a look-up table Chars[] of codes giving the sequence of dots and dashes for the letters A to Z, the digits 0 to 9, and a selection of punctuation marks:
uint8_t Chars[48] = {
//A           B           C           D           E           F
  0b01100000, 0b10001000, 0b10101000, 0b10010000, 0b01000000, 0b00101000,
//G           H           I           J           K           L
  0b11010000, 0b00001000, 0b00100000, 0b01111000, 0b10110000, 0b01001000,
//M           N           O           P           Q           R
  0b11100000, 0b10100000, 0b11110000, 0b01101000, 0b11011000, 0b01010000,
//S           T           U           V           W           X
  0b00010000, 0b11000000, 0b00110000, 0b00011000, 0b01110000, 0b10011000,
//Y           Z           0           1           2           3
  0b10111000, 0b11001000, 0b11111100, 0b01111100, 0b00111100, 0b00011100,
//4           5           6           7           8           9
  0b00001100, 0b00000100, 0b10000100, 0b11000100, 0b11100100, 0b11110100,
//+           ,           -           .           /           ?
  0b01010110, 0b11001110, 0b10000110, 0b01010110, 0b10010100, 0b00110010,
//&           '           (           )           !           "
  0b10101110, 0b01000100, 0b10110100, 0b10110110, 0b10101110, 0b01001010,
};
Each eight-bit code consists of a '0' for a dot and a '1' for a dash, followed by a final additional '1' to indicate the end of the sequence, and then padded with zeros to eight bits.
The routine Letter() takes an ASCII character, converts it to the correct index in the look-up table Chars[], and then outputs it as a sequence of dots and dashes by calling DotDash():
void Letter (char letter) {
  uint8_t index;
  letter = letter | 0x20;                 // Convert letters to lower case
  if (letter == ' ') { Wait(4); return; }
  else if (letter >= 'a' && letter <= 'z') index = letter - 'a';
  else if (letter >= '0' && letter <= '9') index = letter - '0' + 26;
  else if (letter >= '+' && letter <= '/') index = letter - '+' + 36;
  else if (letter == '?') index = 41;
  else if (letter >= '&' && letter <= ')') index = letter - '&' + 42;
  else if (letter >= '!' && letter <= '"') index = letter - '!' + 46;
  else return;
  uint8_t code = Chars[index];
  while (code != 0x80) {
    DotDash(code & 0x80);
    code = code<<1;
  }
  Wait(2);
}
Here's the routine DotDash():
void DotDash (bool dash) {
  Beep(true);
  if (dash) Wait(3); else Wait(1);
  Beep(false);
  Wait(1);
}
DotDash() adds a gap of one unit after each dot or dash, so Letter() takes this into account when defining the gap between characters and words.
The main program
The main program checks repeatedly for a keypress on either of the buttons:
void loop() {
  // Manual mode
  if (digitalRead(Keyer) == 0) Beep(true);
  else Beep(false);
  // Auto mode
  if (digitalRead(Auto) == 0) {
    int p = 0;
    do {
      char c = pgm_read_byte(&Message[p++]);
      if (c == 0 || digitalRead(Keyer) == 0) break;
      Letter(c);
    } while (true);
  }
}
The Keyer button sends a beep while it is depressed. The Auto button transmits the predefined message. You can press the Keyer button to interrupt the message and return to manual mode.
Compiling the program
Compile the program using Spence Konde's ATTiny Core [6]. Choose the ATtiny25/45/85 (No bootloader) option under the ATTinyCore heading on the Board menu. Then check that the subsequent options are set as follows (ignore any other options):
Chip: "ATtiny85"
Clock: "8 MHz (internal)"
Choose Burn Bootloader to set the fuses appropriately for this frequency option. Then upload the program using ISP (in-system programming); I used Sparkfun's Tiny AVR Programmer Board; see ATtiny-Based Beginner's Kit.
Program listing
Here's the whole AM Morse-Code Transmitter program: AM Morse-Code Transmitter Program.
Update
6th February 2022: Fixed a couple of minor bugs in the program.
- ^ This oscilloscope trace was captured using a BitScope Micro BS05 Oscilloscope, available from Pimoroni in the UK.
- ^ Piezo Buzzer on Adafruit.
- ^ The NanoKey on PhoenixKitsonline.co.uk.
- ^ This is close to 641Hz, the frequency used by the US army for morse-code training.
- ^ Traditionally the WPM rate is measured by timing the words PARIS CODEX.
- ^ ATTinyCore on GitHub.
blog comments powered by Disqus