Simple DataFlash Board
17th July 2019
This is a small board that plugs into one of the headers on an Arduino Uno or other board to provide 4Mbytes of non-volatile storage:
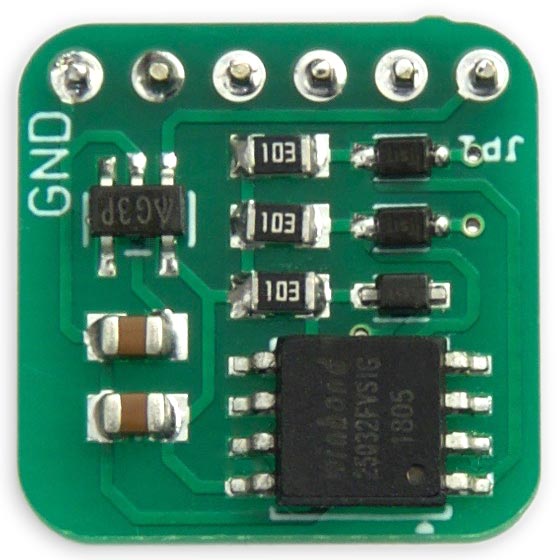
Simple DataFlash board plugs into an Arduino to provide 4Mbytes of EEPROM.
It works with either 5V or 3.3V boards, and is based on the low-cost 4Mbyte Winbond W25Q32FVSIG DataFlash chip. It is ideal for applications such as data logging, playing audio samples, and storing text.
I also describe a simple DataFlash library to interface to the board.
For an example of an application that uses the Simple DataFlash Board see Four Sample Player.
Introduction
A DataFlash chip is a simple and low cost way to add non-volatile storage to a microcontroller; chips offering 4Mbytes of storage are available for under 20 pence/cents each from AliExpress or eBay.
The downside of using DataFlash chips for non-volatile storage is that the smallest area you can erase is a 4Kbyte sector. If you want to provide the ability to change a single byte at an arbitrary address you have to copy the previous contents of the sector to RAM, or elsewhere on the DataFlash, erase the 4Kbyte sector containing the byte, update the sector copy, and then restore the sector to the DataFlash.
This Simple DataFlash Library avoids the need for temporary storage by having the following restrictions:
- When writing, you have to erase the entire DataFlash, and then write successive bytes from the start of the memory.
- When reading you can read successive bytes from any starting position.
This treats the DataFlash much like a sequential file, which is ideal for applications such as datalogging, creating a text database, or saving audio samples. For example, with a 4Mbyte DataFlash chip you could:
- Log the temperature every second for 46 days.
- Store and read back 2000 pages of text or four novels.
- Store and play back 12 minutes of digitised speech.
The Winbond DataFlash chips have a life of over 100,000 erase/program cycles.
The circuit
Here's the circuit of the Simple DataFlash board:
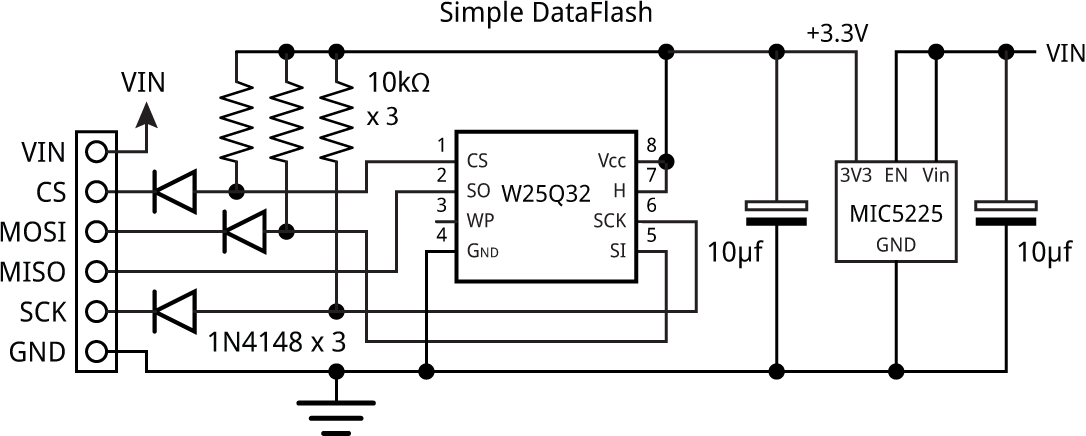
Circuit of the Simple DataFlash board.
I based it on the low-cost 4Mbyte Winbond W25Q32FVSIG DataFlash chip [1], but it should also be compatible with any 25-Series DataFlash chip, such as the 8Mbyte W25Q64 or the 16Mbyte W25Q128.
The DataFlash board includes a regulator, to provide the 3.3V that the DataFlash chip needs, and logic level converters on the CS, MOSI, and SCK inputs, to make it suitable for use with both 3.3V and 5V microcontroller boards.
► Parts list
Construction
The circuit fits on a board 16.5 mm square which I designed in Eagle and sent to PCBWay for fabrication [2]. I chose a green PCB to match the Arduino Uno. There's a link to the Eagle files at the end of the article if you want to make yourself a board.
Here are the connections on the edge connector:
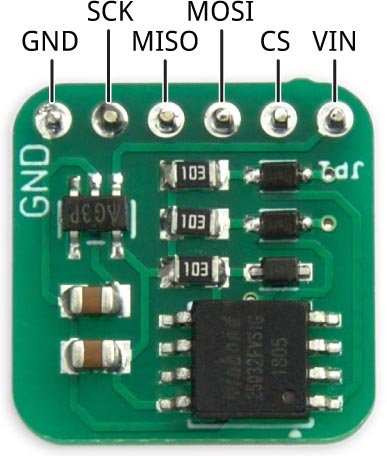
The edge connector is designed to plug straight into the standard header on a microcontroller board, such as the Arduino Uno, with the GND pin plugged into the GND pin on the top row of edge connectors:
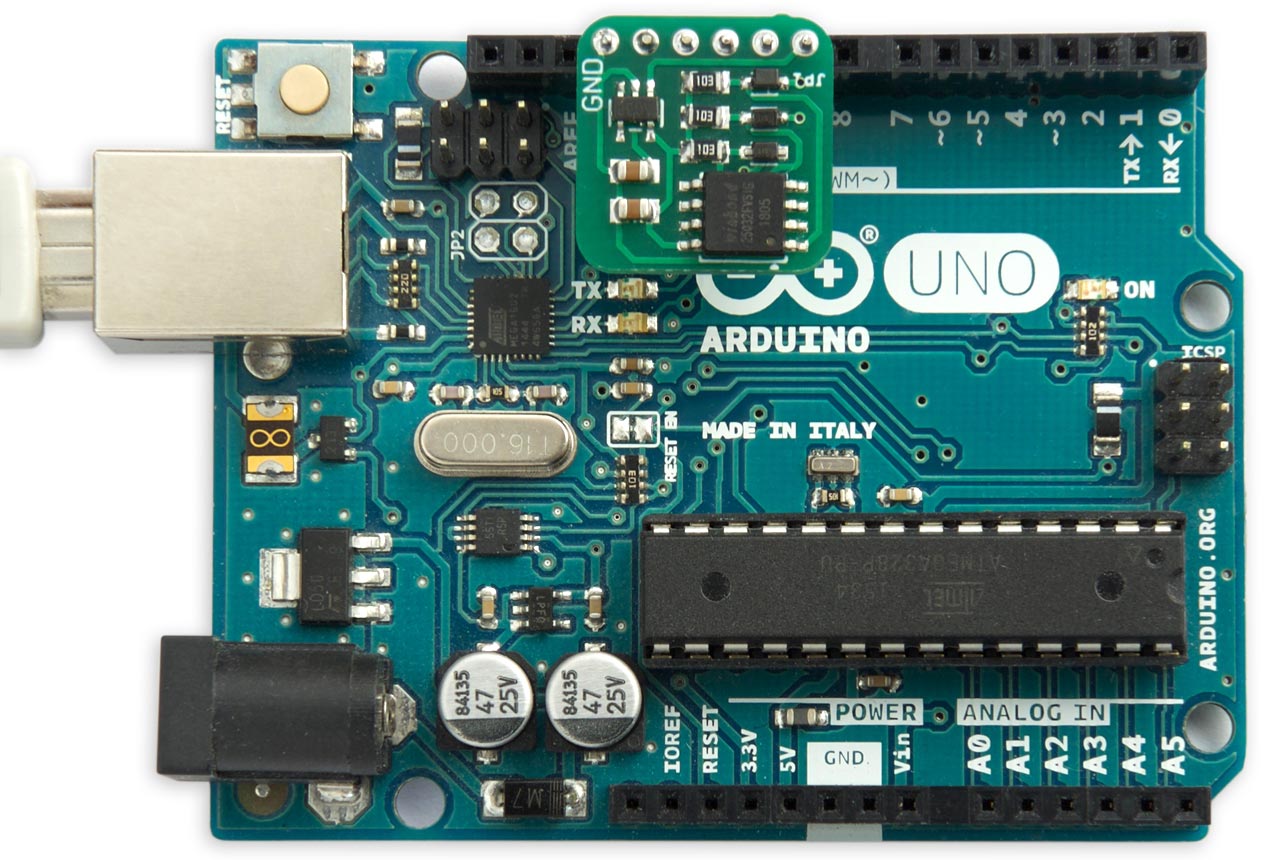
Simple DataFlash board plugged into an Arduino Uno.
The remaining pins then connect to pins 13 to 9 on the edge connector, and the board is powered by making pin 9 an output and taking it high. It will work with GND and any five digital I/O pins; they don't have to be the standard SPI pins.
I've also tested the board on an Arduino Zero ATSAMD21-based board.
The program
For portability the Simple DataFlash library uses the built-in Arduino shiftIn() and ShiftOut() routines to do the SPI interfacing, and on a 16MHz Arduino Uno they give a write speed of about 4.4Kbytes per second, and a read speed of about 5Kbytes per second.
The DataFlash library consists of the following seven routines:
DataFlash.Setup()
Must be called once to set up the I/O lines to interface with the DataFlash chip. It returns true if the flash chip was found successfully.
DataFlash.BeginWrite()
Call this once before writing to the DataFlash. It erases the entire DataFlash chip and sets the address pointer to the start of the chip.
DataFlash.WriteByte(uint8_t byte)
Writes a byte of data to the next DataFlash memory location.
DataFlash.EndWrite()
Call this once after writing to the DataFlash.
DataFlash.BeginRead(unsigned long addr)
Call this once before reading from the DataFlash with the start address for reading.
DataFlash.ReadByte()
Reads and returns a byte of data from the next DataFlash memory location.
DataFlash.EndRead()
Call this once after reading from the DataFlash.
Example
Here's a demo program to write random numbers to the DataFlash, and then read them back, checking they match.
First in setup() the DataFlash board is set up:
void setup() {
  Serial.begin(9600);
  while (!Serial);
  if (!DataFlash.Setup()) {
    Serial.println("DataFlash not found");
    for(;;);
  }
}
In loop() first write random values to each location:
  unsigned long Test = 400000;
  Serial.println("Erase");
  DataFlash.BeginWrite();
  randomSeed(12345);
  Serial.println("Write");
  for (unsigned long i=0; i<Test; i++) {
    DataFlash.WriteByte(random(256));
  }
  DataFlash.EndWrite();
Then seed the random number generator to the same starting value, read back the contents of the DataFlash, and check they match:
  Serial.println("Read");
  DataFlash.BeginRead(0);
  randomSeed(12345);
  int errors = 0;
  for (unsigned long i=0; i<Test; i++) {
    if (DataFlash.ReadByte() != random(256)) errors++;
  }
  DataFlash.EndRead();
  Serial.println("End");
  Serial.print(errors); Serial.println(" errors");
  for(;;);
To save time I've limited the number of bytes that get checked to 400000; this test takes a total of about three minutes. To test the full 4Mbytes change the value of Test to 4194303.
Here's the whole Simple DataFlash library and demo program: Simple DataFlash Program.
Or get the source from GitHub, together with the Eagle files for the PCB so you can make yourself a board, at: https://github.com/technoblogy/simple-dataflash.
Or order a board from OSH Park here: Simple DataFlash Board.
Update
13th January 2020: Added a diagram showing the connections on the edge connector and a note about how long the demo program takes.
- ^ W25Q32FV-DTR datasheet on Winbond.com.
- ^ PCBWay PCB prototyping service.
blog comments powered by Disqus