Alcohol Unit Counter
26th August 2018
There seems to be a lot of discussion in the news currently about how much alcohol it's safe to drink on a regular basis [1][2]. If you want help in monitoring your alcohol consumption this gadget might be useful. You enter the number of units you drink each day, and it keeps track of where you are relative to your target intake:
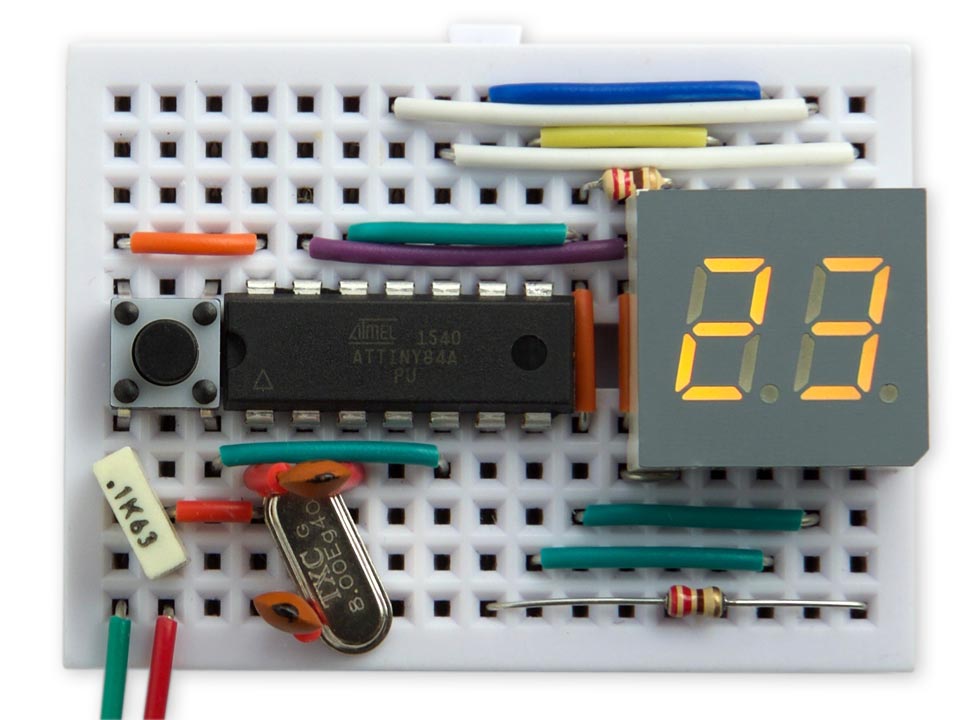
Alcohol Unit Counter, based on an ATtiny84.
It's based on a low-cost two-digit LED display and an ATtiny84.
Introduction
I built this circuit a while ago when I wanted a way to keep an eye on my alcohol intake. Of course you could achieve the same result with a calendar and notebook, but this is more fun and motivating. The aim is to keep to a sensible average level of consumption, with the ability to enjoy several drinks when the occasion arises.
Using the Alcohol Unit Counter
The Alcohol Unit Counter helps you keep to the UK recommended maximum adult alcohol intake of 14 units a week, ie two units a day (you can change this in the program).
To use it press the button once to display your current position relative to your target alcohol consumption; the aim is to keep this at zero.
For example, if it shows 0 you're on target, 2 means you're 2 units over and you'll need to have an alcohol-free day to catch up, and -4 means you're under target and you can enjoy half a bottle of wine, and so on.
At the end of the evening press the button again to enter each unit you've consumed, and the counter increments accordingly. In the middle of the night the counter automatically decrements by your daily allowance.
The counter can display between -19 and 39. Beyond this range it displays '__' for less than -19 or '^^' for more than 39. To save power the display blanks automatically after four seconds.
Calculating units
If you don't know how to work out the number of units in a drink here's the method: simply multiply the volume in litres by the percentage alcohol content. So, a 75cl bottle of 12% alcohol wine contains 0.75x12 or 9 units, and a 500ml bottle of 5% beer contains 0.5x5 or 2.5 units. If you're working in US pints you can roughly divide the number of pints by 2 to get litres.
The circuit
Here's the circuit, following the way it was laid out on the breadboard:
Circuit of the Alcohol Unit Counter.
I used an 8MHz crystal clock, for accurate timing. I connected the 18pF capacitors between the crystal and Vcc, rather than GND as is conventional, to make the wiring easier on the prototyping board. This shouldn't affect the operation of the circuit.
The display is a two-digit seven-segment common-anode LED display [3], but most two-digit LED displays should work; for a common-cathode display you'll have to make a couple of changes to the program.
The ATtiny84 doesn't quite have enough I/O lines to drive the display; the solution is to use the same line for digit 1 and segment f; fortunately the leftmost digit only needs to display the digits 0 to 3 or '-' which don't use this segment.
To save resistors the 220Ω current-limiting resistors are put in series with the digit connections, rather than the segment connections. The downside is that the digits are slightly different brightnesses; if this annoys you use seven 220Ω resistors in series with the segments instead.
Construction
The circuit fits nicely on a mini breadboard from SparkFun [4] or HobbyTronics in the UK [5]. For a more permanent construction you counl use a SparkFun prototyping board [6].
The standby power consumption is about 0.25mA, so a 350mAh rechargeable LiPo cell [7] should give about two month's operation.
The program
The main program stays in a low-power idle mode to save power, and everything works under interrupt.
Clock
The time is maintained using Timer/Counter1 configured to generate an interrupt every 64 seconds. It is set up in setup():
  TCCR1A = 0<<WGM10;                      // CTC mode
  TCCR1B = 1<<WGM12 | 3<<CS10;            // Divide by 64
  OCR1A = 31249;                          // Compare match at 1/64 Hz
  TIMSK1 = 1<<OCIE1A;                     // Enable compare match interrupt
The compare match interrupt service routine increments Ticks, and every day decrements the alcohol units Counter by the number of units per day, Units:
ISR(TIM1_COMPA_vect) {
  Ticks--;
  if (Ticks != 0) return;
  Ticks = Day;
  Counter = max(Counter - Units, Min);
}
Multiplexing the display
As in a few of my previous projects, the display is generated under interrupt, using the contents of the array Buffer[]. For example, to display "12" execute:
Buffer[0]=1; Buffer[1]=2;
The program uses Timer/Counter0 to generate an interrupt at 125Hz, fast enough to avoid flicker, which is used to multiplex the display. It is first configured in setup():
  TCCR0A = 2<<WGM00;                      // CTC mode; count up to OCR0A
  TCCR0B = 0<<WGM02 | 1<<CS00;            // Divide by 1
  OCR0A = 249;                            // Compare match at 125Hz
  TIMSK0 = 0;                             // Initially disable interrupts
The compare match interrupt service routine calls DisplayNextDigit() and counts down a timeout counter:
ISR(TIM0_COMPA_vect) {
  DisplayNextDigit();
  Timeout--;
  if (Timeout != 0) return;
  TIMSK0 = 0<<OCIE0A;                     // Disable compare match interrupt
  DDRA = 0;                               // Blank display - all inputs
  PORTA = 0xFF;                           // All pullups on
}
When the timeout reaches zero (after four seconds) the display is blanked by turning off the compare match interrupt.
DisplayNextDigit() reads the data in the appropriate element of Buffer[] and lights the segments in the corresponding display digit:
void DisplayNextDigit () {
  digit = digit ^ 1;                      // Toggle between 0 and 1
  char segs = charArray[Buffer[digit]];
  PORTA = 0;                              // All low
  DDRA = 0;                               // All inputs
  DDRA = segs & 0x7F;                     // Set display segments
  DDRA = DDRA | 1<<Digits[digit];         // Make it an output
  PORTA = PORTA | 1<<Digits[digit];       // Make it high
}
Finally, the routine Display() decodes a two-digit number into Buffer[]:
void Display (int n) {
  int units = n % 10;
  int tens = n / 10;
  int temp0 = tens;
  int temp1 = abs(units);
  if (tens < 0) temp0 = temp1 = Under;
  else if (tens > 3) temp0 = temp1 = Over;
  else if ((tens == 0) && (units >= 0)) temp0 = Blank;
  else if ((tens == 0) && (units < 0)) temp0 = Minus;
  Buffer[0] = temp0;
  Buffer[1] = temp1;
}
Handling the pushbutton
The pushbutton is configured in setup() to generate an external interrupt, INT0:
  PORTB = 1<<PORTB2;                      // Input pullup
  MCUCR = MCUCR | 2<<ISC00;               // Interrupt on falling edge
  GIMSK = 1<<INT0;                        // Enable INT0 interrupt
Pressing the button calls the interrupt service routine which turns on the display, and increments the units Counter if the display is already on:
ISR(INT0_vect) {
  int val, lastval=0, count = 0;
  do {
    val = PINB & 1<<PINB2;
    if (val == lastval) count++;
    else { lastval = val; count = 0; }
  } while (count < 8);
  if (val != 0) return;
  // Only increment if display already on and button down
  if (Timeout != 0) Counter = min(Counter + 1, Max);
  Display(Counter);
  Timeout = Delay;                        // 4 seconds
  TIMSK0 = 1<<OCIE0A;                     // Enable compare match interrupt
  GIFR = 1<<INTF0;                        // Clear interrupt from bounce
}
To avoid problems from contact bounce the routine first reads the input repeatedly until it gets eight readings in the same state.
Saving power
To keep the power consumption as low as possible the program reduces the 8MHz processor clock in setup() by a factor of 256 to 31250Hz:
  CLKPR = 1<<CLKPCE;
  CLKPR = 8<<CLKPS0;                      // Clock to 31250 Hz
It also disables the ADC as it isn't used, turns off the clocks to the USI and ADC, and enables the IDLE sleep mode:
  ADCSRA &= ~(1<<ADEN);                   // Disable ADC to save power
  PRR = 1<<PRUSI | 1<<PRADC;              // Turn off clocks to USI & ADC to save power
  set_sleep_mode(SLEEP_MODE_IDLE);
Compiling the program
I compiled the program using Spence Konde's ATTiny Core [8]. Select the ATtiny24/44/84 option under the ATtinyCore heading on the Boards menu. Then choose Clockwise, ATtiny84, 8 MHz (external), B.O.D. Disabled from the subsequent menus.
Connect the circuit to your computer via a suitable programmer, such as the Tiny AVR Programmer Board; see ATtiny-Based Beginner's Kit, and choose Burn Bootloader to set the fuses appropriately for the 8MHz crystal. Then choose Upload to upload the program to the ATtiny84.
ISP upload won't work at the low processor speed used by the program, so there's a 2 second delay in Setup() before the program slows down the processor speed. If uploading the program fails, it should work if you try again within 2 seconds.
Here's the whole Alcohol Unit Counter program: Alcohol Unit Counter Program.
Update
23rd January 2023: Added a missing line to the circuit diagram.
- ^ There's no risk-free amount of alcohol, population-level study finds on Ars Technica.
- ^ The risks of alcohol (again) on Medium.
- ^ DA03-11SYKWA Kingbright 2 Digit 7-Segment LED Display on RS-Online.
- ^ Breadboard - Mini Modular on SparkFun.
- ^ Mini Breadboard from HobbyTronics.
- ^ SparkFun Solder-able Breadboard Mini on SparkFun.
- ^ Lithium Ion Polymer Battery 3.7V 350mA on Adafruit.
- ^ ATTinyCore on GitHub.
blog comments powered by Disqus