Simple Tones for ATtiny
4th April 2014
For a recent project based on the ATtiny85 I wanted to play some simple tones through a piezoelectric speaker, but unfortunately the Arduino tone() function isn't supported on the ATtiny85 because it doesn't have the appropriate timers. I therefore needed to find a replacement way of generating simple tones.
There are several existing tone libraries for the ATtiny85, but they all seemed overcomplicated for what I wanted. This post describes my simple TinyTone() function which takes advantage of the ATtiny85's prescaler to provide a compact tone routine that only needs a table of 12 divisors.
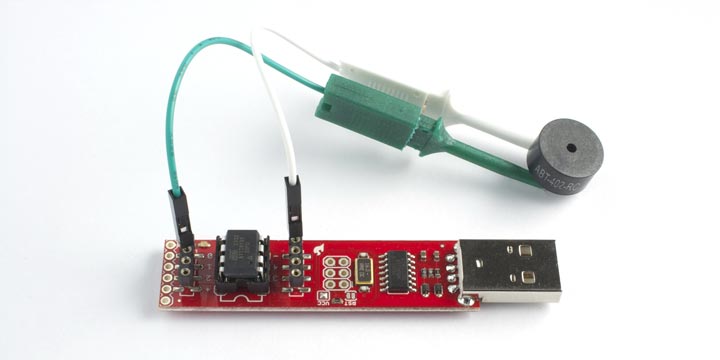
To test this application I used SparkFun's Tiny AVR Programmer (available in the UK from Proto-PIC [1]), which lets you program the ATtiny45 or ATtiny85 using the Arduino development environment [2].
TinyTone procedure
Here's how my TinyTone() function works.
The ATtiny85 contains two timers, referred to as Timer/Counter0 and Timer/Counter1. The first of these is already used by the delay() function, so I've used Timer/Counter1. This divides the clock frequency, which is either 1MHz or 8MHz, by a prescaler, and then by a one-byte counter. The square wave is output on digital output 1.
Because the prescaler divides the clock by a power of two it provides a convenient way of generating the octave. So TinyTone() is written to take three parameters; the note divisor, the octave number, and the duration in milliseconds [3]:
TinyTone(divisor, octave, duration)
We then just need a table of divisors for the notes within one octave. To calculate the divisor for a given note frequency we first work out:
divisor = clock / frequency
For example, C4 (middle C) is 261.63Hz, so we get:
divisor = 1000000 / 261.63
= 3822.19
However, the divider for the counter must fit into 8 bits, so the maximum number we can represent is 255. The solution is to set the prescaler to divide the clock by 2^4, or 16. Then we get:
divisor = 1000000 / 16 / 261.63
= 238.89 which rounds to 239.
We will define a constant for each divisor to save having to remember them; for example C is:
const int Note_C = 239;
TinyTone works for 1MHz or 8MHz clocks. To use it with an 8MHz clock add 3 to the prescaler, to reduce the frequency by an additional factor of 8, as shown in the commented second line of the routine.
Note that for historical reasons each octave goes from C to B; for example, the next note after B4 is C5, and so on.
Specifying the duration
Once you program Timer/Counter1 with a divisor and prescaler it continues to generate a tone on output 1 indefinitely, irrespective of what the program is doing. To create a note of a specified length we need to stop the counter when the duration has elapsed.
One approach is to get the timer to call an interrupt service routine on every cycle; we can then count how many cycles have elapsed, and stop the counter after the appropriate number. This is the approach taken by Bruce E. Hall [4].
However, I decided it was simpler to use the delay() function to time the note; after the delay has elapsed we stop the counter by writing 0 to the prescaler register.
TinyTone program
Here's the complete program:
/* TinyTone for ATtiny85 */

// Notes
const int Note_C  = 239;
const int Note_CS = 225;
const int Note_D  = 213;
const int Note_DS = 201;
const int Note_E  = 190;
const int Note_F  = 179;
const int Note_FS = 169;
const int Note_G  = 159;
const int Note_GS = 150;
const int Note_A  = 142;
const int Note_AS = 134;
const int Note_B  = 127;

int Speaker = 1;

void setup()
{
  pinMode(Speaker, OUTPUT);
}

void loop()
{
  playTune();
  delay(10000);
}

void TinyTone(unsigned char divisor, unsigned char octave, unsigned long duration)
{
  TCCR1 = 0x90 | (8-octave); // for 1MHz clock
  // TCCR1 = 0x90 | (11-octave); // for 8MHz clock
  OCR1C = divisor-1;         // set the OCR
  delay(duration);
  TCCR1 = 0x90;              // stop the counter
}

// Play a scale
void playTune(void)
{
 TinyTone(Note_C, 4, 500);
 TinyTone(Note_D, 4, 500);
 TinyTone(Note_E, 4, 500);
 TinyTone(Note_F, 4, 500);
 TinyTone(Note_G, 4, 500);
 TinyTone(Note_A, 4, 500);
 TinyTone(Note_B, 4, 500);
 TinyTone(Note_C, 5, 500);
}
Addendum
For an improved version of this routine, that can be used to play notes on the ATtiny85 pins 1 or 4, see Playing Notes on the ATtiny85.
- ^ Tiny AVR Programmer on Proto-PIC.
- ^ Tiny AVR Programmer Hookup Guide on SparkFun.
- ^ Note that this technique can't be used with the ATmega328 used on the Arduino Uno because the prescaler cannot be set to any power of 2.
- ^ A Tone Generator for Trinket by Bruce E. Hall.
blog comments powered by Disqus