Secret Maze 2
15th April 2024
This simple project, based on an ATtiny85, gives you a maze that you have to solve by navigating it with four push buttons. The available paths in each direction are shown by four LEDs: a lit LED means that your way is blocked by a wall, and the speaker beeps if you try to move in that direction:
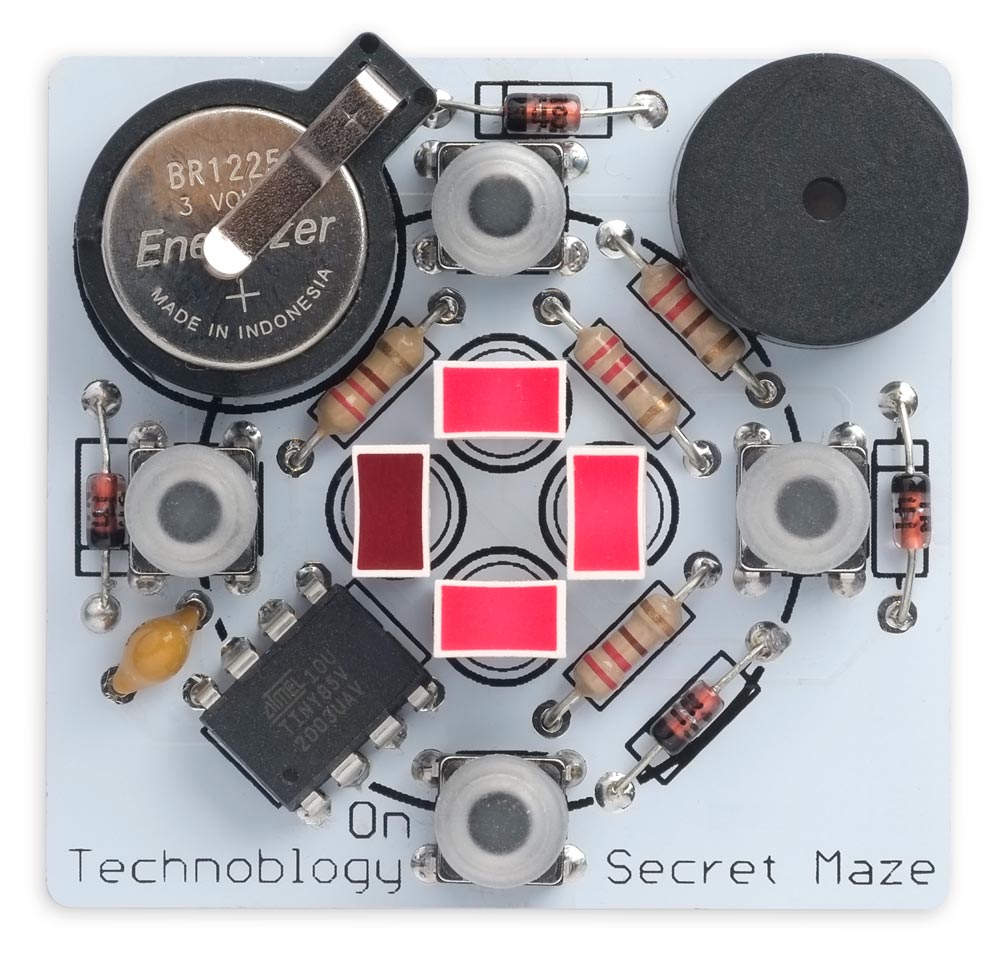
The Secret Maze game based on an ATtiny85; your only option here is to move left.
When you get to the goal all four LEDs flash, and a tune confirms you've succeeded! You can select one of six different mazes to solve.
The project is a good example of what you can achieve with the diminuitive ATtiny85; as well as mapping the maze it's driving four LEDs, reading four push buttons, and playing tones through a speaker!
This is an improved version of my earlier projects Secret Maze and Secret Maze PCB.
Introduction
I recently wanted to build one of my Secret Maze PCBs as a present for a friend's son, and decided to make a few improvements at the same time:
- I redesigned the PCB to make the buttons and LEDs aligned vertically and horizontally, rather than slanted as on the original PCB, as this is more intuitive.
- I have included six different mazes, and allowed you to select one at the start of a new game. You can also add your own mazes.
- I have also made it easier to design your own mazes, and incorporate them in the program, using a popular web-based pixel editor.
This new version of the project includes six alternative mazes. When you start the game the four lights flash in different patterns; press the Down button labelled On when the pattern of lights shows the maze you want. The maze corresponding to the Up light is the same as the one in the original Secret Maze; the other five mazes are new.
To avoid the need for an on/off switch the circuit automatically goes to sleep if there has been no keypress for 30 seconds; this has the advantage that it's not possible to inadvertently leave the game on, and run down the battery. To wake up the game press the Down button labelled On on the PCB.
To go back to the maze selection mode at any time, press and hold all four buttons, then release them.
Navigating the maze using the four lights is challenging, and unless you've got a very good visual memory you'll probably need to draw a map on a piece of paper as you traverse it.
How it works
The ATtiny85 provides five I/O lines. One of these was needed for the piezo speaker, leaving four available to control four LEDs and read four push buttons. At first sight this looks impossible.
The solution is to use charlieplexing, a method of driving LEDs that takes advantage of the fact that each I/O line can have one of three states: low, high, or high-impedance when defined as an input. All the I/O lines are defined as inputs when no LEDs are illuminated, and to light one LED you take one I/O line low and another I/O line high. The LED at the intersection of those two lines will then light up.
The simplest way to visualise this is to draw a diagram, where each cell shows a combination of one I/O line low and another I/O line high. You can place an LED in each cell. The grey squares show positions where you can't connect an LED, because an I/O line can't be both high and low at the same time:
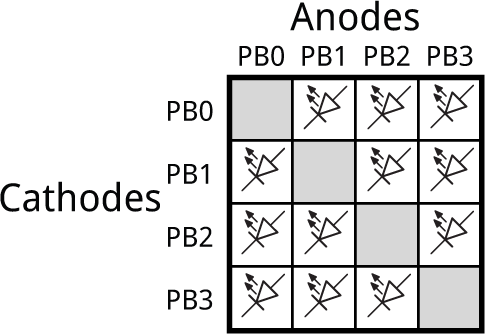
So the total number of LEDs you can control with four I/O lines is 12.
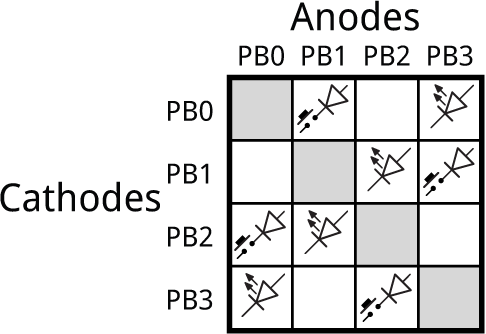
Instead of an LED you can put a push button in series with a diode into any cell. To test the state of the push button you take one I/O line low, make the other I/O line an input with a pullup, and read its state. So you can control a combination of any mixture of 12 LEDs and push buttons.
In this application I only needed four LEDs and four push buttons; the arrangement I used is as shown here:
The circuit
Here's the circuit of the Secret Maze:
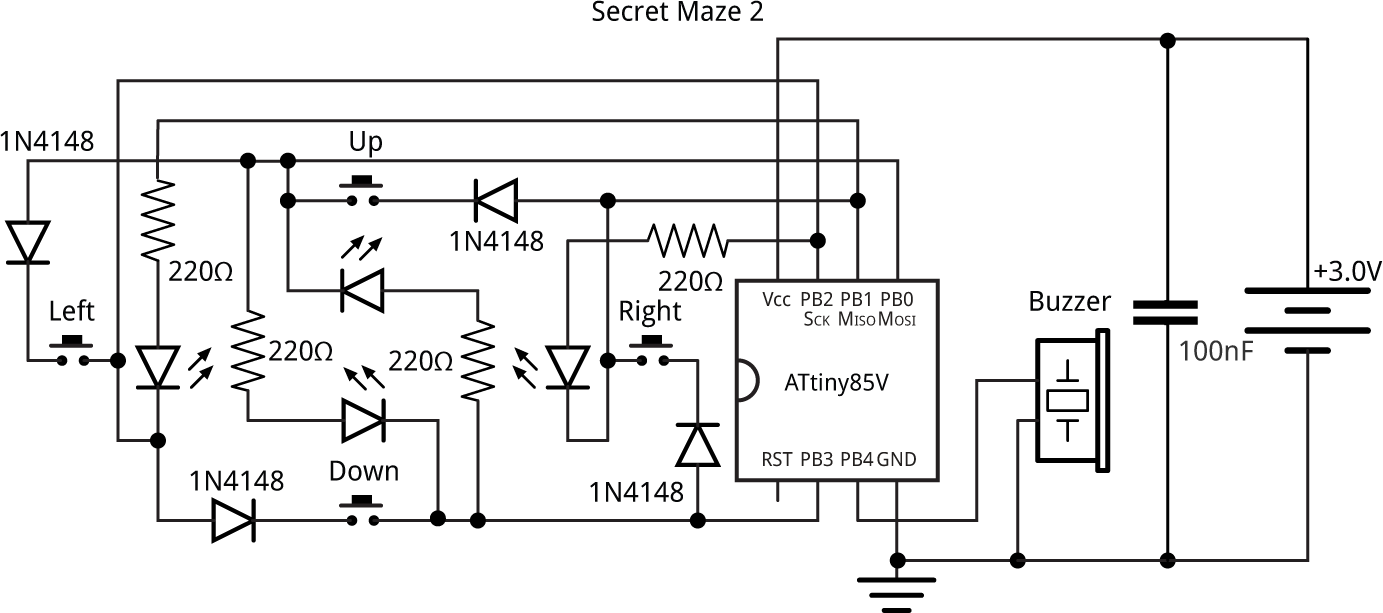
Circuit of Secret Maze 2, based on an ATtiny85.
The circuit is made a bit more complicated by the wiring needed for the charlieplexing. It's identical to the original Secret Maze, so if you built one of those you can use the new version of the program on it.
I recommend using the ATtiny85V variant of the processor as this is rated down to 1.8V, so it will extend the life as the battery fades. The program should also fit on the ATtiny45V or ATtiny25V.
The diodes are 1N4148 small-signal diodes, but almost any diodes should be suitable. They are needed to protect against the user pressing two push buttons at once when an LED is illuminated. For example, consider the case when the LED between PB0 and PB3 is illuminated. PB0 is at 0V and PB3 is at Vcc. Now suppose the user holds down the push button between PB3 and PB1, and the push button between PB1 and PB0. Without the diodes this would short between 0V to Vcc.
Here's the parts list (click to expand):
► Parts list
Construction
I designed the board in Eagle and sent it to PCBWay for fabrication. There's a link to the Eagle files at the end of the article if you want to make yourself a board.
The printed circuit board is designed for through-hole components, so it should be a good project for people without much soldering experience.
The circuit is powered by a 12mm 3V coin cell; types CR1216, CR1220, or CR1225 are suitable, with CR1225 giving the longest life. The battery fits in a through-hole 12mm coin cell holder. Note that if you are making the Secret Maze for a child, please glue the coin cell in the holder so there's no chance of the coin cell being removed and swallowed.
The board is designed for standard 5mm LEDs, but will also accommodate rectangular LEDs with a 0.1" pin spacing; these give a nice visual representation of the four walls of the maze. The LEDs should be red LEDs, as these have the lowest forward voltage, and so are the brightest when powered from a 3V battery.
The PCB will accommodate either of two widely available piezo speakers: the TDK PS1240P02CT3 [1], or the ABT-402-RC [2].
The push buttons are 6mm square tactile buttons. They come in a variety of heights (which are measured from the PCB) [3]; I chose 8mm ones, to make them extend above the other components, and fitted translucent soft caps on them [4].
The program
The mazes
The mazes are designed on a 16x16 grid, and are represented in the program as a matrix of 16x16 numbers. A '1' denotes a wall and a '0' denotes a path. In addition, a '2' indicates the player's starting position, and a '3' indicates the goal.
In this new version of the game you can have paths right up to the edge of the 16 x 16 grid; anything outside the grid is treated as a wall.
The union Rows uses the bitfield feature of C to convert the 16 x 16 matrix of two-bit numbers into an array of 16 32-bit integers, to minimise the storage needed for the mazes:
union Rows {
  struct {
    uint8_t rowf:2, rowe:2, rowd:2, rowc:2, rowb:2, rowa:2, row9:2, row8:2,
            row7:2, row6:2, row5:2, row4:2, row3:2, row2:2, row1:2, row0:2;
  };
  uint32_t Row;
};
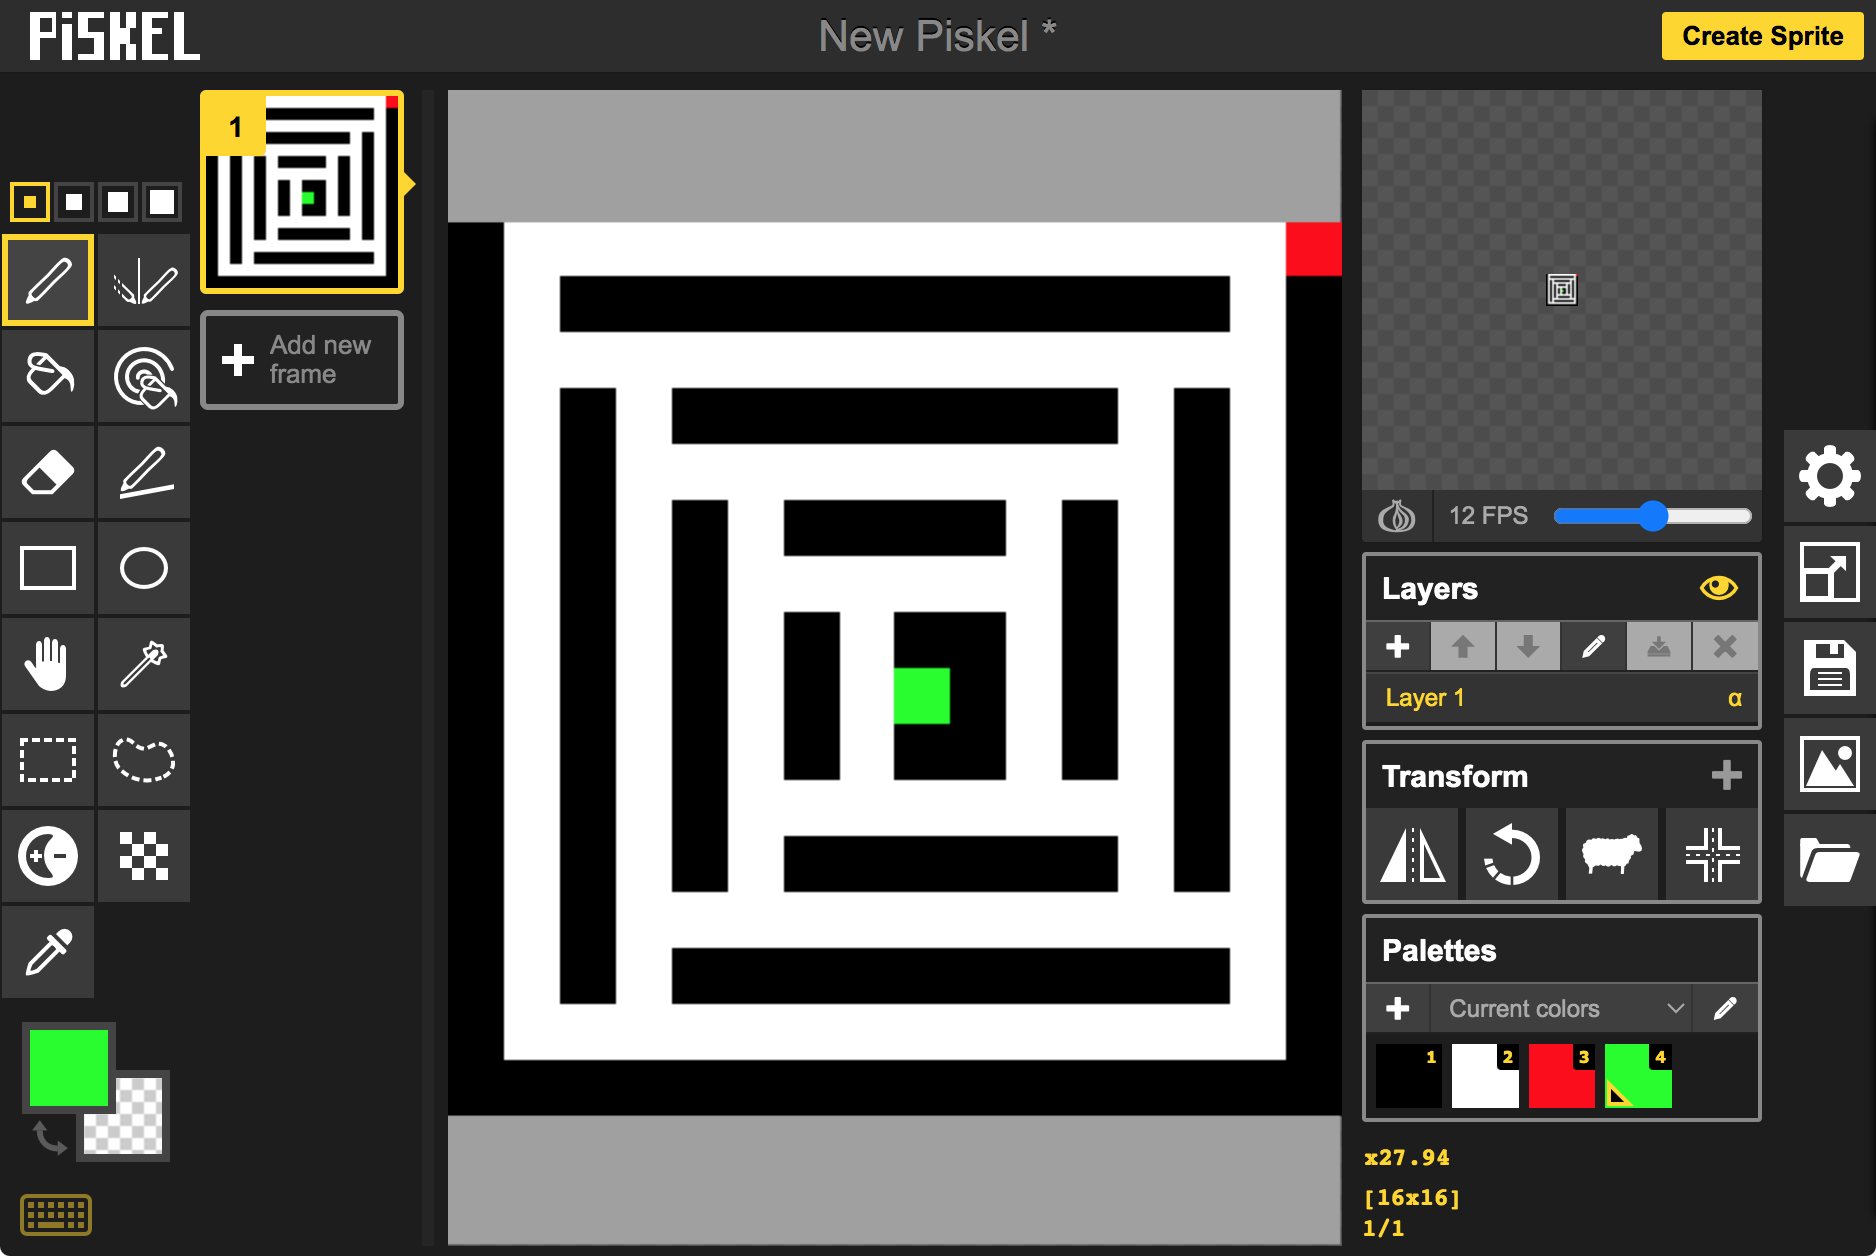
Here's the definition of a typical maze; this isn't one of the built-in mazes, it's the one shown in the example using Piksel at the end of the article:
const union Rows Mazes[TotalMazes][16] PROGMEM = {
{
1, 0, 0, 0, 0, 0, 0, 0, 0, 0, 0, 0, 0, 0, 0, 2,
1, 0, 1, 1, 1, 1, 1, 1, 1, 1, 1, 1, 1, 1, 0, 1,
1, 0, 0, 0, 0, 0, 0, 0, 0, 0, 0, 0, 0, 0, 0, 1,
1, 0, 1, 0, 1, 1, 1, 1, 1, 1, 1, 1, 0, 1, 0, 1,
1, 0, 1, 0, 0, 0, 0, 0, 0, 0, 0, 0, 0, 1, 0, 1,
1, 0, 1, 0, 1, 0, 1, 1, 1, 1, 0, 1, 0, 1, 0, 1,
1, 0, 1, 0, 1, 0, 0, 0, 0, 0, 0, 1, 0, 1, 0, 1,
1, 0, 1, 0, 1, 0, 1, 0, 1, 1, 0, 1, 0, 1, 0, 1,
1, 0, 1, 0, 1, 0, 1, 0, 3, 1, 0, 1, 0, 1, 0, 1,
1, 0, 1, 0, 1, 0, 1, 0, 1, 1, 0, 1, 0, 1, 0, 1,
1, 0, 1, 0, 1, 0, 0, 0, 0, 0, 0, 0, 0, 1, 0, 1,
1, 0, 1, 0, 1, 0, 1, 1, 1, 1, 1, 1, 0, 1, 0, 1,
1, 0, 1, 0, 0, 0, 0, 0, 0, 0, 0, 0, 0, 0, 0, 1,
1, 0, 1, 0, 1, 1, 1, 1, 1, 1, 1, 1, 1, 1, 0, 1,
1, 0, 0, 0, 0, 0, 0, 0, 0, 0, 0, 0, 0, 0, 0, 1,
1, 1, 1, 1, 1, 1, 1, 1, 1, 1, 1, 1, 1, 1, 1, 1
},
The mazes are defined as const ... PROGMEM to place them in the ATtiny85's program memory, to save RAM. With six mazes the whole Secret Maze program only uses about 26% of the program memory on the ATtiny85, and 4% of the RAM, so it should fit on the ATtiny45V, or the ATtiny25V with four mazes.
Reading the maze
The routine Cell() reads the contents in one cell of the currently selected maze, where 0,0 is the top right corner of the maze:
uint8_t Cell (uint8_t x, uint8_t y) {
  uint32_t row = pgm_read_dword(&Mazes[Maze][y].Row);
  return row>>((15-x)*2) & 3;
}
The pgm_read_dword() function is necessary to read from the program memory.
Wall() returns true or false to specify whether a cell is a wall:
bool Wall (int x, int y) {
  if ((x == -1) || (y == -1) || (x == 16) || (y == 16)) return true;
  return (Cell(x, y) == 1);
}
Anything outside the 16 x 16 grid is considered a wall.
Look() returns a four-bit number specifying which of the four adjacent cells are walls:
uint8_t Look (int x, int y) {
  return Wall(x, y+1)<<3 | Wall(x+1, y)<<2 | Wall(x-1, y)<<1 | Wall(x, y-1);
}
Playing beeps
The program uses the routine note() to play a note to the piezo speaker on I/O pin 4. This is from my article Playing Notes on the ATtiny85.
Displaying the lights and checking the push buttons
The state of the lights is set by the bottom four bits in the global variable Lights, and the states of the push buttons by the corresponding bits in the global variable Buttons:
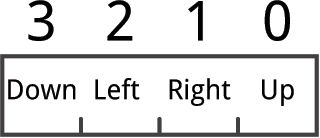
The lights and buttons are multiplexed by the Timer/Counter0 OCR0A compare match interrupt service routine. Timer/Counter0 is set up to give a 500Hz interrupt in setup():
  TCCR0A = 2<<WGM00;                              // CTC mode
  TCCR0B = 2<<CS00;                               // /8 prescaler
  OCR0A = 249;                                    // 500 Hz interrupt
  TIMSK = 1<<OCIE0A;                              // Enable interrupt
The buttons and lights are connected to the I/O pins PB0 to PB3. Each call to the interrupt service routine checks the button on one I/O pin, and lights the light on one I/O pin. Here's the whole interrupt service routine:
ISR(TIMER0_COMPA_vect) {
  // Check button
  int button = ((Bit<<1) + 1) % 5;
  if (PINB & 1<<button) {
    Buttons = Buttons & ~(1<<Bit);
  } else {
    Buttons = Buttons | 1<<Bit;
  }
  Bit = (Bit + 1) & 0x03;                             // Next row
  // Light LED
  button = ((Bit<<1) + 1) % 5;                        // Button
  int light = Bit ^ 0x03;                             // LED
  if (Lights & 1<<Bit) {
    DDRB = (DDRB & (1<<Output)) | 1<<Bit | 1<<light;
    PORTB = 1<<light | 1<<button;
  } else {
    DDRB = (DDRB & (1<<Output)) | 1<<Bit;
    PORTB = 1<<button;
  }
  Millis = Millis + 2;
}
First the routine tests a button and sets the appropriate bit in Buttons if it is down. Then it checks the appropriate bit in Lights and lights the LED if it is a '1'. The routine takes care to avoid changing the Output bit, PB4, used for the speaker.
Because the program uses both of the ATtiny85's timer/counters the Arduino millis() function is not available. The interrupt service routine therefore also increments a variable Millis that is used to provide a millisecond timer, Mymillis(), and a delay function, Mydelay().
Reading the keys
The following function ReadKeys() waits for a keypress, and then returns a four-bit number specifying which of the keys were pressed:
uint8_t ReadKeys () {
  unsigned long Start = Mymillis();
  do {                                                // Go to sleep after Timeout
    if (Mymillis() - Start > Timeout*1000) {
      Sleep();
      Start = Mymillis();
    }
  } while (Buttons == 0);                             // Wait for keypress
  // Wait until keys are stable
  int keys, count = 0, lastkeys = 0;
  do {
    keys = Buttons;
    count++;
    if (lastkeys != keys) count = 0;
    lastkeys = keys;
  } while (count < 7);
  return keys;
}
The variable count is used to provide push button debouncing.
Sleep
If ReadKeys() waits for 30 seconds without a key being pressed it calls Sleep(), which puts the processor to sleep after 30 secs of inactivity:
void Sleep () {
  TIMSK = 0;                                      // Disable interrupt
  DDRB = 0b1000;
  PORTB = 0b0100;                                 // Set up for interrupt
  GIMSK = 1<<INT0;                                // Enable interrupt on INT0 (PB2)
  sleep_enable();
  sleep_cpu();
  GIMSK = 0;                                      // Turn off INT0 interrupt
  TIMSK = 1<<OCIE0A;                              // Enable Timer/Counter0 interrupt
  Buttons = 0b1000;                               // We pressed button on PB3
  Mydelay(500);
  while (Buttons != 0);                           // Ignore this keypress
}
Before putting the processor to sleep it first disables the multiplexing interrupt. It then sets up one of the buttons, marked On on the PCB, so this can be used to wake up the processor from sleep using the INT0 interrupt. The button is connected between PB2 and PB3, so PB3 is set up as a low output, and PB2/INT0 as an input with a pullup. Finally the INT0 interrupt is enabled, and the processor is put to sleep.
Pressing the On button generates an INT0 interrupt which wakes up the processor. The program waits for the key to be released, so it won't affect the maze, and then execution resumes. The power consumption in sleep mode is about 0.25µA at 3V, which is negligible.
Navigating the maze
The main program, in loop(), then runs the game. It first counts up the lights in binary to allow the player to select one of the six mazes:
  int maze = -1;
  unsigned long Start = Mymillis();
  do {
    if (Mymillis() - Start > Timeout*1000) {
      Sleep();
      Start = Mymillis();
    }
    maze = (maze + 1) % TotalMazes;
    Lights = Patterns[maze];                          // Show next pattern
    unsigned long Delay = Mymillis();                 // Delay 1 s
    while ((Mymillis() - Delay < 1000) && (Buttons == 0));
  } while (Buttons == 0);
  // Wait for release key
  Click();
  while (Buttons != 0);
  Maze = maze;
  Lights = 0b1111;
  Mydelay(1000);
Each maze is represented by one of the patterns in Patterns[]. Extend this if you want to provide more than ten mazes. The global variable Maze is set to the number of the maze, 0 to 5.
The position of the player in the maze is represented by x, y which is initially set to the cell containg a '2':
  int x, y;                                           // Player's position
  for (int xx=0; xx<16; xx++) {
    for (int yy=0; yy<16; yy++) {
      if (Cell(xx, yy) == 2) {
        x = xx; y = yy;                               // Set player to start
      }
    }
  }
  Lights = Look(x, y);                                // Display starting position
The program then repeats the following steps:
- Call ReadKeys() to wait for a keypress, including key debouncing, and set the variables dx and dy to the direction corresponding to the keypress:
    int keys = ReadKeys();
    int dx = 0, dy = 0;                               // Movement
    if (keys & 0b1000) dy = 1; else if (keys & 0b100) dx = 1;
    else if (keys & 0b10) dx = -1; else if (keys & 0b1) dy = -1;
- Check whether the move is valid, by calling Wall(). If the destination is blocked call Beep() to play a tone. Otherwise update the player's position to make the move:
    if (Wall(x+dx, y+dy)) Beep();                     // Hit a wall
    else {
      x = x + dx; y = y + dy;                         // Move
      Click();
    }
- Call Look() to display the current position on the lights:
Lights = Look(x, y);
-
Check whether all four buttons are being held down, and if so, enable the watchdog timer to cause a reset:
    do {
      if (Buttons == 0b1111) {
        while (Buttons != 0);
        wdt_enable(4);                                // Will cause a reset
        for(;;);
      }
    } while (Buttons != 0);                           // Wait for key release
-
Check whether we've reached a cell containing '3', and if so, play a tune.
  } while (Cell(x, y) != 3);                          // Have we reached goal?

  Lights = 0;
  for (int n=0; n<=7; n++) {                          // Success tune!
    Lights = Lights ^ 0b1111;                         // Flash lights
    note(n, 4);
    if (n!=4 && n!=11) n++;
    Mydelay(400);
  }
  note(0, 0);                                         // Stop notes
Creating your own mazes
Although you can design your own mazes by typing in a matrix of numbers in the definition of Mazes[][], the easiest way I've found is using a free web-based sprite editor called Piskel. You can draw your own mazes, and then export them and use them to replace one or more of the six default mazes in the program.
Here's the procedure:
- Run Piskel by going to https://www.piskelapp.com/.
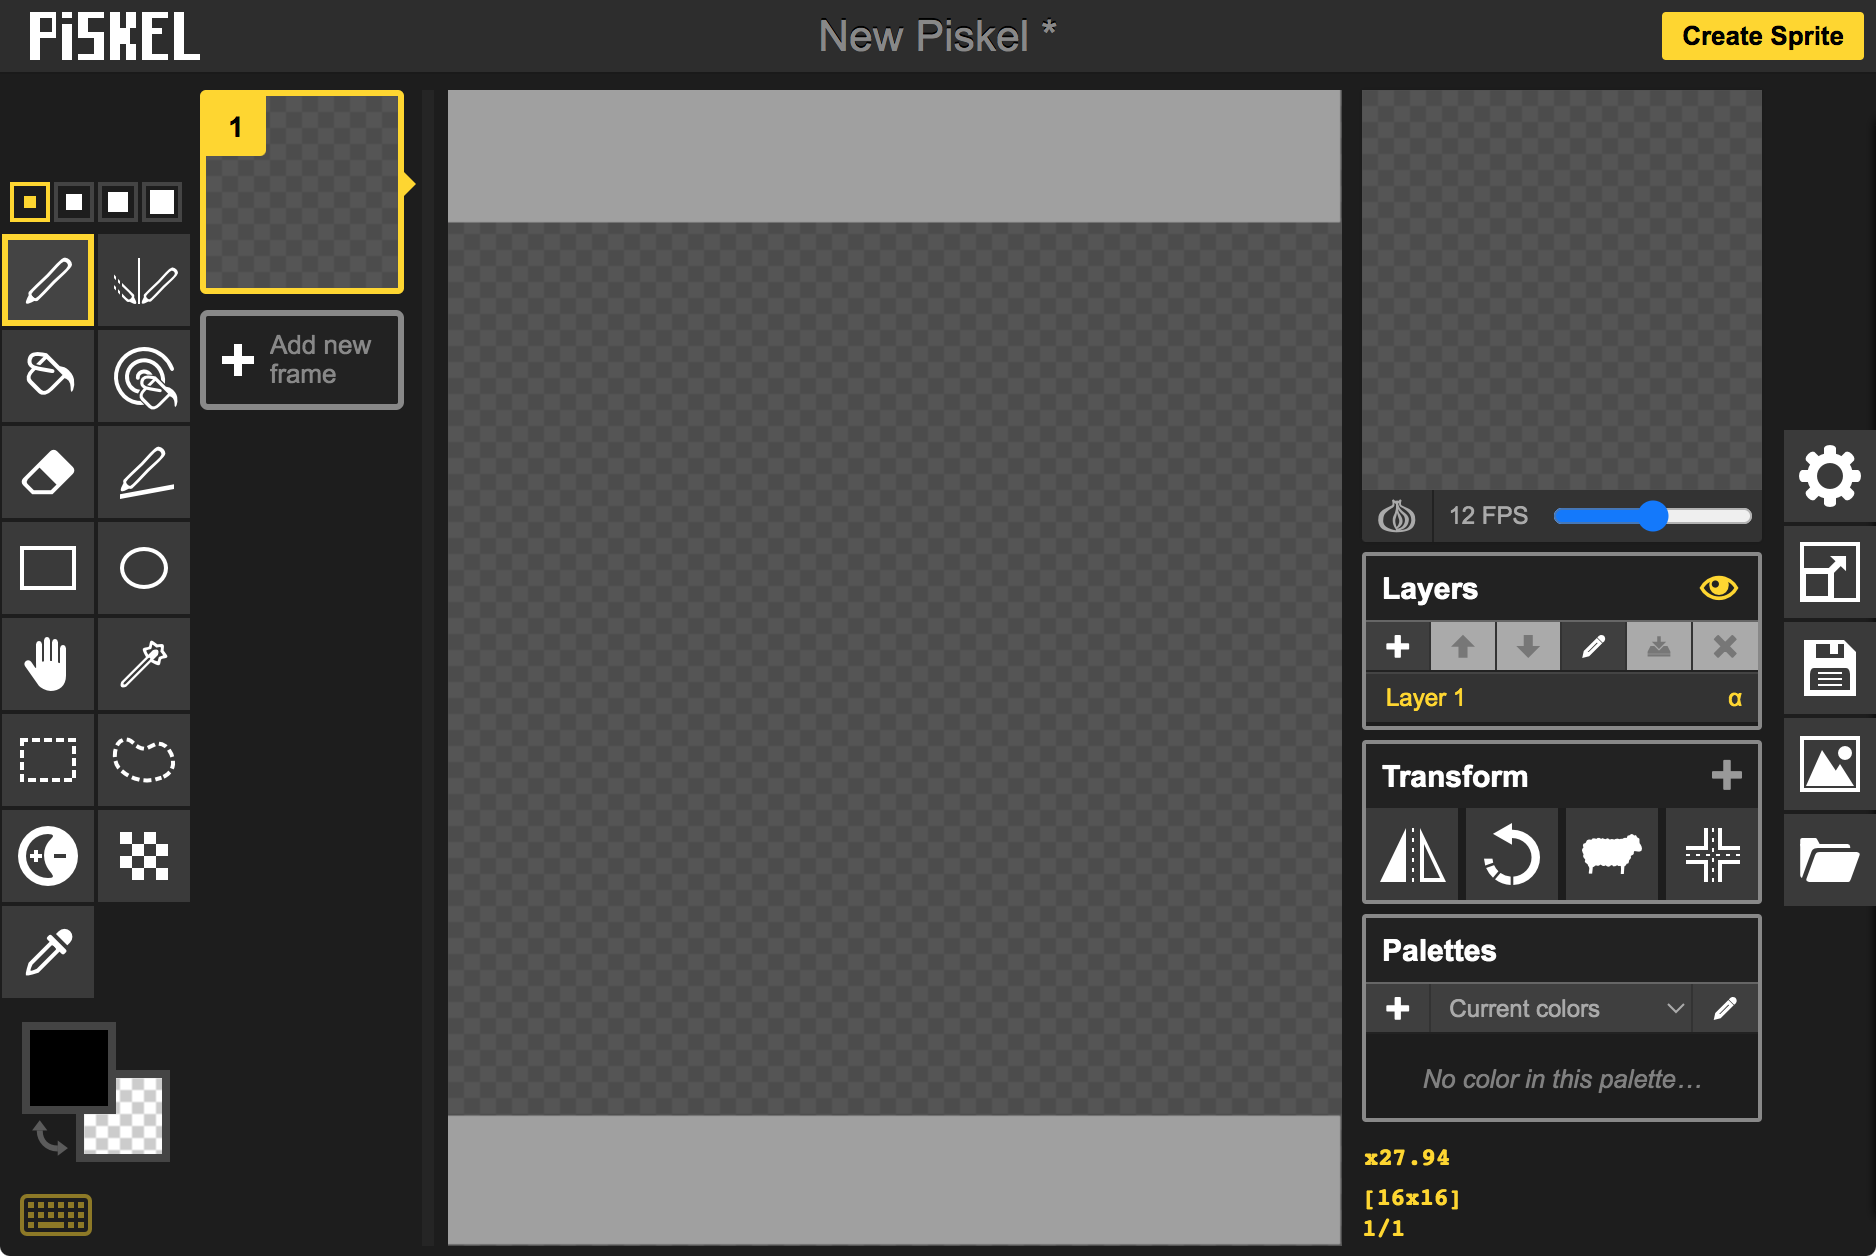
- Click on the Resize icon on the right-hand menu bar, and change the size to 16 x 16:
- Draw your maze using black (#000000) for the walls, and white (#ffffff) for the paths.
- Colour the starting position with a red pixel (#ff0000).
- Colour the goal with a green pixel (#00ff00).
Here's a sample maze I created:
- Click the Save icon on the right-hand menu bar, give the maze a name, and save it to your browser.
- Click the Export icon on the right-hand menu bar and click Download C file.
- Locate the C file in your download location, and open it in a text editor.
- Globally change every occurrence of 0xff000000 to 1.
- Globally change every occurrence of 0xffffffff to 0.
- Edit 0xff0000ff to 2 (the start), and 0xff00ff00 to 3 (the goal).
- Copy the 16 lines of data and paste them into the program, after the existing mazes.
- Update the value of TotalMazes at the start of the program to match the new total number of mazes.
That's it!
Compiling and uploading
Compile the program using Spence Konde's ATTiny Core [5]. Choose the ATtiny25/45/85 (No bootloader) option under the ATTinyCore heading on the Board menu. Then check that the subsequent options are set as follows (ignore any other options):
Chip: "ATtiny85"
Clock Source (Only set on bootload): "1 MHz (internal)"
millis()/micros(): "Disabled (saves flash)"
Connect to the board using an ISP programmer; I used Sparkfun's Tiny AVR Programmer Board; see ATtiny-Based Beginner's Kit. I programmed the ATtiny85 after I had soldered it onto the circuit board by piggy-backing an 8-pin IC socket on top of it, and then plugged in the wires from my Tiny AVR Programmer board. Alternatively you could program the ATtiny85 in the socket on the Tiny AVR Programmer board before soldering it in, or use an IC socket.
Set Programmer to USBtinyISP (ATTinyCore) SLOW (or whatever's appropriate for your programmer). Choose Burn Bootloader on the Tools menu to set the fuses appropriately. Then choose Upload on the Sketch menu to upload the program
Resources
Here's the whole Secret Maze 2 program: Secret Maze 2 Program.
Alternatively, get it on GitHub here together with the Eagle files for the PCB: Secret Maze on GitHub.
Or order a board from PCBWay here: Secret Maze 2.
Or order a board from OSH Park here: Secret Maze 2.
Acknowledgements
Thanks to Chris Jordan for several suggestions incorporated into this project.
- ^ TDK PS1240P02CT3 on Farnell.com.
- ^ Multicomp Pro ABT-402-RC on Farnell.com.
- ^ 180-Piece Ultimate Tactile Button Kit on The Pi Hut.
- ^ Clear Soft Caps for Tactile Buttons on The Pi Hut.
- ^ ATTinyCore on GitHub.
blog comments powered by Disqus
