Reading from a TFT Display
28th July 2022
This article describes an extension to my Tiny TFT Graphics Library to allow you to read pixels from the display:
A kaleidoscope effect created by reading part of an image from a TFT display
and redrawing it repeatedly.
It works with TFT displays available from AliExpress, and I've included four examples showing how you can do things that wouldn't be possible without the ability to read from the display.
Introduction
Being able to read pixels from the display allows you to do several things that wouldn't otherwise be possible:
- You can write programs that process the image on the display, such as a kaleidoscope program that converts an image to a symmetrical pattern.
- You can use an exclusive-OR drawing mode that changes the state of pixels reversibly. Drawing the same thing a second time restores the display to its previous state. This is especially important for dynamic data plotting.
- You can write games that perform collision detection by reading from the screen. For example, you could make a pinball game in which the ball bounces off whatever you have drawn on the screen.
- You can write a screen-dump program that reads the screen image and writes it as a BMP file to an SD card.
For examples of each of these applications see Examples below.
To implement these applications without the ability to read pixels from the display would require you to keep a mirror of the display in RAM, and update the mirror every time you draw to the actual display. This would slow down graphics and require a lot of memory: for example, to mirror a 320x240 colour display would require 153.6Kbytes of RAM. To put this in context, the ATtiny414 used to run these examples only has 256 bytes of RAM.
Compatibility
Unfortunately this feature does not work with Adafruit displays, which is why I didn't include it in my original Tiny TFT Graphics Library 2. It is, however, compatible with all displays based on the ST7735 and ST7789 driver chips available from vendors such as AliExpress and Banggood. Here's a list of displays I've tested:
| Manufacturer | Size | Width | Height | Voltage | Driver | Link |
| AliExpress | 1.44" | 128 | 128 | 3.3 - 5V | ST7735R | 1.44" 128x128 SPI TFT display * |
| AliExpress | 0.96" | 160 | 80 | 3.3V | ST7735 | TFT Display 0.96 inch 80x160 * |
| AliExpress | 1.8" | 160 | 128 | 3.3V | ST7735R | 1.8 inch TFT LCD Module 128x160 |
| AliExpress | 1.8" | 160 | 128 | 3.3V | ST7735R | 1.8" 128x160 SPI TFT display * |
| AliExpress | 1.14" | 240 | 135 | 3.3V | ST7789 | 1.14in SPI 240x135 RGB TFT display * |
| AliExpress | 1.54" | 240 | 240 | 3.3V | ST7789 | 1.54" TFT 240x240 LCD Display * |
| AliExpress | 1.9" | 320 | 170 | 3.3V | ST7789 | 1.9" 320x170 TFT LCD Display * |
| AliExpress | 1.47" | 320 | 172 | 3.3V | ST7789 | 1.47" 172x320 Round Rectangle TFT LCD Display * |
| AliExpress | 2.0" | 320 | 240 | 3.3V | ST7789V | 2.0" TFT 240x320 LCD Display |
* These displays have identical pin connections, and are compatible with my Universal TFT Display Backpack.
Note that these displays are all 3.3V only, so only power them from 3.3V.
What about Adafruit TFT displays?
Adafruit have a range of great TFT displays, in a wide selection of sizes and resolutions, but unfortunately they are not compatible with these routines to read from the display. The reason is that their displays all include a unidirectional on-board logic-level converter to allow them to be used with either 3.3V or 5V, but this has the downside of preventing them from being able to read back from the display memory.
The solution would be to replace the unidirectional logic-level converter on the MOSI connection to the display driver with a bidirectional one, which would require one N-MOSFET and two resistors. I originally planned to include details of how to modify an Adafruit display to implement this, but I've decided against this because the displays are fragile, and the risk of ending up with a non-functional display is too great.
Graphics library extensions
The graphics library incorporates the following extensions to support reading from the display:
Reading a pixel
The main routine for reading a pixel from the display is GetPoint():
uint16_t GetPoint (uint16_t x, uint16_t y) {
  uint32_t pixel = 0;
  PORT_TOGGLE(1<<cs);
  Command2(CASET, yoff+y, yoff+y);
  Command2(RASET, xoff+x, xoff+x);
  Command(RAMRD);
  PORTA.DIRCLR = 1<<mosi;                  // mosi input
  for (uint8_t i=0; i<18; i++) PORT_TOGGLE(1<<sck);
  for (uint8_t i=0; i<21; i++) {
    if (xsize <= 162) PORT_TOGGLE(1<<sck); // ST7735
    pixel = pixel<<1 | (PORTA.IN>>mosi & 1);
    if (xsize > 162) PORT_TOGGLE(1<<sck);  // ST7789
    PORT_TOGGLE(1<<sck);  //high
  }
  for (uint8_t i=0; i<6; i++) PORT_TOGGLE(1<<sck);
  PORTA.DIRSET = 1<<mosi;                  // mosi output
  PORT_TOGGLE(1<<cs);
  return ((pixel>>5) & 0xf800) | ((pixel>>2) & 0x7e0) | (pixel & 0x1f);
}
This first uses the display commands CASET and RASET to set the column range and row range to the current point. It then gives the RAM read command, RAMRD.
The sequence is then as follows:
- Define the mosi pin as an input.
- Toggle sck twice, to insert a dummy clock cycle (see datasheet).
- Toggle sck 16 times, to skip 8 bits.
- Shift the next 21 bits into the variable pixel.
- Toggle sck 6 times to skip the last 3 bits, as we don't need them for the 16-bit colour..
- Define the mosi pin as an output again.
The variable pixel now contains the top 21 bits of the 24-bit colour value. We convert this into a 16-bit colour, and return it, with the statement:
return ((pixel>>5) & 0xf800) | ((pixel>>2) & 0x7e0) | (pixel & 0x1f);
The sequence to shift the 21 bits into the variable pixel needs to be slightly different depending on whether the display uses the ST7735 or ST7789 driver chip. The two if statements determine this from the width of the display, and toggle the sck pin either before or after reading the mosi pin, as appropriate. It took a bit of experimentation to figure this out.
Exclusive-OR plotting
A global variable exor allows you to specify whether plotting should exclusive-OR the foreground colour with the display background.
The PlotPoint() routine is modified to take account of this:
void PlotPoint (int x, int y) {
  uint16_t pixel = 0;
  if (exor) pixel = GetPoint(x, y);
  PORT_TOGGLE(1<<cs);
  Command2(CASET, yoff+y, yoff+y);
  Command2(RASET, xoff+x, xoff+x);
  Command(RAMWR); Data((fore^pixel)>>8); Data((fore^pixel) & 0xff);
  PORT_TOGGLE(1<<cs);
}
Setting exor to true also gives exclusive-OR plotting with DrawTo(), DrawRect(), and DrawCircle().
If you don't need exclusive-OR plotting set exor to false, because plotting is faster without it.
The other routines in the library are identical to the Tiny TFT Graphics Library 2.
Examples
These examples included with the library demonstrate applications of reading back from the display memory. For convenience I've used my Universal TFT Display Backpack to run these examples, but that's not necessary.
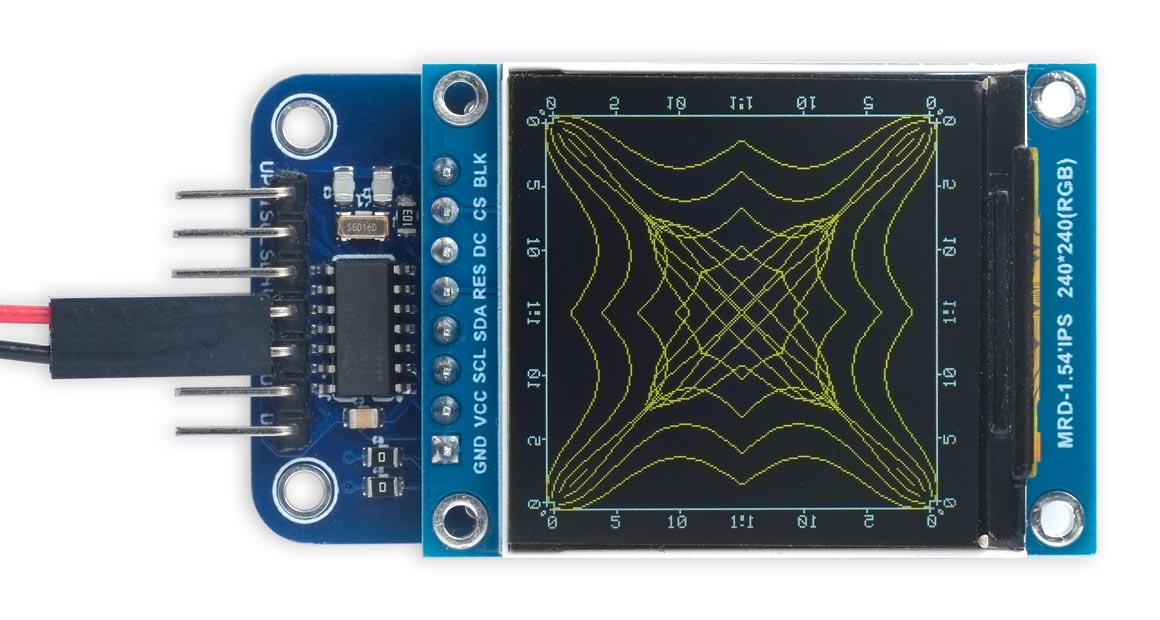
Kaleidoscope
This simple demo takes a triangular section of an existing image on the screen, and reflects it through horizontal, vertical, and diagonal lines to create a symmetrical image, like a kaleidoscope. It works best on square displays; here it is on a 240x240 1.54" display:
The kaleidoscope demo running on a 240x240 1.54" TFT display.
To run it first draw an image, and then run Kaleidoscope(). For this example the initial image is the Waterfall() demo, used for the title image in the article Tiny TFT Graphics Library 2:
void loop () {
  Waterfall();
  Kaleidoscope();
  for (;;);
}
The Kaleidoscope() program simply reads each point in the triangular segment, and then replots it in the eight reflected positions:
void Kaleidoscope () {
  exor = false;
  for (int x=0; x<ysize/2; x++) {
    for (int y=0; y<=x; y++) {
      fore = GetPoint(x,y);
      for (int i=x,m=0; m<2; i=ysize-x-1,m++) {
        for (int j=y,n=0; n<2; j=ysize-y-1,n++) {
          PlotPoint(i, j); PlotPoint(j, i);
        }
      }
    }
  }
}
Stopwatch
The stopwatch takes advantage of exclusive-OR plotting to draw and undraw the hand when it moves without corrupting the clock face. It is designed for a 128x128 display:
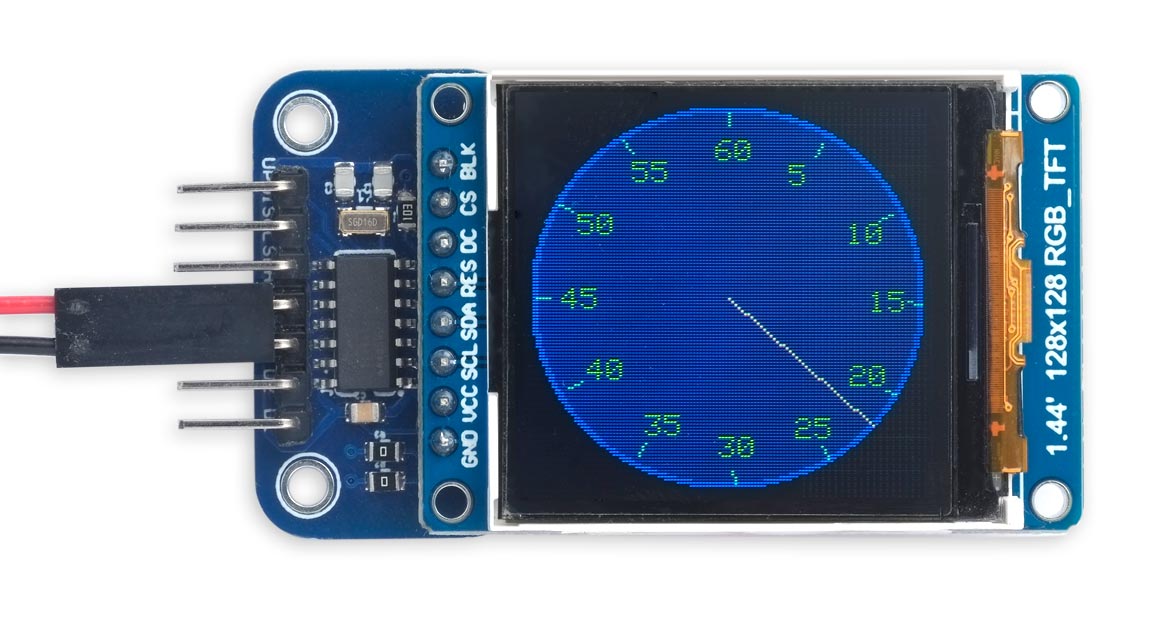
The stopwatch demo running on a 128x128 1.44" TFT display.
The DrawStopwatch() function draws the clock face, and then the TickStopwatch() function moves the hand:
void loop () {
  DrawStopwatch();
  for (;;) TickStopwatch();
}
Here's the program. It uses the Minsky circle algorithm to move the hand in 60 increments around the circle using just integer arithmetic:
const int top = 56;
const int bot = 535;

void DrawStopwatch () {
  const int x0 = 64, y0 = 64, radius = 60;
  fore = Colour(0, 0, 255); MoveTo(x0, y0); DrawCircle(radius+2);
  fore = Colour(0, 0, 128); MoveTo(x0, y0); FillCircle(radius);
  back = fore; fore = White;
  scale = 1; exor = true;
  int x = 0, y = radius*bot;
  for (int i=0; i<60; i++) {
    // Hours and hour marks
    if (i%5 == 0) {
      MoveTo(x0+(x/bot), y0+(y/bot));
      DrawTo(x0 + ((x/bot)*15/16), y0 + ((y/bot)*15/16));
      MoveTo(x0 + ((x/bot)*13/16) - 3*(1+(i==0)), y0 + ((y/bot)*13/16) - 4);
      if (i==0) PlotInt(60); else PlotInt(i);
    }
    x = x + y/bot*top; y = y - x/bot*top;
  }
}

void TickStopwatch () {
  const int x0 = 64, y0 = 64, radius = 60;
  static int x = 0, y = radius*bot;
  MoveTo(x0, y0); DrawTo(x0+(x/bot), y0+(y/bot));
  delay(y<-21400?100000:1000); // delay(1000); //
  MoveTo(x0, y0); DrawTo(x0+(x/bot), y0+(y/bot));
  x = x + y/bot*top; y = y - x/bot*top;
}
Bouncing ball
This demo animates a ball bouncing around on the display. It adjusts itself to the size of the display; here it is on a 160x128 display:
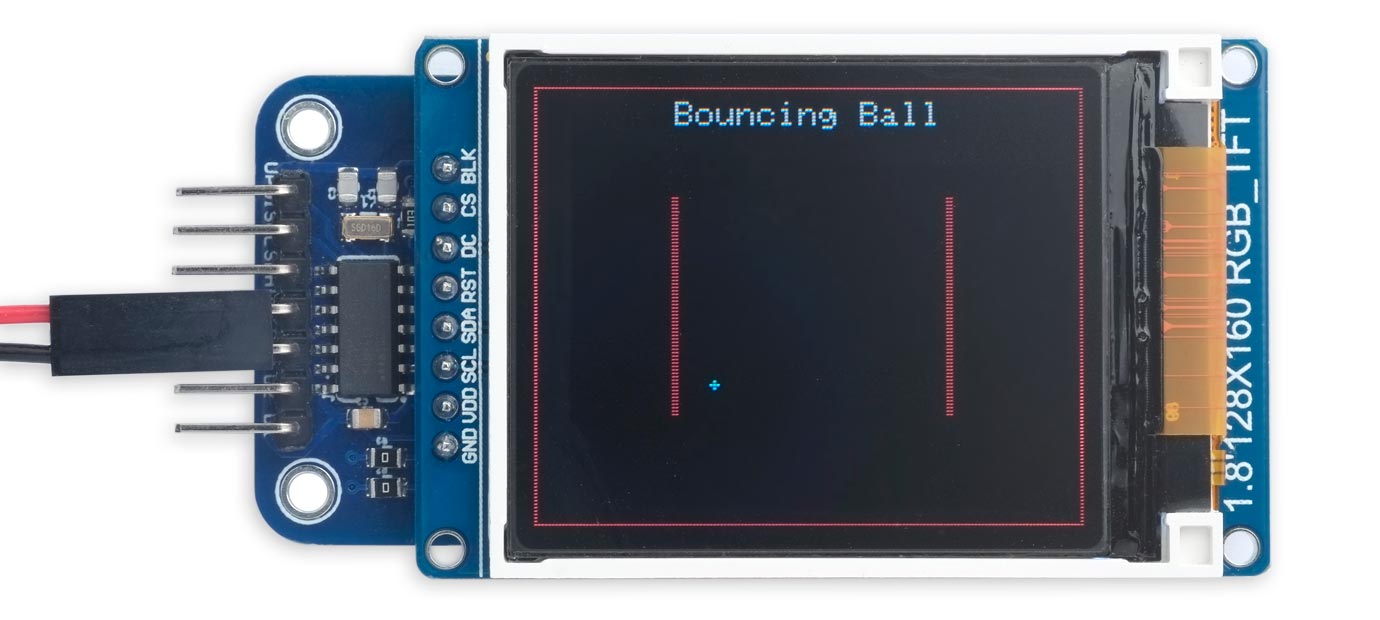
The bouncing ball demo running on a 160x128 1.8" TFT display.
and here it is running on an ATtiny85 with a 240x135 display:
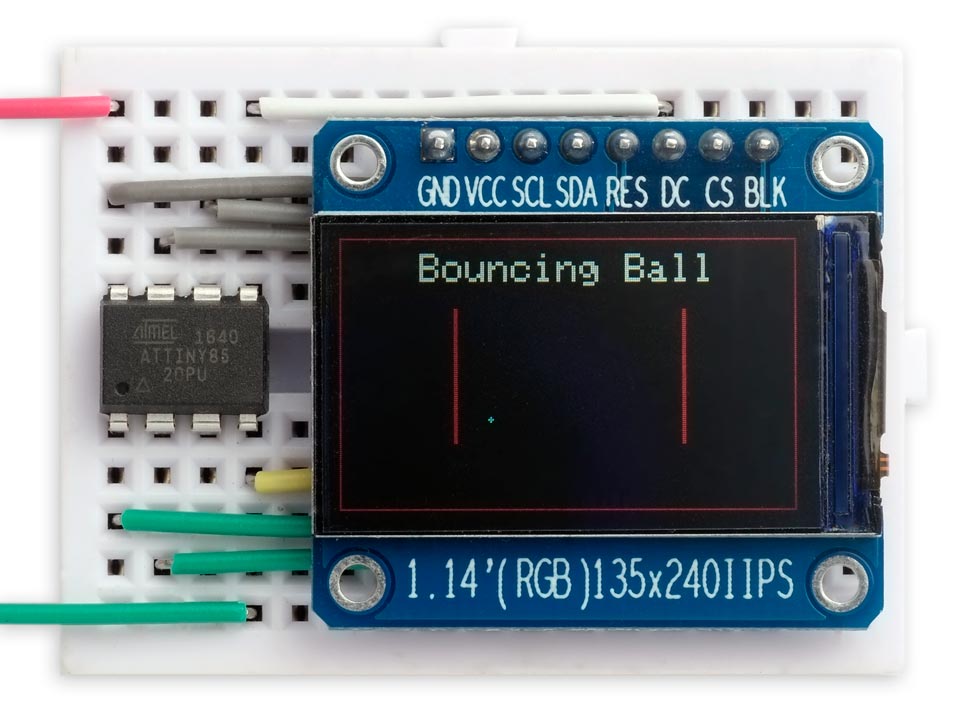
The bouncing ball demo running on an ATtiny85 with a 240x135 1.14" TFT display.
Run it as follows:
void loop () {
  BouncingBall();
  for (;;);
}
Anything drawn in red on the display is treated as a barrier, and the ball will bounce off it. Any other colours, such as the white text, are ignored and can be used to create an interesting background.
After initialising the display the program first draws the arena, consisting of an enclosing rectangle, and two vertical barriers:
void DrawBall (int x, int y) {
  PlotPoint(x, y); PlotPoint(x+1, y);
  PlotPoint(x-1, y); PlotPoint(x, y+1);
  PlotPoint(x, y-1);
}

void BouncingBall () {
  const uint16_t Barrier = Colour(255, 0, 0); // Red
  const uint16_t Ball = Colour(0, 255, 255);  // Cyan
  // Draw arena
  fore = Barrier;
  MoveTo(0, 0); DrawRect(xsize, ysize);
  MoveTo(xsize/4, ysize/4); FillRect(2, ysize/2);
  MoveTo(xsize*3/4, ysize/4); FillRect(2, ysize/2);
  fore = White;
  if (xsize>200) scale = 2;
  MoveTo((xsize-13*6*scale)/2, ysize-scale*12); PlotText(PSTR("Bouncing Ball"));
  scale = 1;
  int ballX = xsize/3, ballY = ysize/3, dirX = -1, dirY = -1;
  exor = true; fore = Ball;
  DrawBall(ballX, ballY);
  for (;;) {
    DrawBall(ballX, ballY);
    // Move ball
    ballX = ballX + dirX; ballY = ballY + dirY;
    DrawBall(ballX, ballY);
    // Check if collision
    if (GetPoint(ballX + (dirX*2), ballY) == Barrier) dirX = -dirX;
    if (GetPoint(ballX, ballY + (dirY*2)) == Barrier) dirY = -dirY;
    delay(10);
    for(;;);
  }
}
It then repeats the following sequence:
- Call DrawBall() to undraw the previous position of the ball.
- Update the ball's position, ballX, ballY, with the direction it's currently moving in, dirX, dirY.
- Call DrawBall() again to draw the new position of the ball.
- Check the points in the direction that the ball is moving to see if it is touching a barrier, and if so, reverse that direction.
It's based on the demo for my earlier article Reading the PyBadge Display.
Saving a screenshot
The final demo draws the BarChart() demo, and it then calls BMPSave() to save it to a BMP-format image file on an SD card. Here's the BarChart() demo running on a 320x170 display:
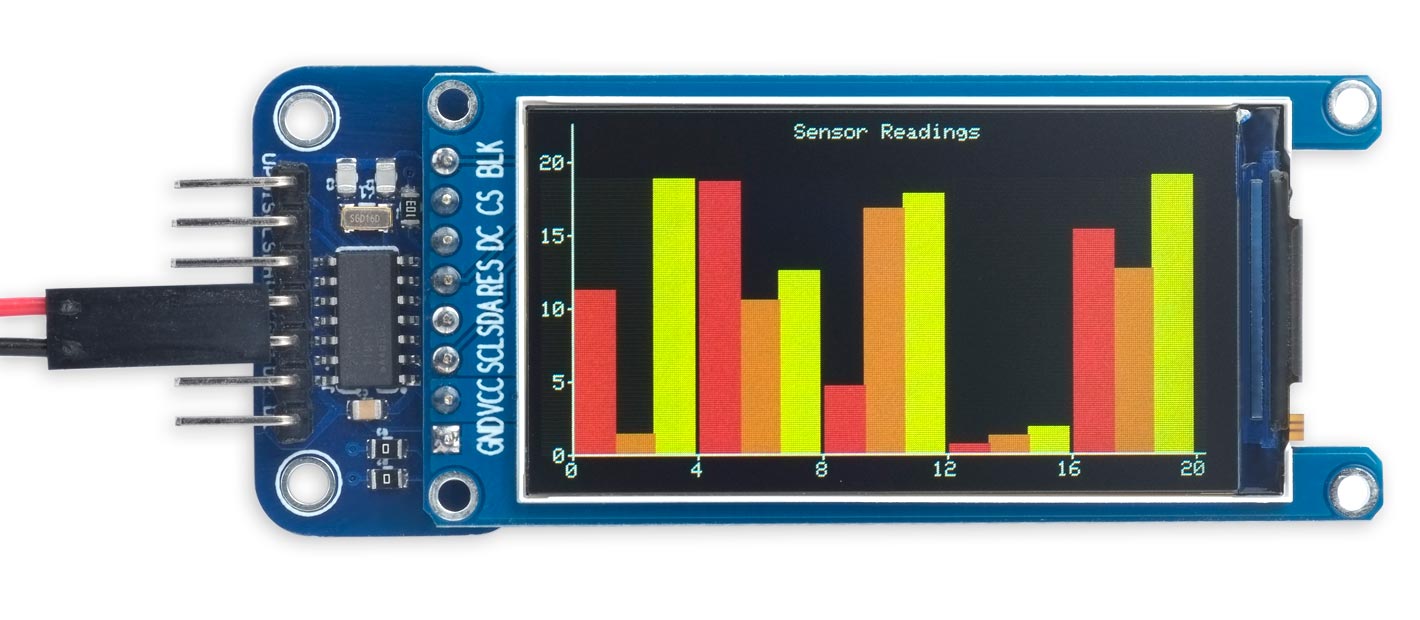
The barchart demo running on a 320x170 1.9" TFT display.
To save a screenshot plot the image you want to save, and then call BMPSave() with the filename you want to use:
void loop () {
  BarChart();
  BMPSave("PIC.BMP");
  for (;;);
}
Here's the resulting BMP file:
The BMP file saved from the above screen image
The BMPSave() program calls GetPoint() for every point on the display and writes out the 16-bit colour value to the file with an appropriate header:
void BMPSave (char *filename) {
  uint16_t width = xsize, height = ysize;
  // Filename
  TinyI2C.start(I2CSDaddress, 0);
  TinyI2C.write('F');
  for (int p=0; filename[p]; p++) TinyI2C.write(filename[p]);
  TinyI2C.restart(I2CSDaddress, 0);
  TinyI2C.write('W');
  //
  // File header: 14 bytes
  TinyI2C.write('B'); TinyI2C.write('M');
  writeFour(14+40+width*height*2);    // File size in bytes
  writeFour(0);
  writeFour(14+40);                   // Offset to image data from start
  //
  // Image header: 40 bytes
  writeFour(40);                      // Header size
  writeFour(width);                   // Image width
  writeFour(height);                  // Image height
  writeTwo(1);                        // Planes
  writeTwo(16);                       // Bits per pixel
  writeFour(0);                       // Compression (none)
  writeFour(0);                       // Image size (0 for uncompressed)
  writeFour(0);                       // Preferred X resolution (ignore)
  writeFour(0);                       // Preferred Y resolution (ignore)
  writeFour(0);                       // Colour map entries (ignore)
  writeFour(0);                       // Important colours (ignore)
  //
  // Image data: width * height * 2 bytes
  for (int y=0; y<height; y++) {
    for (int x=0; x<width; x++) {
      uint16_t rgb = GetPoint(x,y);
      writeTwo((rgb & 0xFFC0)>>1 | (rgb & 0x1F)); // Convert to 555 format
    }
  }
  TinyI2C.stop();
}
I wrote the data via I2C to my I2C SD-Card Module PCB, using the TinyI2C library; see Tiny I2C Routines for all AVR Microcontrollers.
Resources
Here is the version of the Tiny TFT Graphics Library with the extensions for reading from the display, and the demos described above (excluding BMPSave()): Tiny TFT Graphics Library with Read.
And here's the version with BMPSave() included: Tiny TFT Graphics Library with BMPSave.
Updates
7th August 2022: I've updated the library to add support for the classic ATtiny processors, such as the ATtiny85; the previous version only worked on the new 0-series, 1-series, and 2-series ATtiny processors, such as the ATtiny402. I've also added a photograph of a demo running on the ATtiny85.
I've moved the BMPSave() demo to a separate file so the main file doesn't reference the TinyI2C Library, which is only needed for this demo.
26th October 2022: Added support for the AliExpress 1.47" 320x172 Round Rectangle display.
blog comments powered by Disqus