One Input 20-key Keypad Interface
6th July 2018
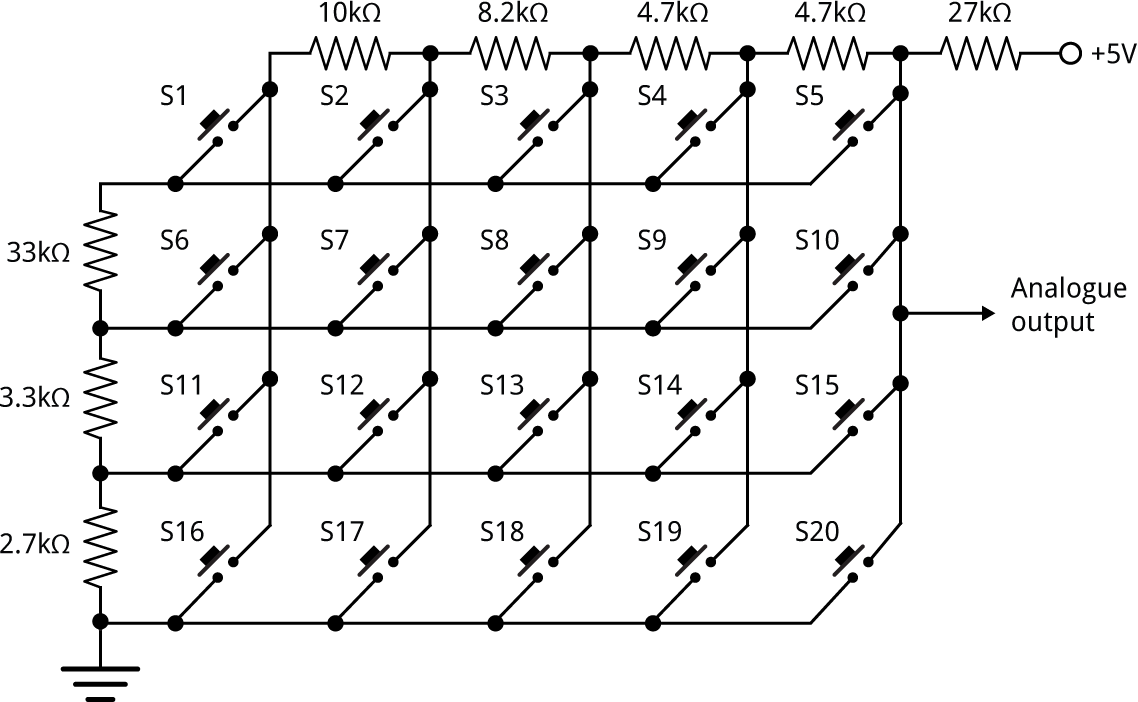
This article shows how to interface a 5 x 4 matrix of 20 keys to a single analogue input on a processor such as the ATmega328 or ATtiny85.
This saves several I/O lines, as a multiplexed 5 x 4 keypad will usually require nine I/O lines. It's also easier to wire up, and the interface program is significantly simpler.
For an example of a project using this circuit see Tiny Machine-Code Monitor.
Introduction
For another project I'm working on I needed a matrix of 16 hexadecimal keys plus four control keys, or 20 keys in total. I decided to try the same approach as my earlier article One Input Keypad Interface, where I gave circuits for a matrix of 12 or 16 keys.
As before, I used a program (written in Lisp) [1] to search for a set of standard resistor values that would give 20 distinct voltages at the analogue input, and chose the one with the largest minimum spacing between values, to make the design as tolerant of variations in the resistor values as possible.
The circuit
Here's the circuit of the keypad interface:
The program
Here's the routine ReadKeypad() to interface to the keypad matrix. It should be suitable for any processor with an analogue input; change the variable Matrix to the input you want to use.
The program uses two arrays:
- AnalogVals[] stores the analogue values given by each pin, in descending order;
- Buttons[] stores the corresponding button for each voltage.
The routine reads the analogue input, and then checks the value against each value in AnalogVals[] until it's larger; it then returns the corresponding button from Buttons[]. To avoid key bounce a do … while loop checks for three equal analogue voltages before returning with a key:
// Matrix keypad *******************************************************

const int Matrix = A2;
const int SmallestGap = 24;
int AnalogVals[] = {1023, 728, 693, 657, 632, 605, 567, 541, 517, 477, 439,
                    404,  371, 316, 290, 264, 220, 186, 151, 93,  0,   -100};
int Buttons[] =    {-1,   1,   2,   3,   10,  17,  4,   7,   14,  5,   8,
                    0,    6,   9,   11,  15,  12,  18,  13,  19,  20};

// Returns the keypad character or -1 if no button pressed
int ReadKeypad() {
  int val, lastval=0, count = 0;
  do {
    val = analogRead(Matrix);
    if (abs(val-lastval)<2) count++;
    else { lastval = val; count = 0; }
  } while (count < 3);
  int i = 0;
  val = val - SmallestGap/2;
  while (val < AnalogVals[i]) { i++; }
  return Buttons[i - 1];
}
The routine ReadKeypad() returns with a value of -1 is no key is being pressed. You could test the routine on an Arduino Uno with the following program:
void loop() {
  int key;
  // Wait for key
  do { key = ReadKeypad(); } while (key == -1);

  Serial.println(key);

  // Wait for key released
  do { key = ReadKeypad(); } while (key != -1);
}
Further suggestions
The pushbutton S20 is connected directly to GND, with the 27kΩ pullup resistor to Vcc, so you can use this in a project to wake the processor up from sleep. Before putting the processor to sleep define a pin change interrupt on the input connected to the keypad; pressing S20 will then cause an interrupt and wake the processor from sleep.
Update
12th July 2018: I've slightly improved the routine to decode the keypad matrix to make it more tolerant of voltage variations.
- ^ Calculating a resistor network on Lispology.
blog comments powered by Disqus