Tiny TFT Graphics Library 2
6th May 2022
This is a small graphics library, specifically aimed at ATtiny microcontrollers, for the variety of small colour TFT displays available at low cost from suppliers like Adafruit, AliExpress, or Banggood:

Tiny TFT Graphics Library running on an ATtiny85 and
driving an Adafruit 2.0" 320x240 colour TFT display.
It's an updated version of my Tiny TFT Graphics Library. This latest version of the library supports both the classic ATtiny processors, such as the ATtiny85, and the new 0-series, 1-series, and 2-series ATtiny processors, such as the ATtiny402. Like the original library it allows you to plot points, draw lines, draw filled rectangles, and plot characters and text with an optional scale factor, in 16-bit colour.
This version adds the ability to plot outline rectanges, and outline and filled circles. I've included demo curve-plotting and histogram-plotting programs that adjust to fit any display.
Introduction
This library supports TFT displays that use an SPI interface and require four pins to drive the display. This leaves one pin free on an 8-pin chip such as the ATtiny85 or ATtiny402. If you need more pins choose a larger chip, such as the ATtiny84 or ATtiny404.
Unlike my Compact TFT Graphics Library which uses standard Arduino SPI calls, this library uses direct I/O pin manipulations. This means that you can use any assignment of pins to the four I/O lines needed by the display, and makes it about twice as fast as one using SPI calls. I've also added support for some additional displays, so it now supports 16 different TFT displays.
How it works
On the classic ATtiny processors, such as the ATtiny85, the library uses the feature that you can toggle one or more bits in a port by writing to the PINB register; for example, to enable or disable the chip-select signal:
PINB = 1<<cs;
So provided you set all the pins to their disabled state at startup, the display routines can simply toggle the appropriate pins to enable or disable them.
On the new ATtiny 0-series and 1-series processors the equivalent OUTTGL register is used; for example:
PORTA.OUTTGL = 1<<cs;
The differences between each family of processors are handled by constants to define the pin assignments, and preprocessor macros to define the bit manipulations. If you use the circuits given below you won't need to change anything, apart from specifying which display you're using.
The ClearDisplay() routine has been optimised further by realising that we don't need to keep setting the mosi bit, since to clear the display it is always zero, so the routine only needs to toggle the sck bit the appropriate number of times. I'm grateful to Thomas Scherer for suggesting this.
Performance
The following table shows the difference in performance on a 240x240 TFT display with a 20MHz ATtiny402:
| Compact TFT Graphics Library | Tiny TFT Graphics Library | |
| ClearDisplay() | 856 ms | 279 ms |
| FillRect(240, 240) | 1142 ms | 737 ms |
| TestChart() | 210 ms | 61 ms |
| BarChart() | 1306 ms | 728 ms |
The library occupies less than 4K bytes, including the character set and demo programs, and so will fit on microcontrollers with 4K flash such as the ATtiny45 and ATtiny402.
Supported displays
This library will work with displays based on the ST7735 which supports a maximum display size of 162x132, or the ST7789 and ILI9340/1 which support a maximum display size of 320x240. It includes parameters for the following colour TFT displays:
| Manufacturer | Size | Width | Height | Voltage | Driver | Link |
| Adafruit | 1.44" | 128 | 128 | 3.3 - 5V | ST7735R | Adafruit 1.44" Color TFT LCD Display * |
| AliExpress | 1.44" | 128 | 128 | 3.3 - 5V | ST7735R | 1.44" 128x128 SPI TFT display † |
| Adafruit | 0.96" | 160 | 80 | 3.3 - 5V | ST7735 | Adafruit 0.96" 160x80 Color TFT Display * |
| AliExpress | 0.96" | 160 | 80 | 3.3V | ST7735 | TFT Display 0.96 inch 80x160 † |
| Adafruit | 1.8" | 160 | 128 | 3.3 - 5V | ST7735R | Adafruit 1.8" Color TFT LCD display |
| AliExpress | 1.8" | 160 | 128 | 3.3V | ST7735R | 1.8 inch TFT LCD Module 128x160 |
| AliExpress | 1.8" | 160 | 128 | 3.3V | ST7735R | 1.8" 128x160 SPI TFT display † |
| Adafruit | 1.14" | 240 | 135 | 3.3 - 5V | ST7789 | Adafruit 1.14" 240x135 Color TFT Display * |
| AliExpress | 1.14" | 240 | 135 | 3.3V | ST7789 | 1.14in SPI 240x135 RGB TFT display † |
| Adafruit | 1.3" | 240 | 240 | 3.3 - 5V | ST7789 | Adafruit 1.3" 240x240 Wide Angle TFT LCD Display * |
| Adafruit | 1.54" | 240 | 240 | 3.3 - 5V | ST7789 | Adafruit 1.54" 240x240 TFT LCD Display * |
| AliExpress | 1.54" | 240 | 240 | 3.3V | ST7789 | 1.54" 240x240 TFT LCD Display † |
| Adafruit | 1.9" | 320 | 170 | 3.3 - 5V | ST7789 | Adafruit 1.9" 320x170 Color IPS TFT Display * |
| AliExpress | 1.9" | 320 | 170 | 3.3V | ST7789 | 1.9" 320x170 TFT LCD Display † |
| Adafruit | 1.47" | 320 | 172 | 3.3 - 5V | ST7789 | Adafruit 1.47" 320x172 Round Rectangle TFT Display * |
| AliExpress | 1.47" | 320 | 172 | 3.3V | ST7789 | 1.47" 172x320 Round Rectangle TFT LCD Display † |
| Adafruit | 2.0" | 320 | 240 | 3.3 - 5V | ST7789 | Adafruit 2.0" 320x240 Color TFT Display * |
| AliExpress | 2.0" | 320 | 240 | 3.3V | ST7789V | 2.0" TFT 240x320 LCD Display |
| Adafruit | 2.2" | 320 | 240 | 3.3 - 5V | ILI9340C | Adafruit 2.2" 320x240 Color TFT Display |
| AliExpress | 2.4" | 320 | 240 | 3.3V | ILI9341 | 2.4" 320x240 TFT Display Module † |
* These Adafruit displays conveniently all have the same edge-connector layout, so you can make a prototyping board or PCB that will take any of them, such as my Universal TFT Display Backpack.
† Likewise, these AliExpress displays have the same edge-connector layout, and are also compatible with my Universal TFT Display Backpack.
Some of the AliExpress displays include a LDO 3.3V regulator, but not logic-level translation, so I recommend only interfacing them to a processor running from 3.3V.
The Adafruit displays all include an LDO 3.3V regulator and logic-level translation, so can be safely interfaced to processors powered from either 5V or 3.3V.
On the AliExpress red 160x128 display you need to connect the backlight pin to Vcc to turn it on. This doesn't seem to be necessary with the other displays.
The library allows you to choose the orientation of the display image, to cater for different mounting choices.
The library will probably support other TFT displays that use the same ST7735, ST7789, ILI9340/1 driver chips, but you may need to experiment with the parameters to get the image scaled and centered correctly.
Connecting the display
To use the graphics library you need to connect up the display correctly, and then select the correct parameters for the display you are using.
The display needs to be connected to the microcontroller via four I/O lines: MOSI, SCK, CS, and DC. You can use any pins for these, but they should all be in the same port. You need to specify the port pin numbers of the pins you are using at the start of the Tiny TFT Graphics Library listing.
Note that on different display boards the pins are labelled in a variety of ways:
| Pin | Labelled |
| Vcc | Vin |
| Ground | GND |
| Clock | SCK, SCL |
| Data In | MOSI, SI, SDA |
| Chip Select | CS, TCS |
| Data/Command | DC, D/C, A0 |
| Backlight | LITE, LIT, BLK |
Don't be confused by pins labelled SCL and SDA on some displays; these are all definitely SPI displays!
ATtiny85/45
By default, the Tiny TFT Graphics Library specifies these pins in PORT B for an ATtiny85/45:
int const dc = 0;
int const mosi = 1;
int const sck = 2;
int const cs = 3;
Here's the corresponding circuit diagram, showing an AliExpress display:
Circuit of the TFT colour graphics display interface using an ATtiny85.
The 33kΩ pullup resistor from the display's CS pin is optional; it is only needed on the AliExpress displays, and holds the chip select high to prevent the display from flickering while programming the ATtiny85.
You can omit the 10kΩ pullup if you're using an Adafruit display, as these include a pullup on the board.
ATtiny402/412
By default, the Tiny TFT Graphics Library specifies these pins in PORT A for an ATtiny402/412:
int const dc = 7;
int const mosi = 1;
int const sck = 3;
int const cs = 6;
Here's the corresponding circuit diagram, showing an AliExpress display:
Circuit of the TFT colour graphics display interface using an ATtiny402.
You can omit the 10kΩ pullup if you're using an Adafruit display, as these include a pullup on the board.
Here's an example of this circuit with an Adafruit 320x240 2.2" TFT display:
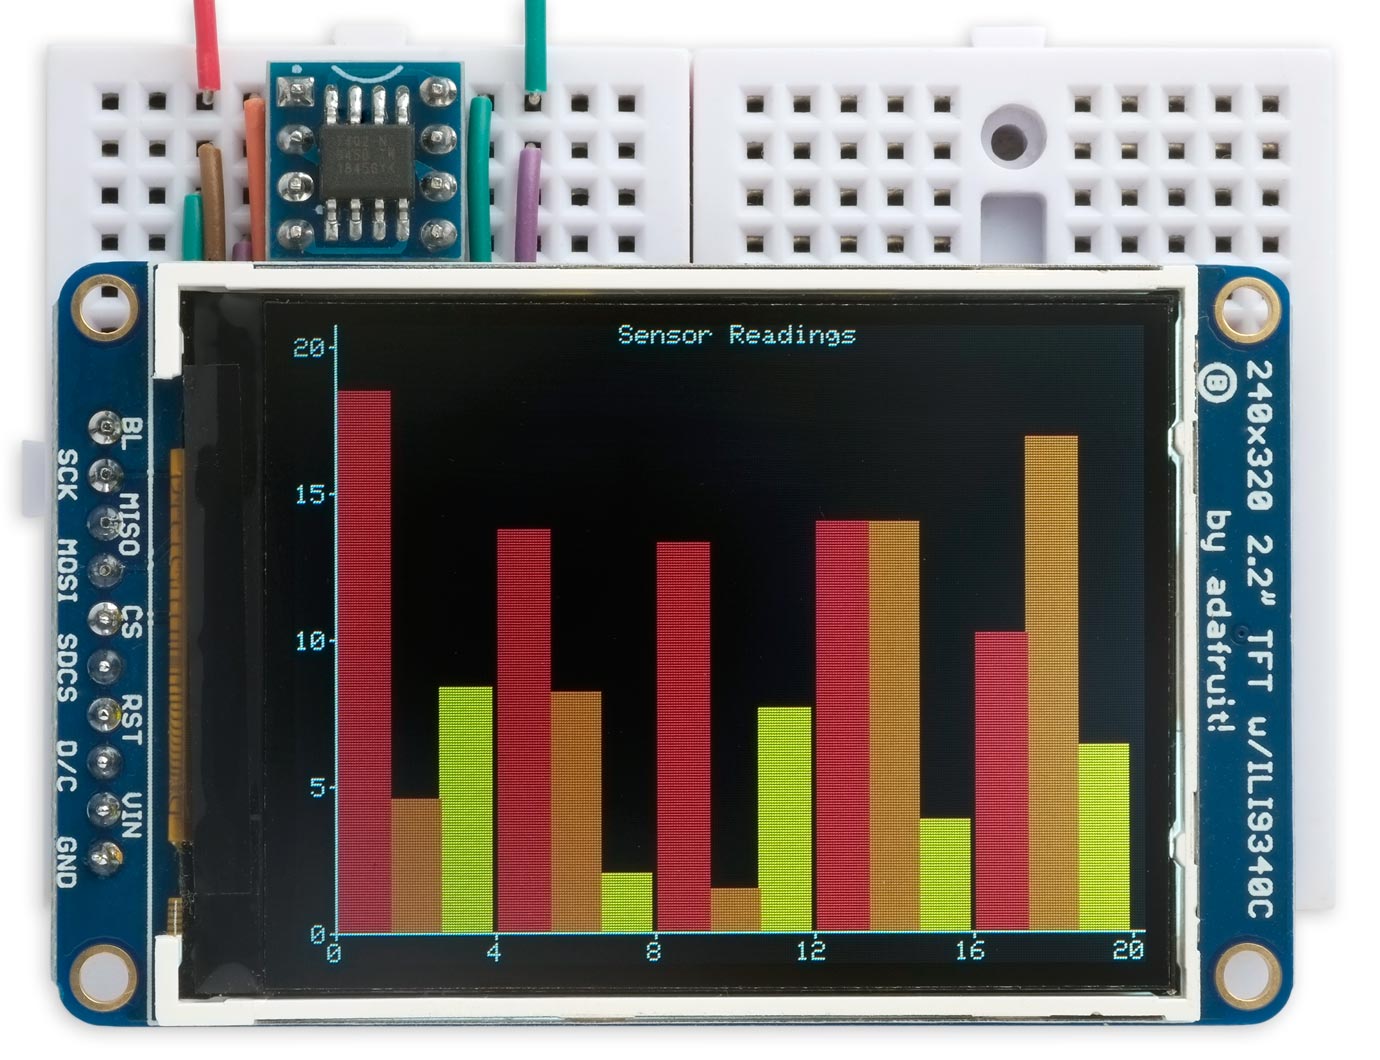
Tiny TFT Graphics Library running on an ATtiny402 and
driving an Adafruit 2.2" 320x240 colour TFT display.
Specifying the display
The different displays are catered for by seven constants which specify the size of the display, the offsets relative to the area supported by the display driver, whether the display is inverted, the rotation value, and the order of the colours; for example:
// Adafruit 1.44" 128x128 display
int const xsize=128, ysize=128, xoff=2, yoff=1, invert=0, rotate=3, bgr=1;
Uncomment the parameters for the display you're using.
By default the parameters give the correct orientation assuming you're using the display with the header pins along the top, except in the case of the larger displays which have the header pins along the shorter edge, in which case the header pins are assumed to be on the left.
However, you can choose to have the display in any orientation, specified by the value of the constant rotate:
Test Chart test pattern.
Note that on some displays you may also have to change the xoff or yoff value when rotating the display.
To check or adjust the values for each display you can run the TestChart() program, which draws a one-pixel border around the display area, and plots a red "F" to show the orientation:
void TestChart () {
  DrawRect(xsize, ysize);
  scale = 8;
  fore = Colour(255, 0, 0);
  MoveTo((xsize-40)/2, (ysize-64)/2); PlotChar('F');
  scale = 1;
}
For example:
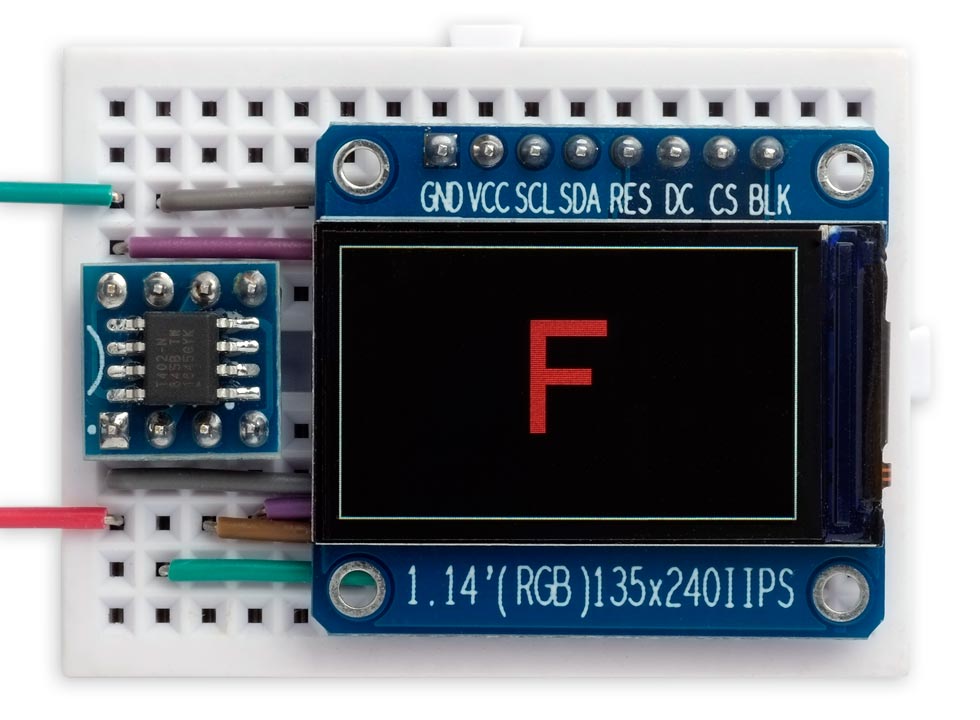
Test Chart displayed on an AliExpress 1.14" 240x135 colour TFT display.
If the 'F' is blue you need to change the value of bgr.
The library will probably support other TFT displays that use the same driver chips, but you may need to experiment with the parameters to get the image scaled and centered correctly.
Graphics commands
Here is a summary of the graphics commands provided by this library:
Colour
The library uses a 16-bit colour mode, which assigns 5 bits to red, 6 bits to green, and 5 bits blue.
Colour() lets you create a colour value by specifying its red, green, and blue components as numbers from 0 to 255:
unsigned int Colour (int r, int g, int b)
Foreground and background
The foreground and background colours are defined by the two global variables fore and back. Initially these are set to White (0xFFFF) and Black (0) respectively:
int fore = White;
int back = Black;
Clearing the display
ClearDisplay() clears the display to black:
void ClearDisplay ()
Plotting points and drawing lines
The library includes basic graphics routines for plotting points and drawing lines. These work on a conventional coordinate system with the origin at lower left. For example, on the 80x160 display:
The current drawing position is stored in the global variables xpos and ypos. You can change this with MoveTo():
void MoveTo (int x, int y)
PlotPoint() plots a single point in the current foreground colour:
void PlotPoint (int x, int y)
DrawTo() draws a line in the foreground colour from the current drawing position to x,y, and updates the drawing position to this:
void DrawTo (int x, int y)
Drawing rectangles
DrawRect() draws an outline rectangle and FillRect() draws a filled rectangle in the foreground colour with width w and height h, and the bottom left corner at the current drawing position:
void DrawRect (int w, int h)
void FillRect (int w, int h)
The drawing position doesn't change.
Drawing circles
DrawCircle() draws an outline circle and FillCircle() draws a filled circle in the foreground colour with radius radius, and the centre at the current drawing position:
void DrawCircle (int radius)
void FillCircle (int radius)
The drawing position doesn't change.
Characters and text
The library includes a character set based on a 5x7 dot matrix.
PlotChar() plots a specified character at the current plot position, and in the current foreground colour:
void PlotChar (char c)
You can plot larger characters by setting the global variable scale, default value 1. After plotting a character PlotChar() moves the drawing position to the start of the next character to make it easy to plot several characters in a row without needing to call MoveTo().
PlotText() plots text from a constant string in program memory:
void PlotText (PGM_P p)
For example:
PlotText(PSTR("Temperature"));
PlotChars() plots text from a char array:
void PlotChars (char *s)
For example, to display a floating-point value:
float Sensorval = 5.23;
char buff[10];
dtostrf(sensorVal, 4, 2, buff);
PlotChars(buff);
PlotInt() plots an integer:
void PlotInt (int i)
Compiling the graphics library
ATtiny85/45
Compile the program using Spence Konde's ATTiny Core [1]. Choose the ATtiny25/45/85 (No bootloader) option under the ATTinyCore heading on the Board menu. Then check that the subsequent options are set as follows (ignore any other options):
Chip: "ATtiny85"
Clock Source: "8 MHz (internal)"
By default the ATtiny85 runs at 1MHz. Choose Burn Bootloader to set the fuses for 8MHz operation, or your graphics will run rather slowly, then upload the program using an ISP (in-system programming) programmer such as Sparkfun's Tiny AVR Programmer Board [2].
ATtiny402/412
Compile the program using Spence Konde's megaTinyCore [3]. Choose the ATtiny412/402/212/202 option under the megaTinyCore heading on the Board menu. Check that the subsequent options are set as follows (ignore any other options):
Chip: "ATtiny402" (or as appropriate)
Clock: "20 MHz internal"
Then upload the program using a UPDI programmer. The recommended option is to use a USB to Serial board, such as the SparkFun FTDI Basic board [4], connected with a 4.7kΩ resistor as follows:
Set the Programmer option to "SerialUPDI with 4.7k resistor or diode (230400 baud)".
Resources
Here's the Tiny TFT Graphics Library with the demos: Tiny TFT Graphics Library 2 Program.
Or get it from GitHub here: https://github.com/technoblogy/tiny-tft-graphics-library.
Updates
7th May 2022: Fixed a bug in DrawRect().
11th May 2022: Minor fixes to the display parameters.
11th July 2022: Added an AliExpress 2.0" 320x240 display.
26th October 2022: Added support for the 1.47" 320x172 Round Rectangle displays available from Adafruit or AliExpress.
14th January 2024: By popular request added a function PlotText() to plot text from a char array.
- ^ ATTinyCore on GitHub.
- ^ Tiny AVR Programmer on SparkFun.
- ^ megaTinyCore on GitHub.
- ^ SparkFun FTDI Basic Breakout - 5V on Sparkfun.
blog comments powered by Disqus