Simple Sprite Routines for the PyGamer/PyBadge
1st May 2020
This article describes three routines designed to make it easy to write games in C that use sprites on the Adafruit PyBadge and PyGamer boards. They allow you to plot erasable sprites, check sprites for collision, and move sprites on the screen while avoiding flicker.
These routines allow you to write simple games in just a few lines of C, so they're ideal for beginners to learn programming. To demonstrate I've included a simple rolling ball maze game, in which you roll a ball through a maze by tilting the PyBadge/PyGamer, taking advantage of the board's accelerometer:
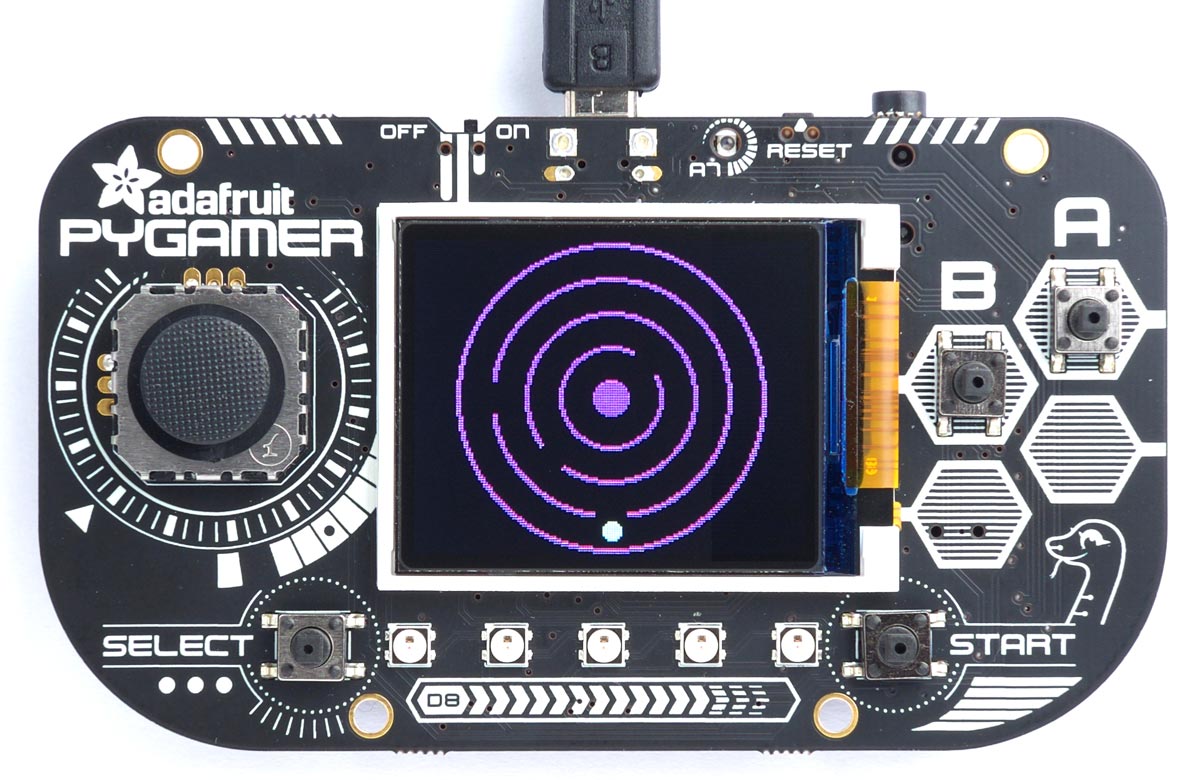
Rolling ball maze game on an Adafruit PyGamer,
uses these routines to move a sprite and do collision detection.
Introduction
Adafruit sell three hand-held game boards: the PyGamer [1] (also available from Mouser in the UK [2]), the PyBadge [3], and the lower-cost PyBadge LC [4] (also available from Pimoroni in the UK [5]). They each incorporate a 1.8" 160x128 colour TFT display, and are an excellent starting point for writing games. Adafruit provide interface libraries for the TFT displays, and their GFX library [6] provides a wide range of graphics functions to allow you to plot points, draw lines, plot open or filled rectangles, circles, ovals, or triangles.
I presented a couple of useful routines in my previous article Reading the PyBadge Display. These supplemented Adafruit's GFX library, adding a getPixel routine that reads the colour value of a point on the display, and an xorPixel routine that plots a point using exclusive-OR plotting.
This article adds three further routines: xorSprite, that plots an 8 x 8 sprite using exclusive-OR plotting, hitSprite that checks whether a sprite has hit a pixel of specified colour on the display, and moveSprite that moves a sprite in a specified direction, avoiding flicker by plotting only the pixels that have changed.
Together these routines let you write simple games based on graphics drawn on the screen, without needing any work behind the scenes. As an example I've provided a ball-maze program in which you have to navigate a ball to the centre of a maze by tilting the PyGamer or PyBadge, using the built-in accelerometer to detect the tilt. The maze is defined simply by drawing it on the screen, so to change it all you have to do is draw a different maze.
I've tested these routines with the Adafruit PyBadge and PyGamer. It should also be possible to adapt them to work with any TFT display based on the ST7735 display controller; you will need to specify the pins used for the TFT display signals CS, DC, MOSI, SCLK, and RST.
Here's a description of the three new routines:
xorSprite()
Plots an 8x8 sprite with its top left pixel at the specified x, y coordinates:
xorSprite (uint16_t x0, uint16_t y0, uint64_t sprite, uint16_t color)
![]()
The colour should be a 16-bit number in the same format as other colours in the GFX library, with 5-6-5 bits specifying the red, green, and blue respectively. Bits that are '1' in the sprite will be plotted by exclusive-ORing the specified colour with the colour that's already there. Bits that are '0' will remain in the background colour.
On any background, plotting a sprite a second time with the same colour will undo the effect of the first plot, restoring the background. You could therefore use xorSprite() to move a sprite across the screen, but using moveSprite() described below is preferable because it will achieve the same effect without flicker.
The sprite should be an 8x8 bitmap which you can define in C like this:
const uint64_t Sprite = 0b\
00111100\
01000010\
10000001\
10100101\
10000001\
10011001\
01000010\
00111100;
For example, this is the definition of the Smiley shown above. The '\' at the end of each line lets you insert linebreaks so you can visualise the sprite.
You can create larger sprites by tiling two or more sprites.
Although xorSprite() only plots in a single colour, you can create multicolour sprites by overlaying different colour bitmaps at the same x, y coordinates. In fact you can create a three-colour sprite with two calls to xorSprite(), a bit like overprinting with two different coloured inks.
hitSprite()
Performs collision detection between an 8x8 sprite with its top left pixel at the specified x, y coordinates with anything on the display in the specified colour:
bool hitSprite (uint16_t x0, uint16_t y0, uint64_t sprite, uint16_t color)
It returns true if a hit has been detected, or false (zero) if not. Only bits that are '1' in the sprite are checked.
If you want to have invisible barriers draw them in a colour that's only one different from the background, so the difference is imperceptible on the display. For example, if your background is black, 0x0000, draw your barriers in the colour 0x0001.
moveSprite()
Moves an 8x8 sprite from the specified x, y coordinates by one pixel in any direction, specified by dx and dy:
moveSprite(uint16_t x0, uint16_t y0, uint64_t sprite, int dx, int dy, uint16_t color)
The moveSprite() routine avoids flicker by plotting only the pixels that have changed between the sprite's two positions. The plotting is done by exclusive-ORing the specified colour with the colour that's already there, ensuring that any background is unaffected.
Rolling ball maze game
The following example program is a version of the classic rolling ball maze, in which you roll a ball through a maze by tilting the PyBadge or PyGamer using the accelerometer provided on these boards. The PyBadge LC doesn't include an accelerometer, but you could use it by connecting an external LIS3DH I2C breakout board.
Initialising the colours and sprite
The program first defines the colours used in the game, and a sprite for the ball:
const uint16_t Maze = ST77XX_MAGENTA;
const uint16_t Ball = ST77XX_WHITE;
const uint16_t Board = ST77XX_BLACK;
const uint64_t Sprite = 0b\
00111100\
01111110\
11111111\
11111111\
11111111\
11111111\
01111110\
00111100;
Drawing the maze
The setup() routine then initialises the display, and draws the maze on the screen. It also initialises the accelerometer:
void setup() {
  tft.initR(INITR_BLACKTAB);
  tft.setRotation(1);
  pinMode(TFT_BACKLIGHT, OUTPUT);
  digitalWrite(TFT_BACKLIGHT, HIGH);
  tft.fillScreen(ST77XX_BLACK);
  // Draw ball maze
  for (int c=4; c>=0; c--) {
    tft.fillCircle(80, 64, (c*14+7), Maze);
    if (c) tft.fillCircle(80, 64, (c*14+5), Board);
  }
  // Gaps
  tft.fillCircle(80, 112, 6, Board);
  tft.fillCircle(32, 64, 6, Board);
  tft.fillCircle(56, 88, 6, Board);
  tft.fillCircle(94, 50, 6, Board);
  Wire.begin();
  lis3dhRate(2);
}
Rolling the ball
Finally, the main loop() function moves the ball according to the inputs from the accelerometer.
First the ball sprite is drawn in its starting position, x,y:
void loop() {
  int x = 77, y = 115, dx, dy, x1, y1;
  tft.xorSprite(x, y, Sprite, Ball);
Then, in a loop, the X and Y values of the accelerometer are read:
  for(;;) {
    // Move ball?
    int sx = lis3dhXYZ(0) / Sens;
    int sy = lis3dhXYZ(1) / Sens;
The variables dx and dy are each set to -1, 0, or 1 depending on whether the board is tilted in the corresponding direction:
    // Set dx and dy to -1, 0, or +1
    dx = (sx > 0) - (sx < 0);
    dy = (sy > 0) - (sy < 0);
If moving in the X or Y direction causes the ball to hit the maze, the corresponding movement is cancelled by setting it to zero:
    if (tft.hitSprite(x+dx, y, Sprite, Maze)) dx = 0;
    if (tft.hitSprite(x, y+dy, Sprite, Maze)) dy = 0;
Finally, the ball sprite is moved in the appropriate direction, and its x,y position is updated:
    tft.moveSprite(x, y, Sprite, dx, dy, Ball);
    x = x + dx; y = y + dy;
    delay(10);
That's all it takes to implement a simple game.
Here are the PyGamer/PyBadge sprite routines together with the demo: PyGamer/PyBadge Sprite Routines.
Further suggestions
You could draw the inner circle in a different colour, and use that to detect when the ball has reached the goal.
To keep things simple I've limited the size of the sprites to 8x8, but the routines could easily be extended to cope with larger sprites.
Update
13th August 2020: I've updated the routines to incorporate improvements I made while working on a version for the Seeed Studio Wio Terminal. The original routines took 3.15ms to move a sprite; these improved routines reduce that to 1.57ms, and are simpler.
- ^ Adafruit PyGamer board on Adafruit.
- ^ Adafruit PyGamer on Mouser.co.uk.
- ^ Adafruit PyBadge board on Adafruit.
- ^ Adafruit PyBadge LC Board on Adafruit.
- ^ Adafruit PyBadge LC on Pimoroni.
- ^ Adafruit GFX Graphics Library on Adafruit.
blog comments powered by Disqus