TinyNav Simple GPS Navigator [Updated]
21st November 2015
This article describes TinyNav, a simple pocket-sized GPS navigator based on a GPS module and an ATtiny85:
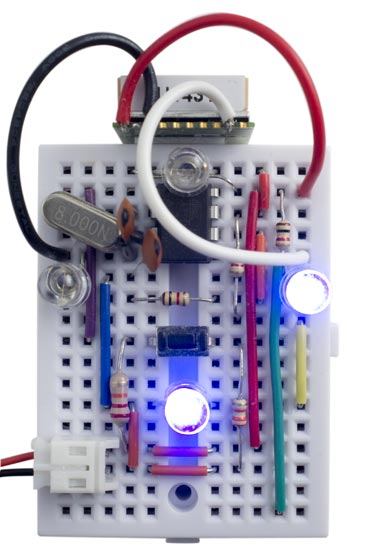
TinyNav simple GPS navigator based on an ATtiny85. Go right and back!
I think it's possibly the first GPS navigator using just an ATtiny85!
The interface consists of four blue LEDs and a push button. Pressing the button stores your current location. Then, as you move, the four LEDs show you the direction back to your stored location as one of eight possible directions; left, right, forward, back, or the directions in between. In addition, the lights flash to show you how far you are away from your destination; a longer gap between flashes means further away.
It was originally designed for playing a treasure-hunt game with my children. It could also be used to help you find your way home when exploring in the countryside, on foot or by bicycle, or to help you get back to your hotel when exploring in an unfamiliar city.
GPS routines
At first I tried using Mikal Hart's excellent TinyGPS library to parse the NMEA sentences from the GPS module [1], but the addition of the floating-point package needed for the routines TinyGPS::distance_between() and TinyGPS::course_to() took the size of my program over the 8192 maximum available on the ATtiny85.
However, the TinyGPS floating-point routines are overkill in this application where we're just showing one of eight compass directions over walking or cycling distances of a few kilometres at most, so I designed much simpler alternatives that use long arithmetic and are much less memory-intensive.
TinyNav is based on two routines to perform the latitude and longitude calculations, and these both use approximations to avoid the need for floating-point arithmetic or trig functions:
- DistanceBetween() calculates the distance between two points, specified by their latitude and longitude. It ignores the curvature of the earth, a valid approximation for small distances.
- CourseTo() calculates the course from one point to another, assuming the distance between them is small.
The routines are accurate for distances of up to several hundred kilometers. They work with the angular measures, latitude or longitude, in units of 1e-4 arc minutes. Thus one degree is represented as 600,000 units:
const long DEGREE = 600000;
This is designed to allow the arithmetic to be done using long integers, and is ideal for parsing the values returned by the GPS module.
Diff and CosFix
The following routines DistanceBetween() and CourseTo() use a function Diff() that calculates the difference between two angular measures:
long Diff (long deg1, long deg2) {
  long result = deg2 - deg1;
  if (result > 180 * DEGREE) return result - 360 * DEGREE;
  else if (result < -180 * DEGREE) return result + 360 * DEGREE;
  else return result;
}
They also use a fixed-point approximation to cos, CosFix():
unsigned int CosFix (long angle) {
  long u = labs(angle)>>16;
  u = (u * u * 6086)>>24;
  return 246 - u;
}
This returns a result scaled by 2^8.
DistanceBetween
This routine calculates the distance between two points, in metres, given their latitude and longitude:
unsigned int DistanceBetween (long lat1, long long1, long lat2, long long2) {
  long dx = (Diff(long2, long1) * CosFix((lat1 + lat2)/2)) / 256;
  long dy = Diff(lat2, lat1);
  unsigned long adx = labs(dx);
  unsigned long ady = labs(dy);
  unsigned long b = max(adx, ady);
  unsigned long a = min(adx, ady);
  if (b == 0) return 0;
  return 95 * (b + (110 * a / b * a + 128) / 256) / 512;
}
It returns the result in metres.
CourseTo
This routine calculates the course from one point to another, in degrees, given their latitude and longitude:
unsigned int CourseTo (long lat1, long long1, long lat2, long long2) {
  int c;
  long dx = (Diff(long2, long1) * CosFix((lat1 + lat2)/2)) / 256;
  long dy = Diff(lat2, lat1);
  long adx = labs(dx);
  long ady = labs(dy);
  if (adx == 0) c = 0;
  else if (adx < ady) c = (adx * (45 + (16 * (ady - adx))/ady))/ady;
  else c = 90 - (ady * (45 + (16 * (adx - ady))/adx))/adx;
  //
  if (dx <= 0 && dy < 0) return c;
  else if (dx < 0 && dy >= 0) return 180 - c;
  else if (dx >= 0 && dy >= 0) return 180 + c;
  else return 360 - c;
}
It returns the result in degrees, from 0 to 359.
Cardinal
Finally, we need a routine to give the cardinal direction from a direction in degrees:
int Cardinal (unsigned int dir) {
  return (((dir*2 + 45) / 90) & 7);
}
This returns 0=N, 1=NE, 2=E, 3=SE, 4=S, 5=SW, 6=W, or 7=NW.
Reading the GPS data
The ATtiny85 doesn't provide a USART, so I implemented a simple 9600 baud receive-only UART using the ATtiny85's USI, as described in an earlier article: Simple ATtiny USI UART.
The internal clock is only accurate to within 10%, which is not good enough for use with a UART, so I used an 8MHz crystal clock for the ATtiny85.
When a byte has been received by the USI a USI overflow interrupt is generated, and the interrupt service routine simply calls ParseGPS() to process the received character. This is described in my earlier article Minimal GPS Parser [Updated].
Displaying the direction
The correction, or direction between the course and destination, is calculated in the main loop using the following calculation:
  WayHome = CourseTo(Lat2, Long2, Lat1, Long1);
  if (WayHome >= Course2) Correction = WayHome-Course2;
    else Correction = WayHome+360-Course2;
The correction is displayed on four blue LEDs, which light up singly for the main directions left, right, forward, and back, or in pairs for the directions in between. Note that the TinyNav doesn't contain a compass, so it can only work out what direction you're pointing in when you're moving, using the course reading from the GPS module. The display when you're stationary is unreliable.
It uses the technique of driving two LEDs from a single output, as described in my earlier post Simple Compass Display. This relies on the fact that blue or white LEDs typically have a forward voltage of 3.4V, so connecting two in series with 220Ω resistors will result in no current flowing, with both LEDs off, if powered from 3.7V. Note that you must use blue or white LEDs; red LEDs will be dimly illuminated all the time. I used bright blue LEDs from Adafruit [2], available from The Pi Hut in the UK [3]. These are so bright that I increased the resistors to 1kΩ.
Here's the routine to display the compass bearing:
void DisplayLEDs (int i) {
    pinMode(LedsEW, INPUT);  pinMode(LedsNS, INPUT);
    if (i < 0) return;
    if (i%4 != 0) {digitalWrite(LedsEW,(i/4 == 1)); pinMode(LedsEW,OUTPUT);}
    if ((i+2)%4 != 0) {digitalWrite(LedsNS,((i+2)/4 == 1)); pinMode(LedsNS,OUTPUT);}
}
It takes the cardinal direction returned by Cardinal(), or -1 turns all the LEDs off.
Calculating the distance
The distance to the destination is calculated in the main loop using the following calculation:
Distance = min(DistanceBetween(Lat2, Long2, Lat1, Long1), 1000);
Storing your destination
Since there are no spare I/O pins, I used the reset pin as an analogue input to detect the pushbutton used to store your current destination. This is connected to the reset pin via a resistor divider to ensure that the voltage is never taken low enough to reset the chip, as described in the section Using the reset pin on the ATtiny85 in my post Getting Extra Pins on ATtiny.
When you press the Store button all four LEDs are illuminated as confirmation that the location has been stored. The location is stored in EEPROM, so it won't be lost if you switch off TinyNav.
The following routines are used to write and read the latitude and longitude:
void EEPROMWritelong(int address, long value) {
  EEPROM.write(address, value & 0xFF);
  EEPROM.write(address+1, value>>8 & 0xFF);
  EEPROM.write(address+2, value>>16 & 0xFF);
  EEPROM.write(address+3, value>>24 & 0xFF);
}

long EEPROMReadlong(long address) {
  return EEPROM.read(address) | (long)EEPROM.read(address+1)<<8 |
    (long)EEPROM.read(address+2)<<16 | (long)EEPROM.read(address+3)<<24;
}
Alternatively, for a treasure hunt, you could look up the destination on Google Maps, and then program the values into the program by setting the values of Lat1 and Long1 in setup(). For example, to make your destination the Statue of Liberty:
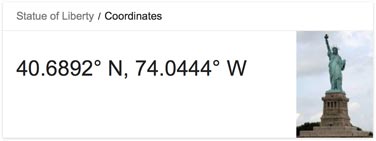
Calculating the values in minutes*1000, the latitude (N-S position) is:
40.6892 x 60 x 10000 = 24413520 (north is positive).
and the longitude (E-W position) is:
-74.0444 x 60 x 10000 = -44426640 (west is negative).
so you would enter:
  Lat1 = 24413520;
  Long1 = -44426640;
Note that I haven't actually been able to test these!
The circuit
For this application I used a cheap GPS module, the Gtop010 (also known as GTPA010 or PA6C) available from PV Electronics for under £20 in the UK [4]. Alternatively, the similar Gtop013 (or PA6H) is available from Adafruit [5], or you could use their breadboard-friendly Ultimate GPS Breakout [6].
Here's the circuit:
Circuit of the TinyNav GPS navigator.
The circuit is powered by a 3.7V LIPO battery, and the total current consumption is about 30-40mA. I tested the project by walking around the neighbourhood.
It all fitted onto a mini breadboard, with the GPS module secured to one end with a piece of double-sided sticky tape.
Compiling the program
I compiled the program using the Arduino-Tiny core extension to the Arduino IDE [7]. This doesn't include a setting for the ATtiny85 with an 8MHz crystal, so I added the following definition to the boards.txt file:
###########################################################################

attiny85at8x.name=ATtiny85 @ 8 MHz  (external crystal; BOD disabled)

attiny85at8x.upload.using=arduino:arduinoisp
attiny85at8x.upload.maximum_size=8192

# Ext. Crystal Osc. 8 MHz; Start-up time: 16K CK/14 CK + 65 ms; [CKSEL=1111 SUT=11]
# Brown-out detection disabled; [BODLEVEL=111]
# Preserve EEPROM memory through the Chip Erase cycle; [EESAVE=0]
# Serial program downloading (SPI) enabled; [SPIEN=0]

attiny85at8x.bootloader.low_fuses=0xFF
attiny85at8x.bootloader.high_fuses=0xD7
attiny85at8x.bootloader.extended_fuses=0xFF
attiny85at8x.bootloader.path=empty
attiny85at8x.bootloader.file=empty85at16.hex

attiny85at8x.build.mcu=attiny85
attiny85at8x.build.f_cpu=8000000L
attiny85at8x.build.core=tiny

###########################################################################
This adds an ATtiny85 @ 8MHz (external crystal; BOD disabled) option to the Board submenu. Select this, and choose Burn Bootloader to set the fuses appropriately using the Tiny AVR Programmer Board; see ATtiny-Based Beginner's Kit. Then upload the program to the ATtiny85.
Note: The GPS module is rated at a maximum supply voltage of 4.3V, so you should disconnect it from the circuit while programming the ATtiny85 using the Tiny AVR Programmer, which supplies 5V to the circuit.
You can get the full listing here: TinyNav GPS Navigator Program.
Other applications
By calibrating the internal 8MHz clock using OSCCAL you could dispense with the external crystal, and free up two I/O lines for other uses; I describe how to calibrate the oscillator here: Odometer/Speedometer Pendant [Updated]. For example, with the extra two I/O lines you could provide a higher-resolution display of the direction.
TinyNav uses 8 bytes to store a position, so you could potentially store 64 locations in the ATtiny85 EEPROM. For example, you could use it to record the locations of landmarks on a hike, or have a treasure hunt with multiple locations.
Update
6th February 2016: I have corrected errors in my routines that caused inaccuracy at higher latitude values. I am grateful to Edgar Bonet for pointing these out, and for providing fixed-point approximations for cos, atan, and sqrt. The new routines are more accurate, and work up to distances of several hundred kilometers. For a more detailed explanation of the routines see A Simple GPS Library.
Finally, I have corrected an error in the EEPROM routines that prevented the correct coordinates from being reloaded after disconnecting and reconnecting power.
All of these changes have been incorporated in the routines above, and in the full listing: TinyNav GPS Navigator Program.
- ^ TinyGPS on Arduiniana
- ^ Super Bright Blue 5mm LED on Adafruit.
- ^ Super Bright Blue 5mm LED on The Pi Hut.
- ^ Micro GPS Module on PV Electronics.
- ^ Ultimate GPS Module on Adafruit.
- ^ Ultimate GPS Breakout on Adafruit.
- ^ Arduino-Tiny core on Google Code.
blog comments powered by Disqus